Community Event / Creation The Buckyball Fllight Academy


Your textbook and Professor for today...

Greetings CDMRs! Bucky, in close cooperation with the Buckyball Racing Club, is putting together a volume of the collected wisdom of the pilots who consistently push the limits of their ships and themselves to just a tad faster every time they get in the cockpit. Why? Well to make a T9-load of credits of course, but also to help traders, Fuel Rats, smugglers, and pizza delivery specialists shave valuable time off of their arrival times. Who's kidding who? Time IS money, and Bucky hates cold pizza.

So this forum is being constructed as a repository for pilots to post bits of wisdom, via link or directly in this thread, so they may be easily consulted by pilots looking to up their game. If submitting a link or a post that is not yours, please include a citation and if possible the permission of the author/content creator in question.

Note that you don't have to have made a Buckyball Run or be a member of the Buckyball Racing Club to contribute, but if this kind of stuff pushes your throttle, then why the heck aren't you joining up? Visit http://www.buckyballracing.org.uk/ for more info.

Contributors will receive full credit for their submissions, as well as a coupon good for 15% off the purchase of "Bucky is My Co-Pilot," soon to be available via download from Pilot Federation Press.

Table of Contents
  1. Pre-Flight/Outfitting
  2. Getting There (Navigation)
    Professor Alot's Route Plotting in the Galactic Core
  3. Takeoff/Departure
  4. Arrival/Supercruise
  5. Docking
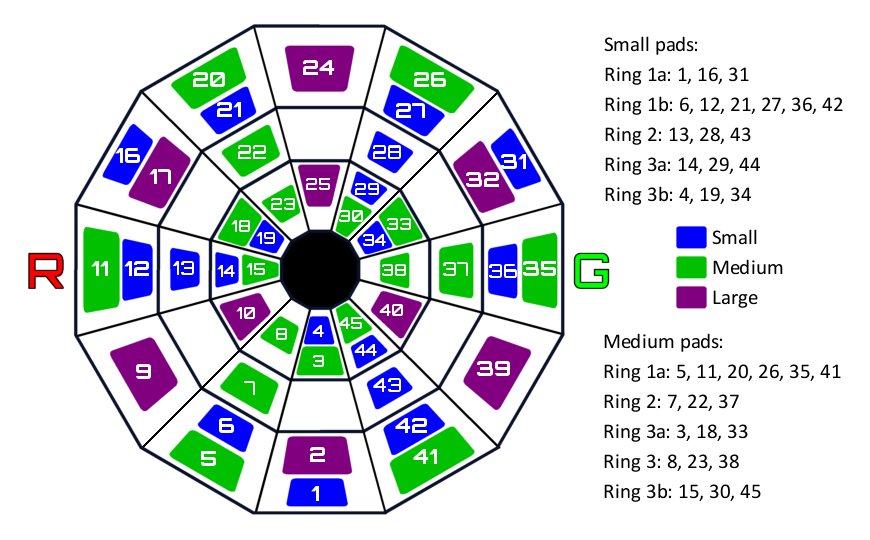
    Professor Drakhyr's Station Landing Pad Diagram (image)
    Professor Ian Baristan's Outpost Landing Guide
  6. Landing
    Professor Cookiehole's High Speed Planetary Landing (with video)
    Professor Baristan's guide to Planetary Base Landing Pads
 
Last edited:
I have got round to turning into a proper picture what I have had, for some months now, scribbled on a piece of paper in front of me - a diagram of the starport landing pads, including a quick reference guide to how far back the small and medium pads are.

starport landing pads.jpg
 
Last edited:
is this the correct place to ask what the dots, dashes & boxes etc mean on the Buckyball leaderboards?

Nope! But there is a key to the leaderboard right under the leaderboard on the first page of the race thread that explains all the mysteries of the leaderboard!
 
Last edited:
Courtesy of Cmdr Tannik Seldon who managed to do the 90km Jailbreak run in 25m 30s when everyone else was averaging around 45m.
I think this video says everything you need to know about how to buggy ... FAST!

[video=youtube_share;djg7TWS-b7c]https://youtu.be/djg7TWS-b7c[/video]
 
Walls of Text

Author: Cookiehole
Subject: Analysis of Races and general tips
Content: Text posts, some with video(s)


While I've wanted to do a ginormous wall of text that explains pretty much everything racing related for ages now, I've realized that this might not happen anytime soon :rolleyes:
So I've collected the links to pretty much all of the race analysis posts I've ever done and thrown them into a list. Everyone loves lists of links!
Some of these posts involve a lot of generally applicable stuff while others are more specific to particular races. I'll try to add new stuff over time and merge all of that into one post at some point.
Thanks to Alec for reminding me to post this here :)


Some notes and additions for 1.6/2.1:
  • Bookmarks are really helpful. I bookmark all of the stations in a race, so that I don't have to select them after arriving in the system. Also renaming them with a number at the beginning might help to have them on top of the list. I've named everything racing related "0 StationXY", other systems I go to frequently "1 HomeStation" and so on, so that the list is ordered. Also, there's enough time to do the navigation plot via the bookmark section of the GalMap while your pad is turning around when docked, so you won't mess up anything with the targeting in supercruise.
  • If you want to do a gravity braking loop the ETA should be more like 5s. 5s let's you overshoot the planet (which is desirable when doing the first approach to a planet <100ls from the main star). For the final approach towards the station I always try to be at an ETA of 0:05 at roughly 25Mm, 0:04 at 15Mm, 0:03 at 10Mm and then hit the 1Mm/s exactly at 1Mm. Note that there are different Supercruise techniques that are similarily fast. Basically everything that makes use of Gravity Braking is faster than the classical 0:06 approach, as long as you don't make any big mistakes.
  • Enhanced thrusters can be bought as a "normal" module at some Engineer bases (f. e. Farseer inc.) and have significantly more performance than normal thrusters. There are only 2A and 3A Enhanced performance thrusters available, so small ships only. Engineer mods can be applied to all sorts of thrusters (even to performance enhanced thrusters) and come in different grades and qualities (random). So the fastest ship would probably be an Imperial Eagle with Enhanced Performance Thrusters and Grade 5 drive tuning.
 
Last edited:
Excellent guide from Hanekura Shizuka on how to approach fuel scooping in the DBX on a Sag A* run.

Based on Alot's comments and wondering just how much time was saved by scooping after beginning to charge the FSD, I decided to make the following:

How To DBX
[video=youtube;g_ZWHj9Qbt8]https://www.youtube.com/watch?v=g_ZWHj9Qbt8[/video]

This gives a few example scoops toward the end to give an idea of how much time passes between charging the FSD and actually pulling out of the star.

UPDATE: Two things, really. The first is that I realized it might be good to add my evidence, in case someone else takes the reins from drakhyr:


https://www.flickr.com/photos/132207737@N08/albums/72157676400506876

The other... looking at the video, I would estimate the adjustment at somewhere around 3.5 to 4 seconds.
 
Excellent guide from Alec Turner :p on SRV driving ...

Note: this is mostly for "fliving" on low gravity worlds.

Has anyone got any basic tips for a noob or is it just lots of practise?

Lots of practice is definitely a thing when it comes to SRV driving.

One thing you can do which is a great little practice exercise ... get yourself stationary on some level ground on a nice low-g world (this one will probably do) then boost straight up (using almost all of your boost capacitor). At the top of your jump start rolling the SRV. As you start to descend, and once you've nearly spun all the way around, counter the roll in the opposite direction. The objective is to do a single barrel roll and to then land perfectly level again, feathering with a bit more boost at the last minute to gently touch all 6 wheels simultaneously back down on the ground. Then try the same thing with a forwards (or backwards) somersault using your pitch controls. Once you've mastered that you can try turning faster to squeeze in 2 spins before touching back down.

As to travelling at speed, a couple of tips to remember.

1) After flying the ship (especially with a HOTAS) use of yaw becomes 2nd nature. Alas the SRV has no yaw control. You must unlearn what you have learned! If you find yourself travelling somewhat sideways after a bad landing (or even backwards when you get really good) then in order to re-align your SRV with its direction of travel you have to: pitch down, roll a bit, pitch up & roll back to level. Try it now with your hand (point your flat hand forwards, tip it down, rotate it right, tip it back up and roll it level - see?). It's a REALLY tricky little manoeuvre to master but absolutely essential for fast SRV travel.

2) Travelling along the ground at speed the SRV has a very nasty tendency to suddenly go into a spin. To avoid this keep ground contact to a minimum. Once you get much above 30-40m/s your (brief) touchdowns (which should then bounce you back into the air - don't make them too gentle, you can bounce pretty hard) need to be precise. You need to be level (with the ground you're about to hit) and facing the direction of travel. Don't be tempted to land on the back wheels, you could be excused for thinking it might work but it won't end well.

3) Look ahead and choose your landing spots. Use boost (or lack thereof) to control your descent and hit them. On rough terrain pick a nice mound (don't know if you've ever skied moguls but you're aiming to bounce across the smooth tops of these, possibly just slightly before each peak).

If you watch videos from people like Tannik they make it look almost too easy. Here's me (from "Kick The Alien") ...

[video=youtube_share;1vCjoJPsJnQ]https://youtu.be/1vCjoJPsJnQ[/video]

You can see that when I land without being perfectly straight and level it goes badly wrong. For example, at 55s my front right wheel touches first and I then have to wrestle the controls like a madman to correct my orientation (with lots of amateurish over-correction!) and at 1:21 I land back wheels first (WRONG!). But at 50s I basically hit just about right and it goes tolerably well.

As for changing your direction of travel ... you can make VERY gentle corrections using steering control when travelling along the ground but otherwise you need to tilt onto your side while moving through the air and use boost to push yourself back into the right direction.

It's all very challenging (possibly THE most challenging thing in the whole damn game) but also enormous fun (possibly THE most fun thing in the whole damn game).

o7

One other thing perhaps worth mentioning: remember that no matter your orientation, your boost *always* makes you go up (in addition to other directions, depending on how you're pointed). So if you hit a rock badly and find yourself skimming along upside down, boost! You'll still gain altitude and some time to correct your orientation before you land. It's worth trying to keep some ENG capacitor in reserve in case this happens.


Further notes:

The speed shown on the HUD is your speed relative to your orientation. You need to be level to the ground to see your true forward speed.
 
Last edited:
I put together a tutorial video for new commanders preparing to have a go at the Lavecon Buckyball 2017.

Thought I might as well leave it here too since it covers some pretty generic Buckyball basics.

[video=youtube_share;6PLCYL4qCqU]https://youtu.be/6PLCYL4qCqU[/video]
 
Last edited:
Thank you for this tutorial Alec Turner .

OK :D

That's not the SRV one I was pointing out to you (which is in the post just before it) but glad you liked it anyway. The Lavecon Buckyball Race is actually over now but the stuff in that race tutorial video is pretty general and will serve you well in other ship races anyway. If you're interested in racing then keep an eye on http://buckyballracing.org.uk which is where we tend to announce our new races.

The next one, called "Double Action Jackson", is a ship race which starts on 1st July.

More information can be found over here ..

https://forums.frontier.co.uk/showt...Double-Action-Jackson-(01-07-3303-09-07-3303)

Fly Fast!
 
Last edited:
Brilliant post from Cmdr furrycat on the art theory of Neutron scooping ...

It is customary for the winner to offer tips so there follows a brief guide to double charging. I actually thought while doing the race that I could carry more speed into the cone and save time. The margin for error is fairly low and I ended up being conservative as it's much better to waste a few seconds trundling into the cone than lose several minutes if you go too fast and jump without getting the second boost. Last night I spent some time double charging to the closest system - so I could quickly jump back and try again - and was able to fly a bit faster through the cone than I did in the race.

[rest of post unquoted below]

[SIZE=+1]The theory of neutron charging[/SIZE]
It take around three seconds to get the charge. On a few occasions it seemed faster than that yet when I went back and checked the video it really wasn't. Maybe two seconds. If there is any variation in charge time due to distance to the neutron star or speed through the cone I couldn't discern it.

To achieve a double charge you need to engage the FSD jump then start a new charge after the five-second countdown starts and finish charging before the countdown finishes, without leaving the jet cone. The second charge can only start after the jump is locked in so needless to say, executing the technique requires practice.

As soon as you enter the cone your ship gets buffeted around and you lose most control. Specifically your minimum speed is locked to what it was when you entered. You can throttle up to increase speed but even zeroing the throttle won't slow you down.

During the actual jump as soon as you throttle up to engage the FSD you are locked to the destination and don't have to worry about losing control. You do however need quick reactions to work the throttle as soon as your FSD starts getting disrupted. The longer you wait the less time you have inside the cone, and throttling up will of course give you more speed. The absolute worst thing that can happen is you drift out of the other side without charging and with no way to cancel the jump.

With the above points in mind the goal is to find a flat trajectory through the cone which keeps your ship in it long enough to get the charge without being so fast that you come out the other side unboosted.

After getting the initial boost and charging the FSD the next step is to line up the jump so you pass through the cone when entering hyperspace. Unfortunately there's no way around needing good spatial awareness for that. You need to be able to read your instruments at-a-glance and figure out a flight path that puts the cone between you and the destination. Head tracking helps a lot!

One technique I tried and rejected was aligning the jump so that the destination was not in the centre of the screen. The thinking was that because you can be "aligned" with a fairly generous offset from the centre, I could lock in the jump and force an angled passage through the cone. In practice what happened was I'd get thrown off course and by the time I'd reacted to the disruption and engaged the throttle I was no longer aligned. So lining up a direct path through the cone to the destination was the best idea.

[SIZE=+1]The practice[/SIZE]
My technique was to dive towards the star at jump-in and then pull up to give me a shallow angle through the cone. I found that a speed not exceeding 0.1c was usually safe to get the boost before passing through. On the initial charge up, however, the loss of control could easily throw you out too early so 20Mm/s is a safer target. During the race I was mostly between 10Mm/s and 24Mm/s.

As soon as I was charged I wanted to get out so the ship would stabilise. When facing away from the cone I tried to speed up, get away then set the throttle to zero as soon as I was out, then open the map. If I ended up facing along the cone I knew I would take a few seconds to escape and opted instead to open the map and plot the jump then fight the loss of control while charging the FSD. In any case I didn't want to get too far from the star because once I was lined up I wanted to cut the time approaching the cone, remembering that carrying too much speed would see me shoot out the other side without getting the double charge.

Now the tricky part, lining up the jump. This is where playing flight sims back in the day paid off. If you don't find it intuitive to position yourself so the cone is between you and the destination remember that the jump is effectively an infinite distance away and not moving. You just need to concentrate on putting yourself on the other side of the cone. If the destination is behind you and the star ahead that means flying past it and turning round. If the destination is ahead and the star behind that means flying a wide loop.

Once they are both vaguely ahead it's a case of approaching on the right side so that the destination HUD element crosses the cone. If it's above you'd fly below the star and look up, watching for when they intersect and then turning towards them.

Then you have the same issue as with the initial jump - approaching quickly but not so quickly you pass through - and with the added complication that if you throttle up too much you will engage the jump. I was a bit slower during the race than in subsequent practice. 0.1c is reasonably safe as long as you're quick on the throttle when the disruption starts, locking the trajectory through the cone and jump ... and prompting a few seconds of breath-holding as you wait for that beautiful frame shift drive supercharged message.

[SIZE=+1]TL;DR[/SIZE]
Flat trajectory into the cone at around 20Mm/s.

Zero throttle as soon as the supercharge starts.

Get out of the cone as quickly as possible after charging, then slow down and start the FSD sequence.

Tight loop to position the cone directly between you and the destination.

Fly directly towards the target at about 0.1c.

Punch it as soon as the disruption starts.
 
Last edited:
And another brilliant post, also from Cmdr furrycat, comparing 4 different station approach supercruise techniques.

I made a comparison video of the different approaches. Jumping from the same system to the same system and cruising to the same station.

[rest of post unquoted below]
At the top left: throttle in the blue zone the whole time.

At the top right: throttle at maximum until 6s then adjusting as appropriate to maintain that ETA. The six second rule.

At the bottom left: throttle at maximum, fly by and loop around. The loop of shame or fame, depending on whether you do it or not.

At the bottom right: throttle at maximum until 5s then loop and pass close to gravity source to slow down dramatically. The gravity braking or racing technique.

Results in the spoiler for those who can't or won't sit through the video.

[video=youtube_share;gy4zca1yjKw]https://youtu.be/gy4zca1yjKw[/video]

The blue zone approach covered the 238Ls in 2m9s.
The six second rule did it in 1m53s.
The loop of speed took 1m43s.
The gravity braking technique was fastest in 1m26s.
 
Top Bottom