You are using an out of date browser. It may not display this or other websites correctly.
You should upgrade or use an alternative browser.
You should upgrade or use an alternative browser.
Community Event / Creation The C-Pod: A DIY Command seat (build log)
- Thread starter ThereIs0nly0ne
- Start date
Have no fear, I've just been a little distracted finishing of a few bits and pieces for my other projects.
A slight detour but here's some evidence if you're remotely interested")
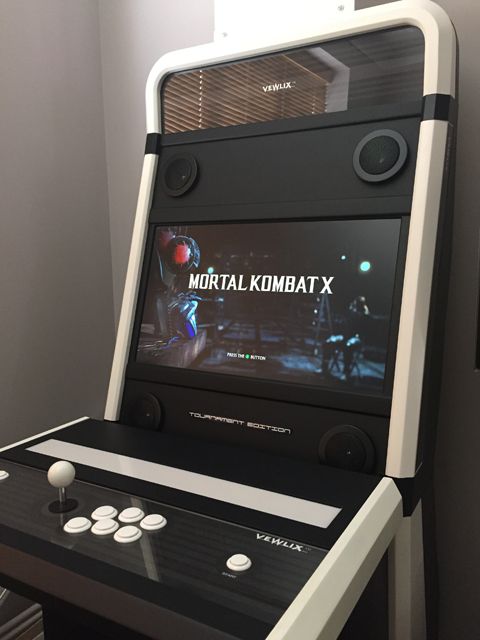
Currently updating the arcade cabinet to give it a Mortal Kombat X theme:
Artwork topper to replace the old and boring one:

Boring:

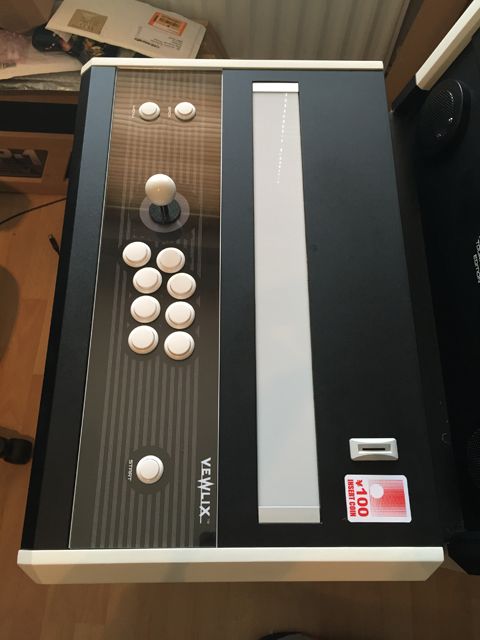
Also about to include an insert coin sticker and an update panel to include 8 buttons rather than 6. Artwork printed on glossy paper rather than matte - like the CP-1 - so it doesn't look washed out:
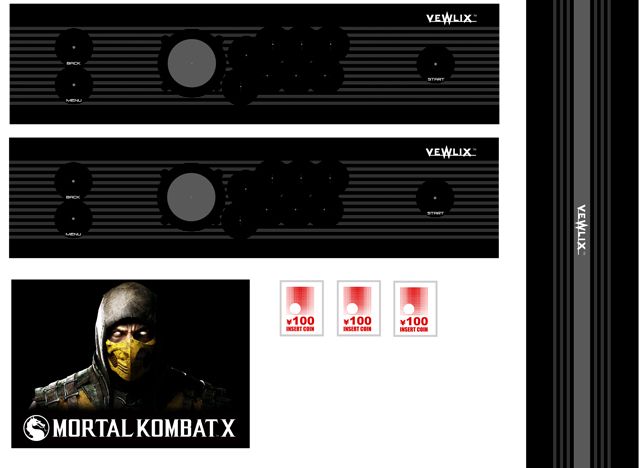
Fun and very gory game:
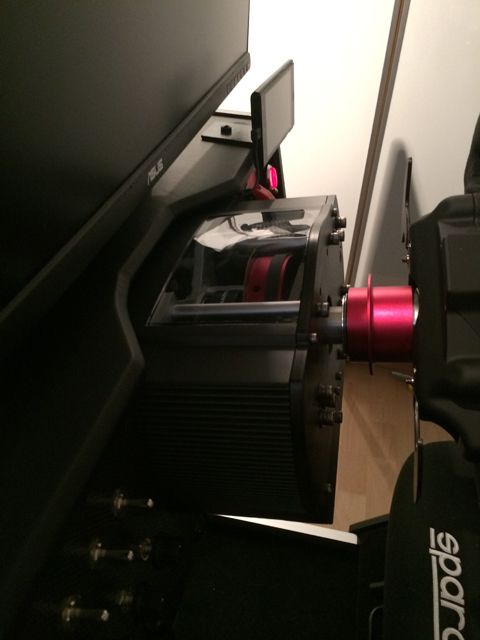
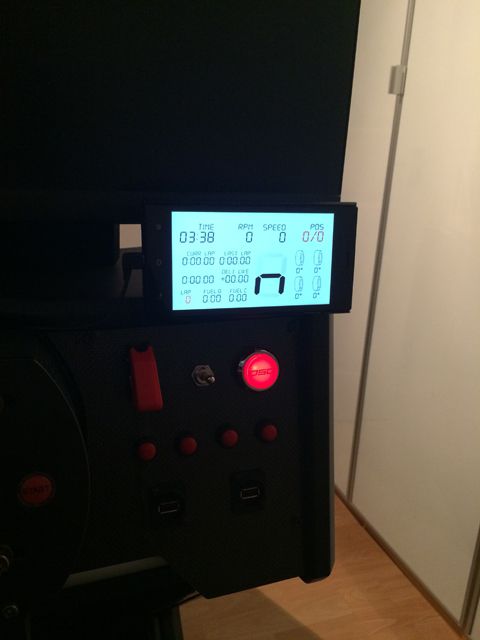
I also spent some time making a display panel for the R-Pod rig:

This is running some software to provide various information whilst on-track:
And just for some giggles, here's a picture of me sitting in the rig. Picture courtesy of my daughter:
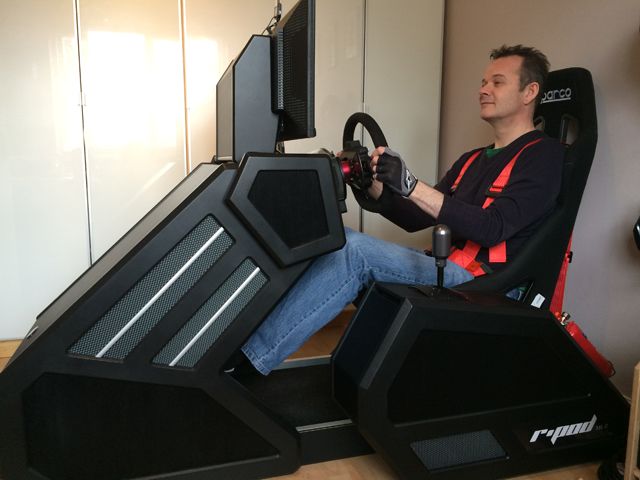
Seat belts fitted now. Great eh? Not remotely sad at all ...
So, maybe not what you've been hoping for but it should show that I'm not slacking!
A slight detour but here's some evidence if you're remotely interested
Currently updating the arcade cabinet to give it a Mortal Kombat X theme:
Artwork topper to replace the old and boring one:

Boring:

Also about to include an insert coin sticker and an update panel to include 8 buttons rather than 6. Artwork printed on glossy paper rather than matte - like the CP-1 - so it doesn't look washed out:

Fun and very gory game:

I also spent some time making a display panel for the R-Pod rig:


This is running some software to provide various information whilst on-track:

And just for some giggles, here's a picture of me sitting in the rig. Picture courtesy of my daughter:

Seat belts fitted now. Great eh? Not remotely sad at all ...
So, maybe not what you've been hoping for but it should show that I'm not slacking!
Last edited:
I'm sure there must still be a market for such .. O-SOME .. cabs as these.
I know people go nuts for vintage games with CRT monitor, down in the bottom and a mirror display ..
How about same as Quad core, crossfire supported, internet connected, LED/ VR display .. Donkey Kong!
Great work as ever TIOO .. looking forward to see this pilot, fleeing pirates, in the C-Pod of course,
Looking far too relaxed here! .. and am looking forward to that harem-scarem look in your eyes!
Excellent, amazing attention to detail as always. Well done TIOO!
When you do the inlay routing, what type of router bit do you use? Do you have any photos of your process when inlay routing?
I generally do the inlay as the last cut of the piece. I use a rebate bit:

It has a guide at the bottom so it just follows the edge as you move the router to make a nice clean recess. I don't have any photos of me doing any of the work unfortunately.
The only thing to be aware of is to raise the piece slightly so that the guide stays clear of the workbench surface.
Thanks for the welcome back guys - no updates yet but starting on this is again is getting closer.
Stuff which may or may not interest you ...
Been busy updating the arcade cabinet panel with an 8 button layout, new artwork, aluminium edging, lightbar retaining strips and a coin slot. Also had a custom badge made for it. Pictures for anyone interested:

Also put together a customized Frontend for the cabinet. Lots of Photoshoping:
Opening screen:

Game selection screen:


It has a guide at the bottom so it just follows the edge as you move the router to make a nice clean recess. I don't have any photos of me doing any of the work unfortunately.
The only thing to be aware of is to raise the piece slightly so that the guide stays clear of the workbench surface.
Thanks for the welcome back guys
- no updates yet but starting on this is again is getting closer.Stuff which may or may not interest you ...
Been busy updating the arcade cabinet panel with an 8 button layout, new artwork, aluminium edging, lightbar retaining strips and a coin slot. Also had a custom badge made for it. Pictures for anyone interested:


Also put together a customized Frontend for the cabinet. Lots of Photoshoping:
Opening screen:

Game selection screen:

Last edited:
Mu77ley
Volunteer Moderator
Stuff which may or may not interest you ...
Been busy updating the arcade cabinet panel with an 8 button layout, new artwork, aluminium edging, lightbar retaining strips and a coin slot. Also had a custom badge made for it. Pictures for anyone interested:
<snip>
Gotta love MAME (and other emulator) cabs. What frontend are you using?
I went the repair/clean-up and mod an original cab route: https://www.flickr.com/photos/mu77ley/sets/72157623624788773

All non-destructive so I can easily put it back to the original game.
Needs an update really. It's still running Windows XP with the MAMEWAH frontend.
Last edited:
Maximus Arcade is the Front End. I had a go with Hyperspin but couldn't get the look and feel I was after unfortunately.
Nothing wrong with XP! Good to see a spinner and a trackball on the panel. Centipede and Arkanoid are a couple of my firm favorites.
Nice cab and glad to hear it can be restored if needs be - you know the saying - don't maim for MAME!
Nothing wrong with XP! Good to see a spinner and a trackball on the panel. Centipede and Arkanoid are a couple of my firm favorites.
Nice cab and glad to hear it can be restored if needs be - you know the saying - don't maim for MAME!
Look's great!
Now get back to work on the ED project or we'll disable your ship and leave you in the void. Just kidding.
I would love to see what you could do with proper tools and a workshop. A table saw, band saw, sanders, drill press, router table and a miter saw (and much more) would make your life so much easier and enjoyable. I'm sure you're more than aware of this, most likely more than I am. I worked at the University of Notre Dame in their "carpenter shop", when I was a very young man, the things the "old timers" could produce was just amazing. The young carpenter's just got to install the new creations for them and the more physically demanding tasks but, the bonus was; we got to watch them during the creation process. If we let someone like you lose in a place like that the results would likely be mind blowing.
I look forward to your posts.
Cheers Sanderson. I'd very much doubt that I could get anywhere close to those master craftsmen but when I retire, one of the first things I will do is set up a workshop and a lathe is top of the list. Turning wood just fascinates me for some reason!
Bog oak!
Bog oak!
That looks wood beautiful!
Thanks for the info about the router bit! Awesome build, really looking forward to seeing the finished chair, keep up the stellar work, pun intended ;-)
No problem
Almost done with this build. Just the back to re-do:

Amazing work as always, and glad to have you back!
I was about to say you're crazy, what with having built all those cabinets - but they all look so well done, with obvious skill. It's a talent and one well applied to this hobby. Besides, I can't call you crazy, seeing as I've put in an order for a full set of Stormtrooper armour, and will be building that and wearing it by the end of the year
I was about to say you're crazy, what with having built all those cabinets - but they all look so well done, with obvious skill. It's a talent and one well applied to this hobby. Besides, I can't call you crazy, seeing as I've put in an order for a full set of Stormtrooper armour, and will be building that and wearing it by the end of the year
Now that's something I must see! You have to post pictures once you've donned the costume.
I have been routing for years and I just can't wrap my head around this. I have a very nice router (1/4" to 3/4" bit capacity 2 1/2hp, etc.) and I either can't get my bit to reach the wood using the guide as you have illustrated without an extension or, if you turn the project over, I'm not understanding how you see the guides (even with bearings on your bits) by looking at your example. Can you please explain? I'm either having a true lapse into the realm of dreadful stupidity or you are doing something I have never seen before. I have even scoured the internet and explained your pictures to a few of my woodworking buddies and just can't figure this out!!
Attach the guides:

Hi Psychokill, I'll try and explain.
Once the wood strip guides are in place, as in the picture, I turn the piece over and clamp it to a workbench. I then use a flush trim router bit with a guide on the bottom to finish. Basically, it's one of these:

For smaller pieces like this, I sometimes make a support platform of the same height (a piece of MDF with a couple wood strips of the same size nailed in) to help stabilize the router and prevent it from wobbling and move the platform around as I trim the inside of the window.
Hope that helps but let me know if you need further clarification.
Edit:

Last edited:
Okay, thanks for that. It's as I suspected, you are using the bearing without actually seeing the guides. Myself, and I have to be honest here, I couldn't do that as I have been using a laser guide for a few years now (though, I guess it wouldn't be any different than if I was using a table with a fence). Hats off to you!! I guess I should try and not rely on all my more modern toys and try to get back to basics. I have been contemplating making my own gaming chair and have been watching this thread very closely for a few months now. I applaud your work and, if I do make a chair of my own, I will be sure to post what I have and what I'm doing. I might just try your method as I see this as a fun project and don't really find the need to try and be super professional with my leisure work. Thanks again and hoping to compare "notes" with ya in the future .
.