Hey Folks,
I ordered my Obutto R3volution about a month ago and received it two weeks ago. Since that time I have been building, configuring, and testing it and thought I would offer some thoughts for others who are interested in this type of setup.
Disclaimer -- I am in no way affiliated with Obutto or Main Performance PC (their US distributor). Opinions and observations offered herein are solely my own.
What I bought: I ordered the Obutto R3V, acrylic tabletops, and the stick and throttle mounts.
Who I ordered it from: In the US, the distributor is Main Performance PC at mainperformancepc.com.
Customer Service: Please note that the customer service guy at Main Performance and the guy from Obutto are both named Chris. One thing I can say about both Obutto and Main Performance is that their customer service is pretty damn good. Every question I had was answered within hours. The one issue I had was when I asked Main Performance Chris about the ability to mount both a stick throttle setup and the keyboard/mouse tray, he said that one would interfere with the other. Obutto Chris said that all you had to do was move the traditional left sided keyboard/mouse tray mount the the other side and it would be out of the way of the throttle.
On to the cockpit!
Packaging: On the day it arrived, I got 4 boxes. Two for the cockpit itself and one each for the tabletops and the stick/throttle mount. The packaging was great. Thick cardboard with everything bubblewrapped to hell and back.
Assembly: Assembly of the cockpit was pretty easy. It took me a total of about 6 hours. Probably this time could be shortened down quite a bit, but I was going quite slow so as not to goof anything up the first time. The assembly 'manual' that comes with the cockpit is absolute crap. Don't even bother with it unless you want to use it as a drink coaster. It strikes me funny that such a well built item has such a crappy manual. Regardless, there are pretty good videos on the Obutto website on the assembly process. Just watch those and you will have little or no problems. The only hitch with the video is that occasionally they will reference a bolt and show a picture of that bolt that is different than the one that you get. Its not a big thing and easily sorted out, but it is something they should edit in the future. You also may have to take some liberties with the use of washers in certain places if you want to move the mounting brackets around. In a few spots, the bolts are just not long enough to put the washers they suggest on and still get the nut to thread. Again, not a big thing, but it could be better spelled out in the videos.
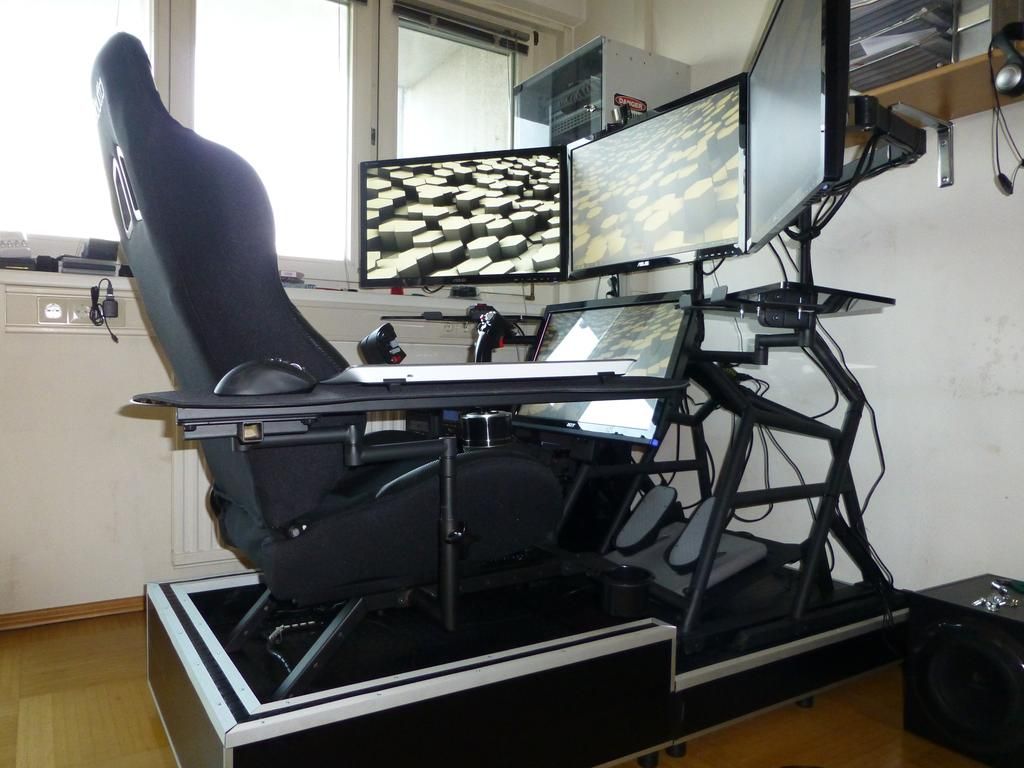
Post assembly, first thoughts: Man, this thing is a beast. Sturdy is not the word for it. After the nuclear bombs fall, all that will survive are cockroaches and this desk. It's seriously built like a tank with heavy duty steel, welds and bolts. The single piece of this thing that doesn't feel rock solid is the keyboard/mouse tray. Because it is mounted at one end, the far end can get kinda springy, sort of the diving board principle. However, the spring is not very noticeable unless you are the type of person who really hammers your keyboard. In fact, I am writing this entire post on that keyboard/mouse tray and not having any problem with it. One of the things that separates this cockpit from the Volair Sim cockpit (which I also looked at), is that the monitor stand on the Obutto is a completely separate unit from the main body of the cockpit. It stands astride the main cockpit and allows you to position the monitor on a fully articulated arm. The reason this becomes important is that if you are really hogging around on a control input (say a steering wheel), the monitor will not shake or move at all. The keyboard/mouse tray is also quite large allowing easy placement of everything without feeling crowded.
Mounting your hardware: The monitor mounts are all VESA standard and depending on what you bought the cockpit can hold anywhere from two to six screens. The basic package can hold two monitors in an above an below configuration if you were to use the main mount plate (where race simmers put the steering wheel) to mount a monitor. If you buy the acrylic tabletops, the table top mounts are also VESA standard and can hold two more monitors potentially giving a 1 over 3 config, finally, you can purchase the additional monitor mounts that attach to the monitor stand for a total of six monitors in a 3 over 3 config if you choose to do so. My setup has a single monitor with the acrylic table tops and I use the steering wheel mount to put small stuff on (like my cell phone).
Just under the seat are two sets of holes for mounting your keyboard/mouse, throttle, or shifter mounts. There are multiple positions here so you can choose what you want and each mount uses two bolts so they are stable as hell. The flightstick mounts either side stick or centerline and they do make a mount specifically for warthog HOTAS setups.
My setup has the throttle on the left forward position, centerline stick, and right hand mounted keyboard/mouse tray.
The pedal tray also has multiple positions from flat to angled up which you can pick based on your comfort.
Mounting your stick and throttle can be as easy or hard as you want it to be. I simply used industrial velcro to mount my X55 stick and throttle and it holds just fine and is very stable. If you wanted, I suppose you could drill holes in the mount plates and mount certain sticks, though the plates themselves are not that big. The bases of the X55 stuff are quite a bit bigger than the plate itself, but again, I haven't seen any instability.
The keyboard/mouse tray, pedal tray, and steering wheel mount plate are all covered with either textured (pedal tray and steering wheel plate) or untextured (keyboard/mouse tray) neoprene. This makes the k/m tray basically one giant mouse pad. The textured pad on the pedal tray gives great grip for my CH rudder pedals. I haven't had to secure them at all.
All of these hardware mounts can be adjusted to meet your particular height/reach requirements.
Cable Management: Because this is not a conventional desktop, cables can kind of get everywhere. My solution was to get a bunch of USB extension cables and velcro them to the frame. This allows me to plug in devices just below their mounts and not have to worry about cable's getting under foot.
Flight to FPS: One of my concerns with this kind of cockpit was being able to smoothly transition from HOTAS setup to k/m when needed. Although not as smooth as I would like, this is not a terribly inconvenient issue. I do have to take off the stick in order to swing the k/m tray over into position. The throttle does not impede the k/m tray in any way. I have also found that I can still easily use the mouse without having the tray in position, you just reach over to the right and use as normal.
Overall feel: So, how does it feel? To me, this is a very comfortable setup. Everything is adjustable to your specific feel and for different applications. I can easily adjust the height of my stick and throttle, position of my rudder pedals, and seat position (both forward/back and degree of reclining), as well as the position and inclination of the monitor. My one and only gripe with the feel of the thing is the seat. It's a bit narrow in the butt. I wear a size 34 waist and it squeezes me a little. This may change over time as the seat breaks in, but right now its a bit tight.
My overall take on this thing is that it's incredibly well built and functional cockpit. For those that are serious about their simming and have the money to drop, I would highly recommend it.
Hope this helps anyone who is thinking about it.
Oh, and I forgot to mention the ultimate selling point, the included cup holder.
I ordered my Obutto R3volution about a month ago and received it two weeks ago. Since that time I have been building, configuring, and testing it and thought I would offer some thoughts for others who are interested in this type of setup.
Disclaimer -- I am in no way affiliated with Obutto or Main Performance PC (their US distributor). Opinions and observations offered herein are solely my own.
What I bought: I ordered the Obutto R3V, acrylic tabletops, and the stick and throttle mounts.
Who I ordered it from: In the US, the distributor is Main Performance PC at mainperformancepc.com.
Customer Service: Please note that the customer service guy at Main Performance and the guy from Obutto are both named Chris. One thing I can say about both Obutto and Main Performance is that their customer service is pretty damn good. Every question I had was answered within hours. The one issue I had was when I asked Main Performance Chris about the ability to mount both a stick throttle setup and the keyboard/mouse tray, he said that one would interfere with the other. Obutto Chris said that all you had to do was move the traditional left sided keyboard/mouse tray mount the the other side and it would be out of the way of the throttle.
On to the cockpit!
Packaging: On the day it arrived, I got 4 boxes. Two for the cockpit itself and one each for the tabletops and the stick/throttle mount. The packaging was great. Thick cardboard with everything bubblewrapped to hell and back.
Assembly: Assembly of the cockpit was pretty easy. It took me a total of about 6 hours. Probably this time could be shortened down quite a bit, but I was going quite slow so as not to goof anything up the first time. The assembly 'manual' that comes with the cockpit is absolute crap. Don't even bother with it unless you want to use it as a drink coaster. It strikes me funny that such a well built item has such a crappy manual. Regardless, there are pretty good videos on the Obutto website on the assembly process. Just watch those and you will have little or no problems. The only hitch with the video is that occasionally they will reference a bolt and show a picture of that bolt that is different than the one that you get. Its not a big thing and easily sorted out, but it is something they should edit in the future. You also may have to take some liberties with the use of washers in certain places if you want to move the mounting brackets around. In a few spots, the bolts are just not long enough to put the washers they suggest on and still get the nut to thread. Again, not a big thing, but it could be better spelled out in the videos.
Post assembly, first thoughts: Man, this thing is a beast. Sturdy is not the word for it. After the nuclear bombs fall, all that will survive are cockroaches and this desk. It's seriously built like a tank with heavy duty steel, welds and bolts. The single piece of this thing that doesn't feel rock solid is the keyboard/mouse tray. Because it is mounted at one end, the far end can get kinda springy, sort of the diving board principle. However, the spring is not very noticeable unless you are the type of person who really hammers your keyboard. In fact, I am writing this entire post on that keyboard/mouse tray and not having any problem with it. One of the things that separates this cockpit from the Volair Sim cockpit (which I also looked at), is that the monitor stand on the Obutto is a completely separate unit from the main body of the cockpit. It stands astride the main cockpit and allows you to position the monitor on a fully articulated arm. The reason this becomes important is that if you are really hogging around on a control input (say a steering wheel), the monitor will not shake or move at all. The keyboard/mouse tray is also quite large allowing easy placement of everything without feeling crowded.
Mounting your hardware: The monitor mounts are all VESA standard and depending on what you bought the cockpit can hold anywhere from two to six screens. The basic package can hold two monitors in an above an below configuration if you were to use the main mount plate (where race simmers put the steering wheel) to mount a monitor. If you buy the acrylic tabletops, the table top mounts are also VESA standard and can hold two more monitors potentially giving a 1 over 3 config, finally, you can purchase the additional monitor mounts that attach to the monitor stand for a total of six monitors in a 3 over 3 config if you choose to do so. My setup has a single monitor with the acrylic table tops and I use the steering wheel mount to put small stuff on (like my cell phone).
Just under the seat are two sets of holes for mounting your keyboard/mouse, throttle, or shifter mounts. There are multiple positions here so you can choose what you want and each mount uses two bolts so they are stable as hell. The flightstick mounts either side stick or centerline and they do make a mount specifically for warthog HOTAS setups.
My setup has the throttle on the left forward position, centerline stick, and right hand mounted keyboard/mouse tray.
The pedal tray also has multiple positions from flat to angled up which you can pick based on your comfort.
Mounting your stick and throttle can be as easy or hard as you want it to be. I simply used industrial velcro to mount my X55 stick and throttle and it holds just fine and is very stable. If you wanted, I suppose you could drill holes in the mount plates and mount certain sticks, though the plates themselves are not that big. The bases of the X55 stuff are quite a bit bigger than the plate itself, but again, I haven't seen any instability.
The keyboard/mouse tray, pedal tray, and steering wheel mount plate are all covered with either textured (pedal tray and steering wheel plate) or untextured (keyboard/mouse tray) neoprene. This makes the k/m tray basically one giant mouse pad. The textured pad on the pedal tray gives great grip for my CH rudder pedals. I haven't had to secure them at all.
All of these hardware mounts can be adjusted to meet your particular height/reach requirements.
Cable Management: Because this is not a conventional desktop, cables can kind of get everywhere. My solution was to get a bunch of USB extension cables and velcro them to the frame. This allows me to plug in devices just below their mounts and not have to worry about cable's getting under foot.
Flight to FPS: One of my concerns with this kind of cockpit was being able to smoothly transition from HOTAS setup to k/m when needed. Although not as smooth as I would like, this is not a terribly inconvenient issue. I do have to take off the stick in order to swing the k/m tray over into position. The throttle does not impede the k/m tray in any way. I have also found that I can still easily use the mouse without having the tray in position, you just reach over to the right and use as normal.
Overall feel: So, how does it feel? To me, this is a very comfortable setup. Everything is adjustable to your specific feel and for different applications. I can easily adjust the height of my stick and throttle, position of my rudder pedals, and seat position (both forward/back and degree of reclining), as well as the position and inclination of the monitor. My one and only gripe with the feel of the thing is the seat. It's a bit narrow in the butt. I wear a size 34 waist and it squeezes me a little. This may change over time as the seat breaks in, but right now its a bit tight.
My overall take on this thing is that it's incredibly well built and functional cockpit. For those that are serious about their simming and have the money to drop, I would highly recommend it.
Hope this helps anyone who is thinking about it.
Oh, and I forgot to mention the ultimate selling point, the included cup holder.
") if i had the cash and room id love one
if i had the cash and room id love one