***
This is a beginner's guide getting Thrustmaster's TARGET joystick calibration and enhancement software to work, also under Win8 and Win8.1. This guide can also serve as a starter guide for using TARGET in general, no matter what Windows you have. TARGET works with the Thrustmaster 16000m, Hotas Cougar, Hotas Warthog, Warthog Throttle, MFD Cougar 1 & MFD Cougar 2.
I wrote this since I had a hell of a time to do this with Windows8.1. There were issues that needed to be fixed to get it to run 100%. Sorry, this guide got really long but in essence what you do is really easy. You would only have to find a good setting once anyway and from there it is simple.
***
What is TARGET and Why Do You Want It?
The TARGET software can greatly enhance and improve your joystick 'experience' because you can use it to set deadzones, custom sensitivity curves and much more. In fact, it is an entire scripting language/interpreter which lets you configure your joystick in infinite ways.
Here in this post I only want to focus on the BASICS. In this case I use TARGET to set small deadzones (one in the middle and two outer) on my Thrustmaster 16000m. (You want a small deadzone to get rid of "middle-position" creep!) and the outer I set so I don't have to move the stick as far as is default.
* Make sure you have your Windows updated with all the latest updates.
* Install the TARGET software on your PC. You can get it from Thrustmaster's site here: http://ts.thrustmaster.com/eng/index.php?pg=view_files&gid=1&fid=3&pid=311&cid=5
* Set all the files you installed so they run as administrator
Once you installed the software on your PC, go to the location where you installed it, eg. C:\Program Files (x86)\Thrustmaster\TARGET\ and C:\Program Files (x86)\Thrustmaster\TARGET\x64 and set all the executable files to run as administrator. For this, you right-click the files in the folder like TmService.exe, TargetGui.exe, TargetScripteditor.exe, Properties --> Compatibility --> Set to "Run As Administrator"
(Whether the above is necessary needs to be verified, not 100% certain now)
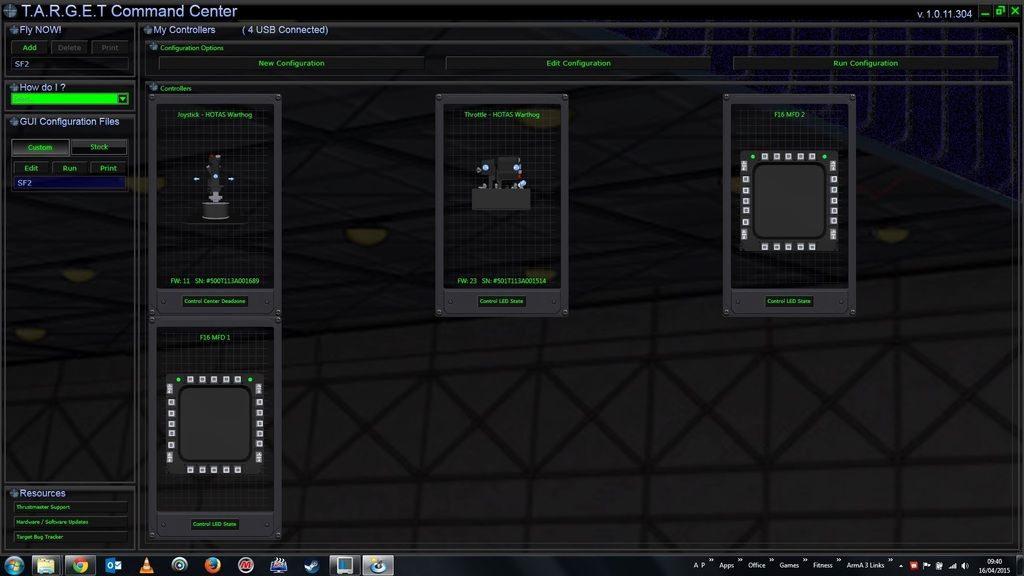
- The TARGET software basically consists of a program with a GUI (TargetGUI.exe) which you use to create a configuration and a software TargetScripteditor. (I'll explain this later).
* Start the TargetGUI and click on new configuration in the middle, give the configuration some name.
* Click/Check your device(s), in my case the Thrustmaster 16000m, check that there is a green checkmark. Click next.
Now TARGET shows a screen where you can define deadzone, custom curves etc. Here in my example I set a small deadzone of 4 for my 16000m and two outer deadzones of 7 like:

Note that the outer small deadzone makes the curve steeper, which means practically it reduces the movement needed to max out the stick.
You do the above for the TWO axes, the JOYX and the JOYY axe.
Click "next" when done.
What you do now is actually that you click on View Script. We don't care about anything else.
When you click View Script, your PC's texteditor comes up and has the generated script which for my 16000m looks like:
* Correcting the Bug in the script so the POV HAT works.
The above script needs a short, manual addition since for some unknown reason the POV/HAT buttons with the original created script don't work, at least not under Win8/8.1
Look how I added four more lines after the last "SetSCurve ..." that start with MapKey ... Add those four lines before the "}" like I did in the script example above. IMPORTANT: You would need to do that anytime you have TargetGUI create a script.
Whether this problem with the initially non-working POV/HAT is with other versions of Windows and whether it affects other sticks but the 16000m I don't know! If so, you might have to customize your script accordingly, note that my script is specific for the 16000m.
Now you SAVE this script to your computer to some convenient location, like My Documents as "Elite Dangerous.tmc" or similar.
At this point you can actually exit the TargetGUI software.
* Running the Script with the newly "enhanced" joystick settings.
For running the script I personally run TargetScriptEditor.exe but you can ALSO run the script from the TargetGUI program. I use the TargetScriptEditor.exe since it uses less memory than the GUI program.
* Start the TargetScriptEditor.exe
Go to Menu and LOAD (Menu --> OPEN) your newly created script, like My Documents/Elite Dangerous.tmc
You now have a screen like this:

From here you can load, edit, save and most importantly RUN your script.
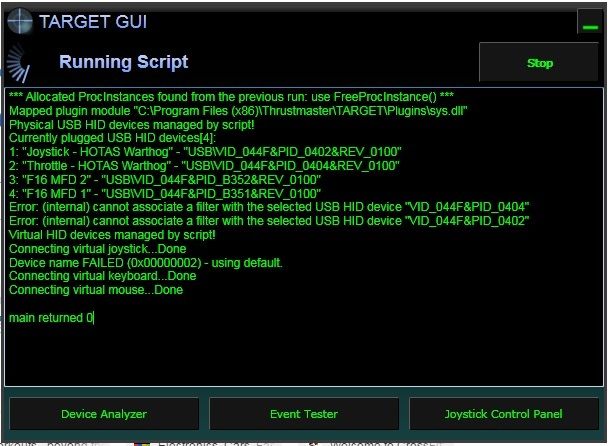
So click on RUN.
When it runs successfully, you can minimize the TargetScriptEditor to your taskbar and just let it run there. The script MUST run at all times while you play to use the stick with your new settings.
* What it does
What the TARGET software does is that it creates a new, "virtual" device with the new settings while hiding your original device.
Tip: In case you just freshly installed the stick in Win8/8.1 and it doesn't work when you run the TARGET script, please see "Troubleshooting" at the end of this post. There is a fix for this.
Since TARGET hides the "original" joystick and creates a new, virtual one...this also means that Elite: Dangerous will use a different config compared to as if you were not running TARGET. So, when you had an old control config in Elite and now you use the "new" stick with TARGET you will have to get into Elite: Dangerous Options and make a new config, it will not use the old one you had before! Of course you would only need to do that once anyway, assuming that from there on you will always use TARGET.
TARGET offers a lot of important features, especially setting deadzones etc. so I consider it extremely helpful, there is no reason to use the "old" stick/config without TARGET any longer. My $0.02
* Making quick changes to your stick settings by modifying the script
You can quickly make changes in the script like altering the values for curves, deadzone WITHOUT really needing to use the TargetGUI software.
Simply stop the script in TargetScripteditor. Alter a value, like in my example I have two lines SetSCurve(&T16000, JOYX, 7, 2, 7, 0, 0);
You could change the 2 into a 5 (the 2 here is the value for the center deadzone), SAVE the script...and run it script again.
* CALIBRATING your stick to find the right values, eg. for the deadzones. Quick and Dirty Method
Like above, make sure the script is RUNNING. As we discussed, this creates a new virtual joystick called "Thrustmaster Combined".
In newer Windows, you can start the built-in "Set up USB controllers". (The easiest way for me to do this is in Win Start Menu actually to type and search for "Set Up USB" until you see "Set Up USB Controllers" in Windows menu and then create a shortcut on the Desktop!
There is also a built-in "Device Analyzer" in the two Target Softwares which basically does the same. You start the Device Analyzer from the menu (while your virtual joystick is running!) Now, VERY IMPORTANT, chances are you don't see your stick here.
You click in the Target Device Analyzer all the way on TOP, left that round symbol. It then comes up with a list of devices to select from. Here you click on Thrustmaster Combined to select the stick.
You get something like:

Whether you use the built-in Windows calibration tool or this one, you want to use it to find a good deadzone setting.
The Windows joystick calibration tool, after you select the virtual Joystick Thrustmaster Combined, SHOWS THE VIRTUAL JOYSTICK, the Thrustmaster Device Analyzer also shows the "original" joystick to the left and the virtual in the larger section.
You can use either tool to "quick and dirty" calibrate your stick's deadzone to see whether the deadzone set in the script is big enough: What you do, you grab your stick and only slightly wiggle it around and check on the screen whether the wiggling results in movement.
(Almost ANY joystick has some play in the middle position. It should not result in any movement on the virtual joystick if you slightly wiggle it. In the "Device Analyzer" you can see the original, non-calibrated movement on the left side. So if you wiggle the stick slightly and you see numbers/movement in the large section in Device Analyzer as well we can assume the stick is too sensitive and needs a deadzone in the middle. You may want to set the deadzone just as big that the slight wiggling does not result in movement. A good general rough value to use there would be 4 or 5).
Stop the script, and change the value of your deadzone setting like
SetSCurve(&T16000, JOYX, 7, 2, 7, 0, 0);
to
SetSCurve(&T16000, JOYX, 7, 5, 7, 0, 0);
Save the modified script, re-start script.
Check again with the calibration tools.
I found that values anywhere from 2-8 for the deadzones can work. Just make sure you set it that accidental slight touching doesn't move your stick, you don't usually want any "middle position creep". The 16000m is very sensitive out of the box and any slight touching would already move your ship") Not optimal.
Not optimal.
Also, if you change any values, make sure you do it always for BOTH axis in the script. Modify the two lines, the one for the JOYX axis and the other line for the JOYY axis.
NOTES:
I was initially hesitant to use TARGET and thought there is no reason since the stick works out of the box. HOWEVER, without TARGET you miss out on essential things which would become clear once you get annoyed in game by an overly sensitive joystick. Elite has deadzone settings in the options, yes, but I figure with TARGET you can fine-tune them a lot better.
Also, one main reason that I use it is that I was coming from a XBOX 360 controller and found it very difficult to get used to having to move the stick that far to "max it out". This is why I set small deadzones on the "outer zones" which I guess is like that now you only need to move the stick 85% or so as compared to before. And of course can you do a lot more with TARGET if you wish so.
For example, you could set custom "S-Curves" to make the stick more sensitive in the middle, things like that.
*Troubleshooting
There is a chance that your virtual/calibrated stick won't work right away using Windows 8/8.1. It has to do with the new "enhanced power management settings" for USB devices in Win8.1. Some claim the problem is gone with the latest Windows updates but I can confirm the problem still persists when the joystick is freshly installed.
If you have that problem, like you move the stick when you run TARGET but nothing happens, Microsoft has a workaround to fix the problem here.
http://support.microsoft.com/kb/2900614/en-us
(Check the steps where it says "Workaround". It requires editing the registry.)
You would check the status at the bottom in TARGET when you run your script, it would show you the ID of the device somewhere like USB HID device "T.16000M"(USB\VID_044F&PID_B10A\5&BE1018E&0&2) selected
You would then use the above workaround and edit the registry setting for this particular device, eg. by disabling Enhanced Power Management, change the registry value from "1" to "0". That's it and your stick from thereon will be recognized.
(TARGET makes the "original" joystick invisible, Windows would assume it's not used and power management would disable it. We don't want this since TARGET of course still needs the "hidden" joystick turned on to read the raw input and translate it for the virtual, calibrated one).
Addition: There is a VERY handy free utility out there to view, manipulate, uninstall etc. your USB devices, "USBDeview" from here: http://www.nirsoft.net/utils/usb_devices_view.html
Download the appropriate version (64bit, 32bit etc.) for your windows. Install and run it. This tool can help to quickly edit the "EnancedPowerManagement" registry setting. In the utility you would just right-click your stick in the list (in my case Thrustmaster 16000) and then click on "Open in Regedit". It then jumps right to your joystick setting in the Windows registry so you won't have to search. You click the entry in the registry and then "Device Parameters" and can quickly change the EnhancedPowerManagement setting from "1" to "0"
Addition 2: It can help understanding how TARGET works when you realize that every time you run a script/config it creates a virtual joystick and hides the "real" one. The input from the real stick is read and the modifications and changes are applied to the virtual stick.
This is a beginner's guide getting Thrustmaster's TARGET joystick calibration and enhancement software to work, also under Win8 and Win8.1. This guide can also serve as a starter guide for using TARGET in general, no matter what Windows you have. TARGET works with the Thrustmaster 16000m, Hotas Cougar, Hotas Warthog, Warthog Throttle, MFD Cougar 1 & MFD Cougar 2.
I wrote this since I had a hell of a time to do this with Windows8.1. There were issues that needed to be fixed to get it to run 100%. Sorry, this guide got really long but in essence what you do is really easy. You would only have to find a good setting once anyway and from there it is simple.
***
What is TARGET and Why Do You Want It?
The TARGET software can greatly enhance and improve your joystick 'experience' because you can use it to set deadzones, custom sensitivity curves and much more. In fact, it is an entire scripting language/interpreter which lets you configure your joystick in infinite ways.
Here in this post I only want to focus on the BASICS. In this case I use TARGET to set small deadzones (one in the middle and two outer) on my Thrustmaster 16000m. (You want a small deadzone to get rid of "middle-position" creep!) and the outer I set so I don't have to move the stick as far as is default.
* Make sure you have your Windows updated with all the latest updates.
* Install the TARGET software on your PC. You can get it from Thrustmaster's site here: http://ts.thrustmaster.com/eng/index.php?pg=view_files&gid=1&fid=3&pid=311&cid=5
* Set all the files you installed so they run as administrator
Once you installed the software on your PC, go to the location where you installed it, eg. C:\Program Files (x86)\Thrustmaster\TARGET\ and C:\Program Files (x86)\Thrustmaster\TARGET\x64 and set all the executable files to run as administrator. For this, you right-click the files in the folder like TmService.exe, TargetGui.exe, TargetScripteditor.exe, Properties --> Compatibility --> Set to "Run As Administrator"
(Whether the above is necessary needs to be verified, not 100% certain now)
- The TARGET software basically consists of a program with a GUI (TargetGUI.exe) which you use to create a configuration and a software TargetScripteditor. (I'll explain this later).
* Start the TargetGUI and click on new configuration in the middle, give the configuration some name.
* Click/Check your device(s), in my case the Thrustmaster 16000m, check that there is a green checkmark. Click next.
Now TARGET shows a screen where you can define deadzone, custom curves etc. Here in my example I set a small deadzone of 4 for my 16000m and two outer deadzones of 7 like:
Note that the outer small deadzone makes the curve steeper, which means practically it reduces the movement needed to max out the stick.
You do the above for the TWO axes, the JOYX and the JOYY axe.
Click "next" when done.
What you do now is actually that you click on View Script. We don't care about anything else.
When you click View Script, your PC's texteditor comes up and has the generated script which for my 16000m looks like:
Code:
include "target.tmh"
int main()
{
    Configure(&HCougar, MODE_EXCLUDED);
    Configure(&Joystick, MODE_EXCLUDED);
    Configure(&Throttle, MODE_EXCLUDED);
    Configure(&LMFD, MODE_EXCLUDED);
    Configure(&RMFD, MODE_EXCLUDED);
    if(Init(&EventHandle)) return 1;
    SetKBRate(32, 50);
    SetKBLayout(KB_ENG);
    MapAxis(&T16000, JOYX, DX_X_AXIS, AXIS_NORMAL, MAP_ABSOLUTE);
    SetSCurve(&T16000, JOYX, 7, 4, 7, 0, 0);
    MapAxis(&T16000, JOYY, DX_Y_AXIS, AXIS_NORMAL, MAP_ABSOLUTE);
    SetSCurve(&T16000, JOYY, 7, 4, 7, 0, 0);
    MapAxis(&T16000, RUDDER, DX_ZROT_AXIS, AXIS_NORMAL, MAP_ABSOLUTE);
    SetSCurve(&T16000, RUDDER, 0, 0, 0, 0, 0);
    MapAxis(&T16000, THR, DX_SLIDER_AXIS, AXIS_NORMAL, MAP_ABSOLUTE);
    SetSCurve(&T16000, THR, 0, 0, 0, 0, 0);


        // *** [B]HERE WE NEED TO ADD FOUR MORE LINES BY HAND:[/B]
        //
    MapKey(&T16000, H1U,DXHATUP);
    MapKey(&T16000, H1R,DXHATRIGHT);
    MapKey(&T16000, H1D,DXHATDOWN);
    MapKey(&T16000, H1L,DXHATLEFT);
        //
        // *** [B]TO GET THE POV/HAT OF THE STICK WORKING!![/B]

}
int EventHandle(int type, alias o, int x)
{
    DefaultMapping(&o, x);
}The above script needs a short, manual addition since for some unknown reason the POV/HAT buttons with the original created script don't work, at least not under Win8/8.1
Look how I added four more lines after the last "SetSCurve ..." that start with MapKey ... Add those four lines before the "}" like I did in the script example above. IMPORTANT: You would need to do that anytime you have TargetGUI create a script.
Whether this problem with the initially non-working POV/HAT is with other versions of Windows and whether it affects other sticks but the 16000m I don't know! If so, you might have to customize your script accordingly, note that my script is specific for the 16000m.
Now you SAVE this script to your computer to some convenient location, like My Documents as "Elite Dangerous.tmc" or similar.
At this point you can actually exit the TargetGUI software.
* Running the Script with the newly "enhanced" joystick settings.
For running the script I personally run TargetScriptEditor.exe but you can ALSO run the script from the TargetGUI program. I use the TargetScriptEditor.exe since it uses less memory than the GUI program.
* Start the TargetScriptEditor.exe
Go to Menu and LOAD (Menu --> OPEN) your newly created script, like My Documents/Elite Dangerous.tmc
You now have a screen like this:
From here you can load, edit, save and most importantly RUN your script.
So click on RUN.
When it runs successfully, you can minimize the TargetScriptEditor to your taskbar and just let it run there. The script MUST run at all times while you play to use the stick with your new settings.
* What it does
What the TARGET software does is that it creates a new, "virtual" device with the new settings while hiding your original device.
Tip: In case you just freshly installed the stick in Win8/8.1 and it doesn't work when you run the TARGET script, please see "Troubleshooting" at the end of this post. There is a fix for this.
Since TARGET hides the "original" joystick and creates a new, virtual one...this also means that Elite: Dangerous will use a different config compared to as if you were not running TARGET. So, when you had an old control config in Elite and now you use the "new" stick with TARGET you will have to get into Elite: Dangerous Options and make a new config, it will not use the old one you had before! Of course you would only need to do that once anyway, assuming that from there on you will always use TARGET.
TARGET offers a lot of important features, especially setting deadzones etc. so I consider it extremely helpful, there is no reason to use the "old" stick/config without TARGET any longer. My $0.02
* Making quick changes to your stick settings by modifying the script
You can quickly make changes in the script like altering the values for curves, deadzone WITHOUT really needing to use the TargetGUI software.
Simply stop the script in TargetScripteditor. Alter a value, like in my example I have two lines SetSCurve(&T16000, JOYX, 7, 2, 7, 0, 0);
You could change the 2 into a 5 (the 2 here is the value for the center deadzone), SAVE the script...and run it script again.
* CALIBRATING your stick to find the right values, eg. for the deadzones. Quick and Dirty Method
Like above, make sure the script is RUNNING. As we discussed, this creates a new virtual joystick called "Thrustmaster Combined".
In newer Windows, you can start the built-in "Set up USB controllers". (The easiest way for me to do this is in Win Start Menu actually to type and search for "Set Up USB" until you see "Set Up USB Controllers" in Windows menu and then create a shortcut on the Desktop!
There is also a built-in "Device Analyzer" in the two Target Softwares which basically does the same. You start the Device Analyzer from the menu (while your virtual joystick is running!) Now, VERY IMPORTANT, chances are you don't see your stick here.
You click in the Target Device Analyzer all the way on TOP, left that round symbol. It then comes up with a list of devices to select from. Here you click on Thrustmaster Combined to select the stick.
You get something like:
Whether you use the built-in Windows calibration tool or this one, you want to use it to find a good deadzone setting.
The Windows joystick calibration tool, after you select the virtual Joystick Thrustmaster Combined, SHOWS THE VIRTUAL JOYSTICK, the Thrustmaster Device Analyzer also shows the "original" joystick to the left and the virtual in the larger section.
You can use either tool to "quick and dirty" calibrate your stick's deadzone to see whether the deadzone set in the script is big enough: What you do, you grab your stick and only slightly wiggle it around and check on the screen whether the wiggling results in movement.
(Almost ANY joystick has some play in the middle position. It should not result in any movement on the virtual joystick if you slightly wiggle it. In the "Device Analyzer" you can see the original, non-calibrated movement on the left side. So if you wiggle the stick slightly and you see numbers/movement in the large section in Device Analyzer as well we can assume the stick is too sensitive and needs a deadzone in the middle. You may want to set the deadzone just as big that the slight wiggling does not result in movement. A good general rough value to use there would be 4 or 5).
Stop the script, and change the value of your deadzone setting like
SetSCurve(&T16000, JOYX, 7, 2, 7, 0, 0);
to
SetSCurve(&T16000, JOYX, 7, 5, 7, 0, 0);
Save the modified script, re-start script.
Check again with the calibration tools.
I found that values anywhere from 2-8 for the deadzones can work. Just make sure you set it that accidental slight touching doesn't move your stick, you don't usually want any "middle position creep". The 16000m is very sensitive out of the box and any slight touching would already move your ship
Not optimal.Also, if you change any values, make sure you do it always for BOTH axis in the script. Modify the two lines, the one for the JOYX axis and the other line for the JOYY axis.
NOTES:
I was initially hesitant to use TARGET and thought there is no reason since the stick works out of the box. HOWEVER, without TARGET you miss out on essential things which would become clear once you get annoyed in game by an overly sensitive joystick. Elite has deadzone settings in the options, yes, but I figure with TARGET you can fine-tune them a lot better.
Also, one main reason that I use it is that I was coming from a XBOX 360 controller and found it very difficult to get used to having to move the stick that far to "max it out". This is why I set small deadzones on the "outer zones" which I guess is like that now you only need to move the stick 85% or so as compared to before. And of course can you do a lot more with TARGET if you wish so.
For example, you could set custom "S-Curves" to make the stick more sensitive in the middle, things like that.
*Troubleshooting
There is a chance that your virtual/calibrated stick won't work right away using Windows 8/8.1. It has to do with the new "enhanced power management settings" for USB devices in Win8.1. Some claim the problem is gone with the latest Windows updates but I can confirm the problem still persists when the joystick is freshly installed.
If you have that problem, like you move the stick when you run TARGET but nothing happens, Microsoft has a workaround to fix the problem here.
http://support.microsoft.com/kb/2900614/en-us
(Check the steps where it says "Workaround". It requires editing the registry.)
You would check the status at the bottom in TARGET when you run your script, it would show you the ID of the device somewhere like USB HID device "T.16000M"(USB\VID_044F&PID_B10A\5&BE1018E&0&2) selected
You would then use the above workaround and edit the registry setting for this particular device, eg. by disabling Enhanced Power Management, change the registry value from "1" to "0". That's it and your stick from thereon will be recognized.
(TARGET makes the "original" joystick invisible, Windows would assume it's not used and power management would disable it. We don't want this since TARGET of course still needs the "hidden" joystick turned on to read the raw input and translate it for the virtual, calibrated one).
Addition: There is a VERY handy free utility out there to view, manipulate, uninstall etc. your USB devices, "USBDeview" from here: http://www.nirsoft.net/utils/usb_devices_view.html
Download the appropriate version (64bit, 32bit etc.) for your windows. Install and run it. This tool can help to quickly edit the "EnancedPowerManagement" registry setting. In the utility you would just right-click your stick in the list (in my case Thrustmaster 16000) and then click on "Open in Regedit". It then jumps right to your joystick setting in the Windows registry so you won't have to search. You click the entry in the registry and then "Device Parameters" and can quickly change the EnhancedPowerManagement setting from "1" to "0"
Addition 2: It can help understanding how TARGET works when you realize that every time you run a script/config it creates a virtual joystick and hides the "real" one. The input from the real stick is read and the modifications and changes are applied to the virtual stick.
Last edited: