Community Event / Creation The Steel Beast - Budwyzer's Simpit Build Log

I like space games and while looking into flight controls for Elite Dangerous I stumbled across peoples' simpit builds, mostly linked on this site, Enride, Thereisonlyone, and Pigfumbler I mainly blame all of you. So I decided to spend my lunch one day with Google Sketchups and then it took off and I got hooked.

My original design differs a good bit from what I finally ended up with, so here's my IMGUR album that chronicles every single step. I'll spare this thread that nightmare.

Here's close enough to my final design, of course things change every minute so this pic can never be constantly updated.

I drew a lot of my inspiration from the Obutto line. And after seeing some of others' fantastic reations, will be looking into giving this skeleton a face later on.
UN5YN2c.png


Slid together - I read on how Obutto separated the monitor frame from the seat frame in order to negate shaking the screen when shaking the seat. Maybe it was also to be able to sell the triple monitor separately at a huge mark up, but it still sounded like a good reason.

1njRanb.png


The seat I pulled from a PT Cruiser at a salvage yard, during their holiday half-off sale. Snagged it for $14, yes I'm American. :D
It wasn't until I got to cleaning it up that I realized there was supposed to be a drawer underneath it. :(

u9ojwHs.jpg


I didn't buy enough angled steel to do the seat frame as well as the monitor mount, so I cut some extra tubing to fit as a seat brace and started framing it up. I had previously measured how high my arms were comfortable with, so now i just needed to measure the distance that I wanted the controls to be away from me. Please excuse the purple camera, I bought into the HTC One hypetrain.

4RC4uy4.jpg


Here's the result of last saturday's welding. This angle is looking toward the front of the seat. Luckily my brother in law was there, because it turns out that I'm terrible at welding.

LD415fN.jpg


I'll be back soon to update the thread with more pictures by next week, if I don't get a chance to work on it during the week.
 
Whoa! Is that 3 inch tube?!?!:eek: Talk about strong and stable!

Nice job so far, very interested to see how this turns out, keep up the good work!
 
It's 2" square tube. I started by looking at 1 inch, but that stuff is tiny. 2" was the minimum for a solid frame as well as looking solid.

Thanks for the kind words. I'll definitely get more done on it this weekend and be back then.


*Edit*
And then I found out that father's day is this weekend. Why Real Life?!? Why must you get in the way!?
 
Last edited:
Anotherone bites the dust!!!
Welcome to insanity mate! Sad to say, as you no doubt have seen, not much have happened on my build since winter and I think TIOO has it on ice as well. Pigfumbler is the man though, hes warriored through and is nearing completion! Though, these projects are never complete!

Your really off to a good start and im impressed that your doing the frame in metal! Really professional and sturdy!
My design was also (initially) intended to be adjustable for racing games (i used to simrace many years ago) but the further the build went on, the less adjustable it became. In the end, it will be possible to mount wheel, stick and pedals but it will require some time and wont be as quick as I first imagined. If possible, one should always build it adjustable and modular!

Im not all to active with ED anymore but im still checking the forums almost daily and will subscribe to this thread so I can see your progress!

A FYI, there are some fairly cheap triple-monitor-mounts available, though they arent as adjustable as the more expensive ditos.
Im linking to the one Ive bought myself, its a sturdy and simple design.
I dont own three monitors myself yet, but ive testfitted my single monitor and im suprised at the quality of this mount considering its price is 3-4 times cheaper then regular trips.

http://www.conrad.com/ce/en/product...ivelling-SpeaKa-Professional?ref=searchDetail

Then again, from what youve been showing I take it metalworking isnt an issue for you so you can probably build your own mount much cheaper anyway :)
 
That's too bad, I like seeing progress on peoples' builds. Your build has of course been a big motivator for me to get at it.

I'm toying with the idea of making that wheel mount platform fold downwards on hinged mounts. But we'll see how that affects the cost. I'm trying to build something on par, personally better, than the Obutto R3volution at a far lower cost so finding that balance between getting what I want at the cost that I want and the Feature Creep is tricky.

I'm planning on drilling two holes in preparation for using 2 of these mounts, or similar, on the sides. The main monitor mount is angle iron. I'll have pics of this in a couple of weeks after I finish the main frame first. Doing it first so my monitor frame doesn't take a bunch of room in my father in laws barn, as opposed to just sitting in a pile right now.

Thanks for the support. :)

I havent abandoned the build but just need a good time to start it up again. Usually, summer isnt a good time for such projects, but come autumn when the usual weekly gatherings and parties become less frequent and all we do up here is wait for the cold dark winter, there far worse ways to spend the free time then building simpits!


Keeping the costs down is something we all strive for but dont compromise the builds quality or functionality because of it. As long as you are happy with the build enjoying your time and feel its worth it, no cost is too high. Compromimsing too much, and youll end up scrapping it. (or thats my experience at least :D )

Looking forward to see your progress!
 
Subbed and repped! That's looking very sturdy, able to stand the strain of exciting interdictions! nice one, I'll be following regularly!
 
Some progress this weekend. I spent 5 hours grinding and welding the monitor frame on Saturday, but worked until I felt my sunburn begin to burn again and called it quits real quick so didn't get any pics there. I got some from the work I did today though.

First, I found a drawer! I had to search two more salvage yards and 20 PT Cruisers but I found it. And it fits!
0UFyHCR.jpg


I cut my armrest bases. I've got a makeshift slide and 7"x7" joystick base on the right side that I cut and used as a template for the left side.
I plan on using the X-52 Pro, which supposedly has a 7x7x2 base on each side.
Y0NF68j.jpg

My helpers finally showed up. After all the hard work was done, of course. Like any good helper.
keiOrES.jpg

Fitted shot from the front, just for kicks.
aq3DqAG.jpg
 
Aaaaaaaaawwww, the little horse :)
Looks like you have an idyllic place to work at, and your doing great progress!

Have you thought about mouse/keyboard placement?
I dont know how much other games you might play but should you wish to have a good sitting with a regular mouse/keyboard game, how can you arrange the placement of the mouse and keyboard to give you a comfortable position?
Im thinking about using strong magnets to stabilize the joystick which will still let it be quickly removed to make room for a mousepad.
At this point, the keyboard can be moved from its tray and placed in the knee. Its not a very elegant solution but it works!

Also, have you given entry/exit of the simpit any thoughts?
You are making the monitor mount separated, maybe make the seat itself somehow slide to and from the monitor mount?
Though, it IS a good feeling having to carefully climb up and over stuff to get "into the pit" but it will also become an inconvenience if you have a habit of moving away from the computer often.
 
Subbed and repped! That's looking very sturdy, able to stand the strain of exciting interdictions! nice one, I'll be following regularly!

Thanks! Hopefully I can make this a journey worth following for you.


Aaaaaaaaawwww, the little horse :)
Looks like you have an idyllic place to work at, and your doing great progress!

Have you thought about mouse/keyboard placement?
I dont know how much other games you might play but should you wish to have a good sitting with a regular mouse/keyboard game, how can you arrange the placement of the mouse and keyboard to give you a comfortable position?
Im thinking about using strong magnets to stabilize the joystick which will still let it be quickly removed to make room for a mousepad.
At this point, the keyboard can be moved from its tray and placed in the knee. Its not a very elegant solution but it works!

Also, have you given entry/exit of the simpit any thoughts?
You are making the monitor mount separated, maybe make the seat itself somehow slide to and from the monitor mount?
Though, it IS a good feeling having to carefully climb up and over stuff to get "into the pit" but it will also become an inconvenience if you have a habit of moving away from the computer often.

Enride, to answer your questions.

I have thought about M/KB placement. That vertical board on the right side is a placeholder for the final KB/M tray. It will be on a door hinge attached to a slider. It will then slide up and lay down across the frame. My HOTAS placement is at a comfortable spot with the seat near the rear and sliding the seat forward moves it into a comfortable range of the KB/M tray. I'll be using magnets on mine as well, in order to help hold the tray up against the metal frame when it's stowed away.

Back up at my second pic/drawing gives the best example of entry/exit to the contraption. I'm leaving a gap between the armrests and little shelf in the front. There should be enough to swing my feet through.
 
I finally finished welding the monitor and pc tower stand!

XzUo7tv.jpg The seat frame is drying in the back. It just got a clear coat over two coats of matte black on the bottom. I've got to wait on the 2nd can of black to arrive to do some touchups, then the rest of it'll be getting a clear coat as well.


Obligatory shot of my messy workbench.

ADAAQCG.jpgMy little chopsaw side-station may prove useful if it turns out that my shelf stand is too high up under my monitor when I slide them together.


Here's a shot of the transducer that came out of the $20 Aura Interactor vest. Just a thought for anyone looking into transducers. Thanks again to VRGamerDude for pointing me to that!

UJOb76z.jpg


So far, I'm realizing that steel may not have been the best idea. I can only really suggest it if you either have a seriously final plan that you're sure will fulfill everything you want, or at least have a way to disassemble and reassemble pieces if you decide that something would fit better a different way. But luckily I included some wood in my design and I can work around that very easily.
 
Looking good, sir!
I can thoroughly recommend those transducers too! Acceptable amounts of bass. Because I used a car seat it dampens a lot of the vibration for me but on reflection, it's kind of obvious, I guess I'm a muppet but half the fun of these builds is creating solutions for problems ☺
 
I finished the top black coat on the rest of the frame. Ran out before I could do the bottom. D:

I went ahead and put it all togetherish.
rg8FPR0.jpgI need to get an image the shows the entrance area on the left.
Today I cut the right side middle tube about 3/4" shorter and built a small mousepad area for when I don't want/need the keyboard tray across my lap.
I just used some liquid nails on a couple of pieces of wood that I cut to 1 3/4" wide and glued them to the bottom corner then jammed it down into the tube on the right. I was going to take it back out and get a pic, but it's actually in there so good that I was afraid I'd break it if I tried to get it out. I'll wait a day, instead of an hour, for it to dry and try to get it out and a pic.


ZbOV3m8.jpgHere's a shot with the keyboard tray pulled up and layed across.

And here's the paintjob I'm thinking of.
16X1WDZ.pngIt's a very, very, rought sketch I did in MSPaint. If anyone has any suggestion, please feel free to let me know. Otherwise I'll just be getting some cheap blue spray paint, wrapping the frame in newspaper and masking tape, and hitting it with the blue then a clear coat.
 
Last edited:
Nice, shes taking shape now!

About the paintjob, are you doing the "spiral" type pattern youve drawn or would camofluage be an option?
Put some scattered tapes over the black and cover with blue, then put on some more scattered tape and cover with one more color, a greyish perhaps or maybe dark red.
The right colors and it could look really sweet.
 
If anyone has any suggestion, please feel free to let me know.

Great job on the seat Commander .. another talented builder at work!!

As you mention, open to suggestions, and as you show blue and black stripes ..
Makes me think ..

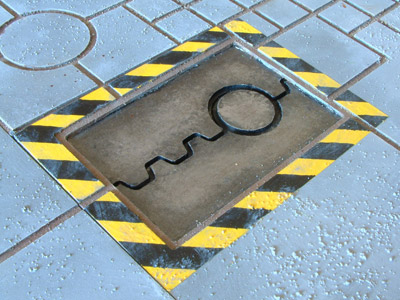
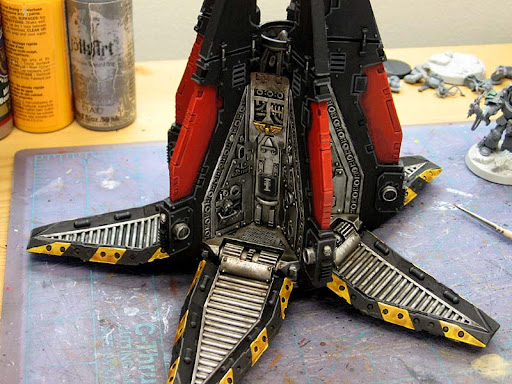
Have you considered yellow and black? (Hazard) Gives a very industrial look ..

img_0807.jpg


hatch.jpg


Forge%20World%20drop%20pod%20progress%20inside.jpg

Might bring too much attention (so you can't pretend you're not playing ED) in front room though :D
 
Thanks!

I live in the country, so I've seen enough camo to last me a lifetime, Enride.

I tried mocking up yellow/black stripes, but I guess it just isn't me. I seem to be partial to blue, or near blue. My wife suggested glow in the dark green, so I'm looking into that. :D


**Update
Turns out glow in the dark paint is wildly expensive. That's a no-go.
 
Last edited:
Ok, well, I'm a lazy . I skipped out on the extra paint. I spent about 30 minutes taping one side, then realized that it would take me about 2 hours to tape it all. In a shed with no fan and in high 90s, well I just said "NOOOPE".

So, here we are now.

After removing the old, lame, desk and dragging the new hotness frame in.

P90S7K6.jpg

Another Angle
a4Qi9T8.jpg

Here's the clutter in the closet that this thing has caused
lE1voxI.jpg

Alright, dropped the seat frame in.
b4Q6bzD.jpg

And dropped the front shelf down, using the spring loaded hinges. :)
Z3Mx2YL.jpg

The large platform in back is held down by blocks of wood screwed onto the bottom side of the 90 degree angles hanging off. This same concept will be used to hold the armrests on as well.
UHJveMt.jpg

Cut the foam pad to width and cut bolt holes in it.
waHZjky.jpgHopefully this helps isolate the vibrations of the seat away from the frame.

Dropped the seat in and bolted it down.
XcOalk4.jpg

And found a steel plate in the back of the seat that should make an excellent place to mount the transducer! I'll have to cut a 3.5 inch hole in the plastic back cover in order for it to fit back on.
nJOJ8KF.jpg
 
Thanks! :)


I got quite a bit more done after 5 yesterday as well, just didn't have a chance to post! My joystick also arrived late in the evening, so I didn't get the chance to mount it.


I done goofed and had to use the slider, on the keyboard tray, that I ordered long before I got to the measurement process. The slider is way to short so the tray has another 10 to 12 inches that it could still go lower.
6qp7A4R.jpg


You can see the keyboard mounted on its tray from this angle.
TTB9w34.jpg


- Still yet to do
* Mount the armrests & joysticks
* Mount the rear speakers
* Build the foot board
* Add a mousepad to the lower deck
* Add the damn cup holder
* Put up some posters, or something. I have a ton of open wall space now.
 
Last edited:
Back
Top Bottom