Community Event / Creation The Svadilfare: Building a sci-fi simrig

Okay guys n gals, time for me to start up my simpit. After a few weeks of being impressed by TIOO's C-Pod project, I began planning something similar.
Eventually it is planned to be a full simrig with everything integrated into the build. I havent worked out the details yet but triple monitors, basshaker(s) and various switches/button panels and more is already decided.

Ive nicknamed this build the "Svadilfare".
In Norse mythology Svadilfare was the fathering stallion of Sleipnir and the workhorse of the giant Hrimthurs who where tricked into building the walls of asgard.
Svadilfare, in modern language, best translates to "enduring traveller". A fitting name!

Ive been working on the plans for the first component of the rig, the seat. While the estetics of the design is not finalized, and alot might/will be added during construction, the main design is finished and ready to be built.

EDIT:
A big change of concept as ive gone from making a smaller kind of rig to a full simpit. I just cant help it, the wish to build a full simpit has been gnawing me since I decided I wasnt gonna do it. Well…Now im doing it!

ljMyOqg.jpg


This is the final concept drawing and later in the thread you can already see the progress made so far.
 
Last edited:
Good luck and bon voyage. Enjoy the journey and all the twist, turns and satisfaction it brings!

If you need a sounding board, I'll be happy to help.
 
Okay, for a time now ill be working at a school where ill be able to utilize the woodworking classroom and all its tools after i go off my regular work!
So a great time to get started by getting all the big cutting/grinding out of the way since its one of the worst thing to do at home (I swear I still find dust around since my last project!).

I got hold of the MFD, finished up my day, and got to work today after I…well got off work i guess.
Anyway, time for some pics!


wtCe3Fq.jpg

I decided that todays work would be to cut the 16mm pieces for the main structure so yesterday I printed a quick drawing with all measurements needed.


F8XJpDh.jpg

The stands is the only pieces that would be a bit tricky to make since its the only ones with alot of different angels so drawing it up on the board took some time. And then a quick measurement to see everything was good to go and I continued with the jigsaw (or is it padsaw in english? I dont know…)


Ng79GYe.jpg

Routing is new to me as ive never done it before, but this was a good time to learn. I had to get these two pieces to be identical so first I had to trim the edges of the first piece.


UgOvLFt.jpg

During the routing, the bearing on the trim bit came loose and the bit went into the piece slightly. This wont be a problem since it vanish during filling/sanding but I was kind of startled but lucky i didnt get the bearing lodged into my thigh! (or even someplace worse…)
If ill be using a router regularly later on, ill probably get a good one, and some highquality bits.


9z9u6S0.jpg

Eventually I got it finished, used it as a template for the second piece, cut it and then used the first piece as template for flushtrimming so they are identical.
I then moved on to cutting the rest of the support pieces. This is where having access to some good machines really pay off as I turned my attention over to this beauty:


8udtJRN.jpg

Since the supporting pieces will be inbetween the two stands its important that they are identical in lenght. This machine makes it impossible to cut them in any other way! Cutting all the remaining pieces took but half an hour and the cuts are flawless! Some of these pieces will need to have their edges angled to follow the seatline of the stand though so they arent completed yet.


NWPcy8K.jpg

As it was getting late, and I was getting hungry I called it a night and went home. but first I had to put some pieces together just too see how it looked.
Initially I thought "hell, this is really small". But It really isnt though, when I started comparing it to various chairs and seats around It shows that it really is wide enough, but being placed on the floor kiond of screws with my head!


Thats it for the first progress report.
Dont expect this many pictures every update, I just wanted to get things started with a bang!
Ill continue work tomorrow when my goal is to first cut all the covering pieces from the 8mm MDF, then try to get the base construction assembled.
So if everything goes as planned, Ill be able to testsit it tomorrow!

As always, comments and feedback is welcome!
 
Nice one man.Keep it up.If you left it as it was the comfort level would be almost exactly that of a South West Trains seat.
 
WTH kind of trains yous guys got down there!?

Tioo, may I ask about the batons you use for assembly, what are there dimensions?
I found some roughly 25mm by 25mm strips that I figured I could use but they split very easily and i cant see them holding for 4 screws even if i predrill.
Figure i better look for some thicker ones but maybe you can shed some light on the issue?
 
Very uncomfortable, overcrowded, badly ventilated, frequently delayed, expensive trains.

25mm x 25mm sounds perfect. I use pine and make sure I don't drill the pilot holes too close to the ends as they can split much more easily that way - I leave about 3-4cm. It can help to go a little slow when the screw is almost in. What type of screws are you using?

Edit: Are you using a power driver or doing it by hand?
 
Last edited:
Very uncomfortable, overcrowded, badly ventilated, frequently delayed, expensive trains.

25mm x 25mm sounds perfect. I use pine and make sure I don't drill the pilot holes too close to the ends as they can split much more easily that way - I leave about 3-4cm. It can help to go a little slow when the screw is almost in. What type of screws are you using?

Edit: Are you using a power driver or doing it by hand?


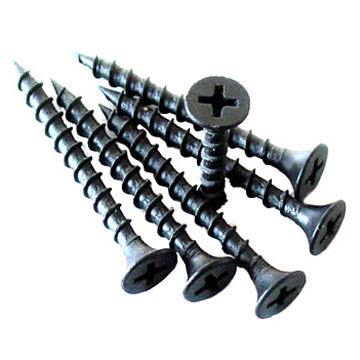
I use regular drywall screws, 32mm, and a power driver.

drywall_screws.jpg


Predrilled with a 3mm drill (iirc) and the screws are around 4mm at the threads or something like that.
 
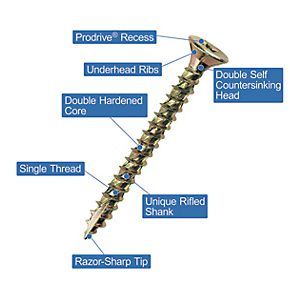
I tend to go a little smaller with the pilot hole. I've not used drywall screws but it may be worthwhile using TurboDrive / TurboGold or similar screws. They make a significant difference from regular screws in my experience - much easier to work with and hold exceptionally well in MDF:


- - - - - Additional Content Posted / Auto Merge - - - - -

I think you should list some of the bad points,just for balance.

Lol - you started it!
 
I tend to go a little smaller with the pilot hole. I've not used drywall screws but it may be worthwhile using TurboDrive / TurboGold or similar screws. They make a significant difference from regular screws in my experience - much easier to work with and hold exceptionally well in MDF:


- - - - - Additional Content Posted / Auto Merge - - - - -


Lol - you started it!

Ok tnx mate!
Ill see what i can find and do a little trial n error tomorrow.
Hell, all this building even made me forget that b3 was due today!

I was going to sleep but now i dont think i can just yet!
 

Rafe Zetter

Banned
Hopefully this won't throw a wrench in the works but... the small pads in the drawing at the front that are small leg rests, you could, with some jiggery-pokery make them raise up and down on a lever so that your legs are better supported, especially if you are considering foot pedals, then your feet won't be on your heels all the time.

You might even get lucky and find a lazyboy or something about and salvage the footrest mechanism from that :)

Otherwise a good start, and having a wood shop to use is a major bonus...

Also I found on ebay that car breakers sell the foam inserts that go into car seats - the shaped back portion with side supports - you might be able to buy one of those and just cover it instead of buying foam and shaping or whatever, just a thought.

Thanks, thats a good idea about the car foam inserts, im gonna look into that! Maybe visit the local scrapyard even.

Raisable legrests would be awesome, and it has struck me that in their current form Im unsure if they will ever give any support.
The seat is too close to the ground as it is now but in the future it will be higher and the legs will curve down more. Its something to be adjusted as i get far enough to get a feel for the position of the pedals relative to the seat.
 
nice project i love your workshop and look foward to seeing the end result :D
Thank you, but it really isnt MY workshop, only one I have access to at the moment. When my work at that school is done, so is that access, so while im not gonna stress the build I do need to capitalize on this opportunity!

The tablemounted saw with adjustable cutting assistance is the stuff of dreams! If/when I move to a house and get my own workshop, one of these are the first addition without a doubt!

I was about to say that .. I'm having workshop envy !!
Great to see this build getting started (and your Commander Identification Patch, is en route, Commander!)

Very nice, looking forward to see it in real! I dont know how, but in one way or another itll be a part of the simrig!

Speaking of which, i got a good few hours of work done to it today!
First I cut all the pieces of 12mm MDF that will be the covers for the seat.
Then I began the dry assembly of the base construction.

mC3aVYy.jpg

It took a little time to get this rolling as this is new to me, but after a while (and a piece needing to be remade) things started to go more smooth.
I began by clamping the batons to the supporting piece, making sure that they where aligned. Then predrilled holes through the batons and all the way through the MFD then screwed them together.

With the support and baton in unity, i clamped it in place on one of the sidestands, once again making sure to align the edges as good as possible. It will prove to have been time well spent since the better I align them now, the less ill have to fill/sand later!
Then i predrilled through the baton once again, this time perpendicular to the first screws, so the drill goes through the MDF of the sidestand.
I then put the screws through from the outside.

I did this for all the supports, one at a time and when they where all finished and screwed onto one of the sidestand, it was simple to put the other sidestand on top and screw the other side, aligning all edged starting from the front going backwards.

1DHkKc4.jpg


This is where i realize how much its worth to spend some extra time making sure all pieces are cut to the right dimensions. Any uneven cuts or misshaped pieces will seriously hinder a good assembly at this stage, but with the right tools and some extra time spent I was happy to see that everything lined up pretty good!
I also excluded one of the supports in the bottom seat, it really wasnt needed and would only prove to be a hinder for a future basshaker.

Eg9z0FG.jpg

Heres a side view with the screws visible. I have yet to decide if i want the screws visible, if not ill have to change them for one that goes into the mdf, and then cover them with filler later on. Ill see what I can find.


There we go, now im off to listen to some music! My childhood heroes (and still all time favorite band) just released their first album in 19 years, and I got the collectors edition in mail TODAY!
Tomorrow I had planned to finish the front end of the base and then figure out how to make angled cuts so the covers can be fitted properly but im unsure if ill have the time. And then the weekend is fully planned so this might be all the progress made this week, unless I can squeeze in some time on sunday.
And I havent even got time yet to try b3 :D
 
Some major and excellent progress there Enride!

I would be inclined to sink the screws into the MDF - it'll make working with the side pieces you're going to attach a whole lot easier.
 
Back
Top Bottom