EDIT: This mod failed after some days for me. Something went wrong with the digged line, so i reverted back to full smooth throttle. So please, do not try to do it, it is very very risky and complex to arrange. Bytheway the idea was good and at least i tryed.
Hello Commanders!
It is very cool to play ED with the "full range" feature, but x52 Pro owners know well about the - useless with ED - two throttle detents to feel the afterburner and reverse thrust, put at about 80% and 20% of the throttle slider respectively.
Everybody knows about the mod to remove those detents and feel the throttle a little bit better, but the problem is that you don't feel the "zero" throttle that is in the exact middle of the slider when you use "full range". Well, after playing ED for a while you can get skilled to stop at zero power without feeling the detent, ok... But I wanted to try to do a more advanced mod:
Center detent!
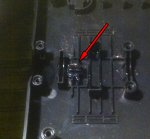
This is the detent:

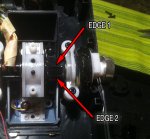
And these are the two edges that make you feel it:

So the idea is to smooth out the two edges and dig a line on the cylinder, in the very middle of the (removed) edges, to make the detent works reversely: the detent won't be stopped by the edges, but it will stop going inside the digged line.
For first, the detent must be put in a little bit higher position, in order to make it go inside the digged line properly. In my case I simply use some paper:

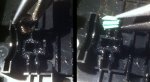
Then with a Dremel smooth out the two edges, VERY, VERY gently and accurately:

Now, ready to dig the line in the very center. It needs to be enough deep to make the detent go inside, but not too much deep to break the cylinder. And it needs to be enough width and long to fit the detent:

Reassembled the X52 Pro... I was both a little lucky and a little skilled, and now got a cool center detent!
My final suggestion is: DO NOT DO IT.
Hello Commanders!
It is very cool to play ED with the "full range" feature, but x52 Pro owners know well about the - useless with ED - two throttle detents to feel the afterburner and reverse thrust, put at about 80% and 20% of the throttle slider respectively.
Everybody knows about the mod to remove those detents and feel the throttle a little bit better, but the problem is that you don't feel the "zero" throttle that is in the exact middle of the slider when you use "full range". Well, after playing ED for a while you can get skilled to stop at zero power without feeling the detent, ok... But I wanted to try to do a more advanced mod:
Center detent!
This is the detent:
And these are the two edges that make you feel it:
So the idea is to smooth out the two edges and dig a line on the cylinder, in the very middle of the (removed) edges, to make the detent works reversely: the detent won't be stopped by the edges, but it will stop going inside the digged line.
For first, the detent must be put in a little bit higher position, in order to make it go inside the digged line properly. In my case I simply use some paper:
Then with a Dremel smooth out the two edges, VERY, VERY gently and accurately:
Now, ready to dig the line in the very center. It needs to be enough deep to make the detent go inside, but not too much deep to break the cylinder. And it needs to be enough width and long to fit the detent:
Reassembled the X52 Pro... I was both a little lucky and a little skilled, and now got a cool center detent!
My final suggestion is: DO NOT DO IT.
Attachments
Last edited:
