This guide covers how to export material from VR sculpting software Medium (free with an oculus Rift) and make them compatible to the Thememaker's toolkit (TMTK) to create Planet coaster custom assets. I will use an exemple to illustrate how to process your FBX file using blender and your texture files with photoshop.
In details, the guide will explain 1) how to export a model from medium, 2) import it to blender, 3) adjusts the physics, 4) create the UV maping for texture, 5) create the texture using image files, 6) create the levels of details for your 3d model, 7) export and package the file. There's also a last section about file size to help you make the best choices in your creation process.
PS: Same guide is also available as Steam guide here
Enjoy!
--------
Create a 3D model in Medium VR
First make your model in medium. Each clay layer in medium will be a specific texture material and will produce a texture map. Each layer will also becore a model in blender, use Ctrl+'J' to merge them. The UV processing in medium is very chunky, very bad to work with. If you wanna put any texture over your model other than simple red/green coloring that you can filter later, you will have to remap the model in blender. In other words, forget about hand painting the model in medium to add more stuff later. You can keep the surface, but you’re gonna be stuck with it’s current finish (smooth-diffuse style).
Export the model
Export your model in FBX.
In the options activate texture>PNG, choose resolution for the texture (1024 is good), and try to select the mesh with % compression/degradation that bring you as close as 8000 triangles as possible. TMTK has a max of 8000. The export will create the whole set of texture maps but the normal map is no good (you can try, I never got anything out of them). The base color map works fine, but is unintelligible if you wanna add or transform anything (chunks too small, seams really wrong, etc.).
Jump to blender

Open Blender, create a new file (Ctrl+N), and empty the content (no lights, cube or camera).
Import the FBX model (Menu File>import>FBX) you just exported from Medium.
Check or rename material(s) in the material(s) tab. This is the name of all your texture maps + _suffix of the particular map. For the whole guide, I will be using the name : 'Material'. My basic color texture map must have the name Material_BC.png
Rename the model if needed.
It's also very wise to save the blender file right now to be able to revert any transformation that makes you unhappy later on.
With all the specifics of the toolkit with the names. It's also a good idea to work in a clean folder structure. Ex : each model have their own folder with 1 subfolder named 'originals' for the originals FBX coming out of Medium, a second subfolder for the reworked meshes and texture called something like 'Final' + one more subfolder for each version. Take the structure you want, but you shouldn't destroy or overwrite the original exports from medium. Keeping things clean will make the packaging much easier later.
It's also a good idea to come up with your own standard for naming your materials. Since I use the folder system, I personnally use the name : 'mat1_mtl', ('mat2_mtl', 'mat3...etc) for all my texture, no matter the 3d model. That way I can swap flat textures easily and I don't need to remember the name.
Adjust position and size
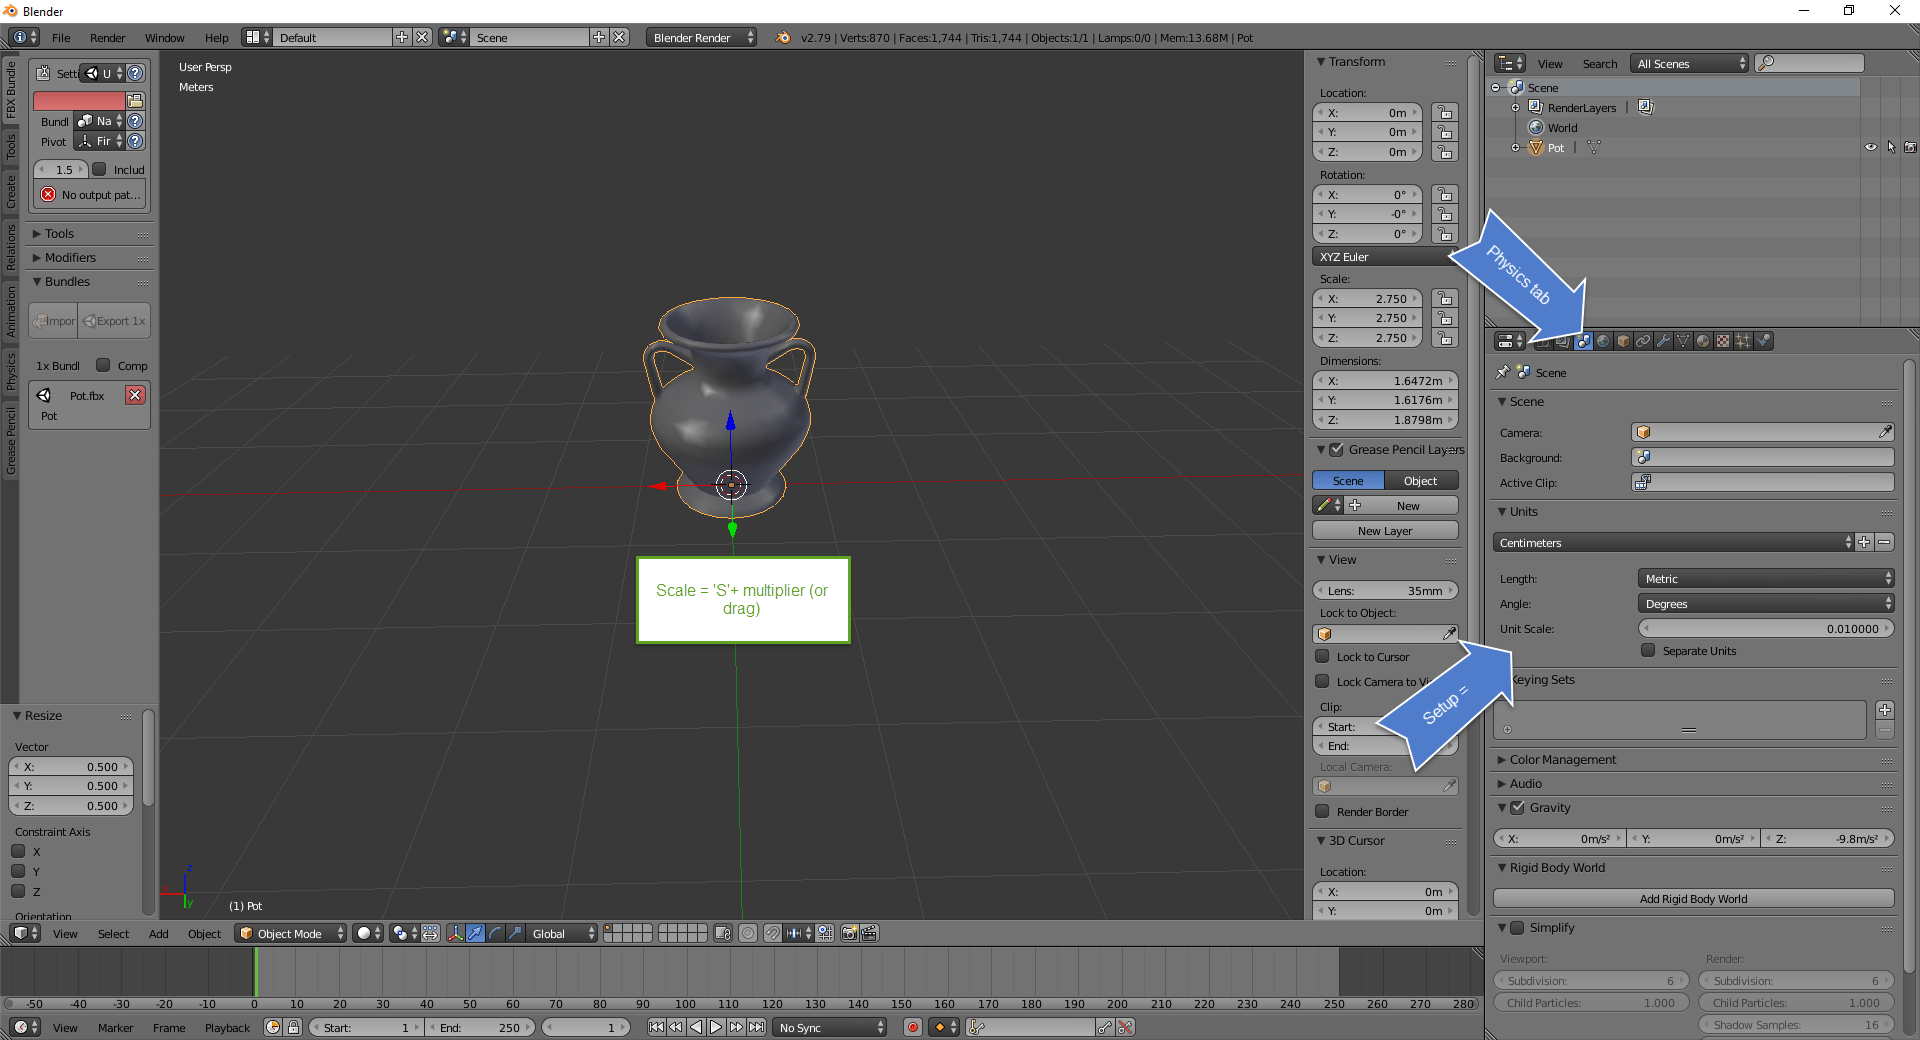
Place the model at the center. To adjust size… Go to physics tab, UNITS> Centimeter/Metric/Degree and then press ‘n’ to open the detail panel. Adjust size by pressing ‘s’ + [multiplier]. Ex: pressing ‘s’ +‘100’ will scale the model 100 times biger.
Now with the necessary weird rotation for the model to appear the right way in game ress ‘r’+’x-90’ and enter. Also, Press ‘r’+’y180’ [i.e. rotate on x axis by minus 90 than, on the y axis by 180]. Recenter model : Ctrl+’a’>Rotation and scale, Ctrl+’a’>Location. Don’t ask me why, it’s just that way! By pressing '1' [frontview] on the num keypad, you should see the bottom of your asset to be the right way up in game.
Make your mesh watertight

To clean up the mesh. Press ‘Tab’ to go edit mode. At the bottom menu : Mesh>Clean up> Fill Holes. You can also delete doubles and decimate geometry. But the filling of holes is very important or your model will be destroyed if it’s not watertight when you create the Level Of Details (LODs). Medium models are NOT watertight, they have cracks in them and they will become visible when you decimate the model making the LODs.
UV map the model
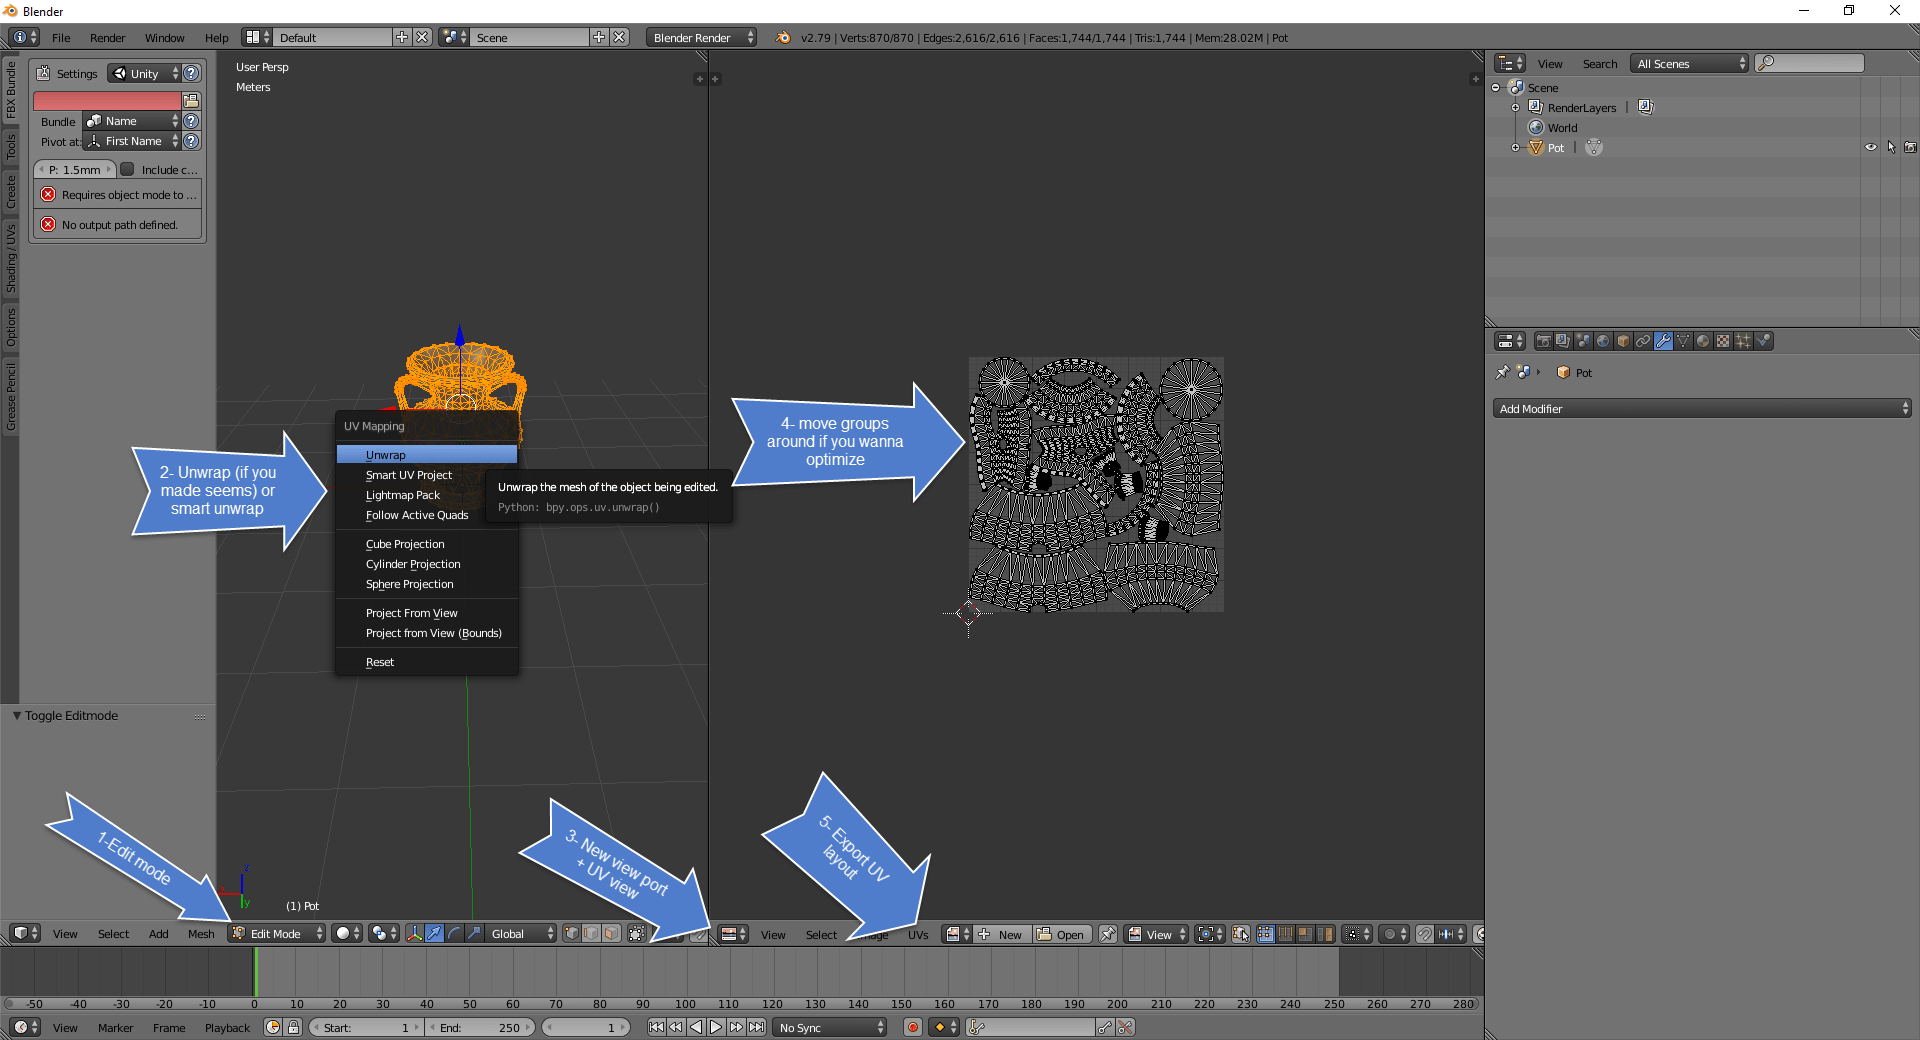
If you wanna keep the original texture file, skip this bit about UVs and texture, maybe you can change the resolution of the original or do some simple color sampling and filtering to create flexicolor options, but otherwise, this is the limit of the automatic mapping of medium. The name of your texture file MUST be the same as the material name in Blender + add '_BC' at the end. Only PNGs will be accepted.
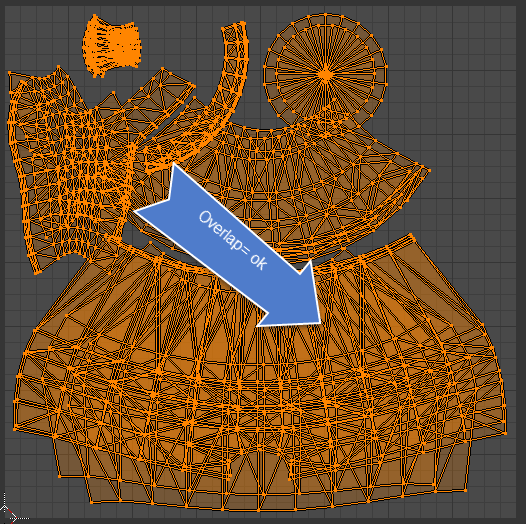
To remake the UV map of the model, Go in edit mode, work your seams (where your texture will be cut up) if you can (Ctrl+’E’>marks seams), then press ‘U’ Smart UV unwrap. Open a second view port and use UV View to look at the map you created. You can work your seams; move the groups of faces on the map until you are satisfied. Unwrap as many times as you want. You can export the UV Layout by pressing (at bottom of the page) UVs>Export UV layout. The toolkit handle overlap very well but don’t support tillable generated (in other words…your mesh has to fit in the sqare map whatever the resolution).
Have fun playing with texture in Photoshop. Simply use the UV layout to play with different textures (use the ones made for 3D with normal maps, MT, AO etc).

You can also create free style (with bush or custom shapes on a transparent background) and use the photoshop filter > ‘create normal map' to create engravings with a copy of your decal. Merge the 2 normals (with your decal on top) to create the new one. (Nvidia also as an addon if you got an old photoshop, like I do).
To create the ambient occlusion map, use the drop shadow effect at distance = 0 and play with the size and spread. For the other maps of your decal, you can use similar method depending on the wanted effect (Changing opacity, or sometime an invert do just what you want to make a metalness map or roughness map).

Editorial section....
DON'T STEAL texures (and models for that matter). There's plenty of sites with open copyright for very good quality texture so you DON'T NEED TO STEAL STUFF! It's also totally fine to give credit to the artist even if he does't legally require it.
-end of the editorial-
Here's a ''gifts'' for you to play with : decal of princess Amelie. To the left you have the Basic color and to the right you have the normal map. Have fun!


Make a flexicolor
To make Flexicolors with your texture
Open your texture basic color in photoshop.
Make a copy of your basic color layer.
On the copy, Menu >Select>Color range – and select the color you want to be your first flexicolor than press 'OK'. Use the bucket with white on a blank layer with your selection still active. Create a new layer under the one you just made. Bucket black the whole layer. Save (Save for web Ctrl+Alt+Shift+S > PNG) the result as Material_F1.PNG The white bits will be colourable by the user.
Repeat process with another color….. name Material_F2.PNG etc…. F3… up to F4.
Last, you need to adjust the Basic color image (Material_BC.png) so that the flexi will have the desired strength. For maximum, use all white layers you created like they are white masks on the desaturated Basic Color layer. Save result as the new Material_BC.png file.
This particular texture comes from Poliigon - ... the guy from the donut tutorial..
Create Levels of details
Back to Blender...
Levels of details are the specific degradation of quality you plan for your model as the game user zoom away from it. [Wow that was so good a definition, can't believe I made it!]
To create Levels of Details (LOD) use Blender addon FBX Bundle. On the tab that will apear once installed : FBXaddon > modifiers> LOD : steps = 6, Quality = 0.05. Apply.
Also, change the names of models to end with their respective level of detail suffix. Ex: Model_L0/Model_L2/Model_L3/Model_L4/Model_L5…
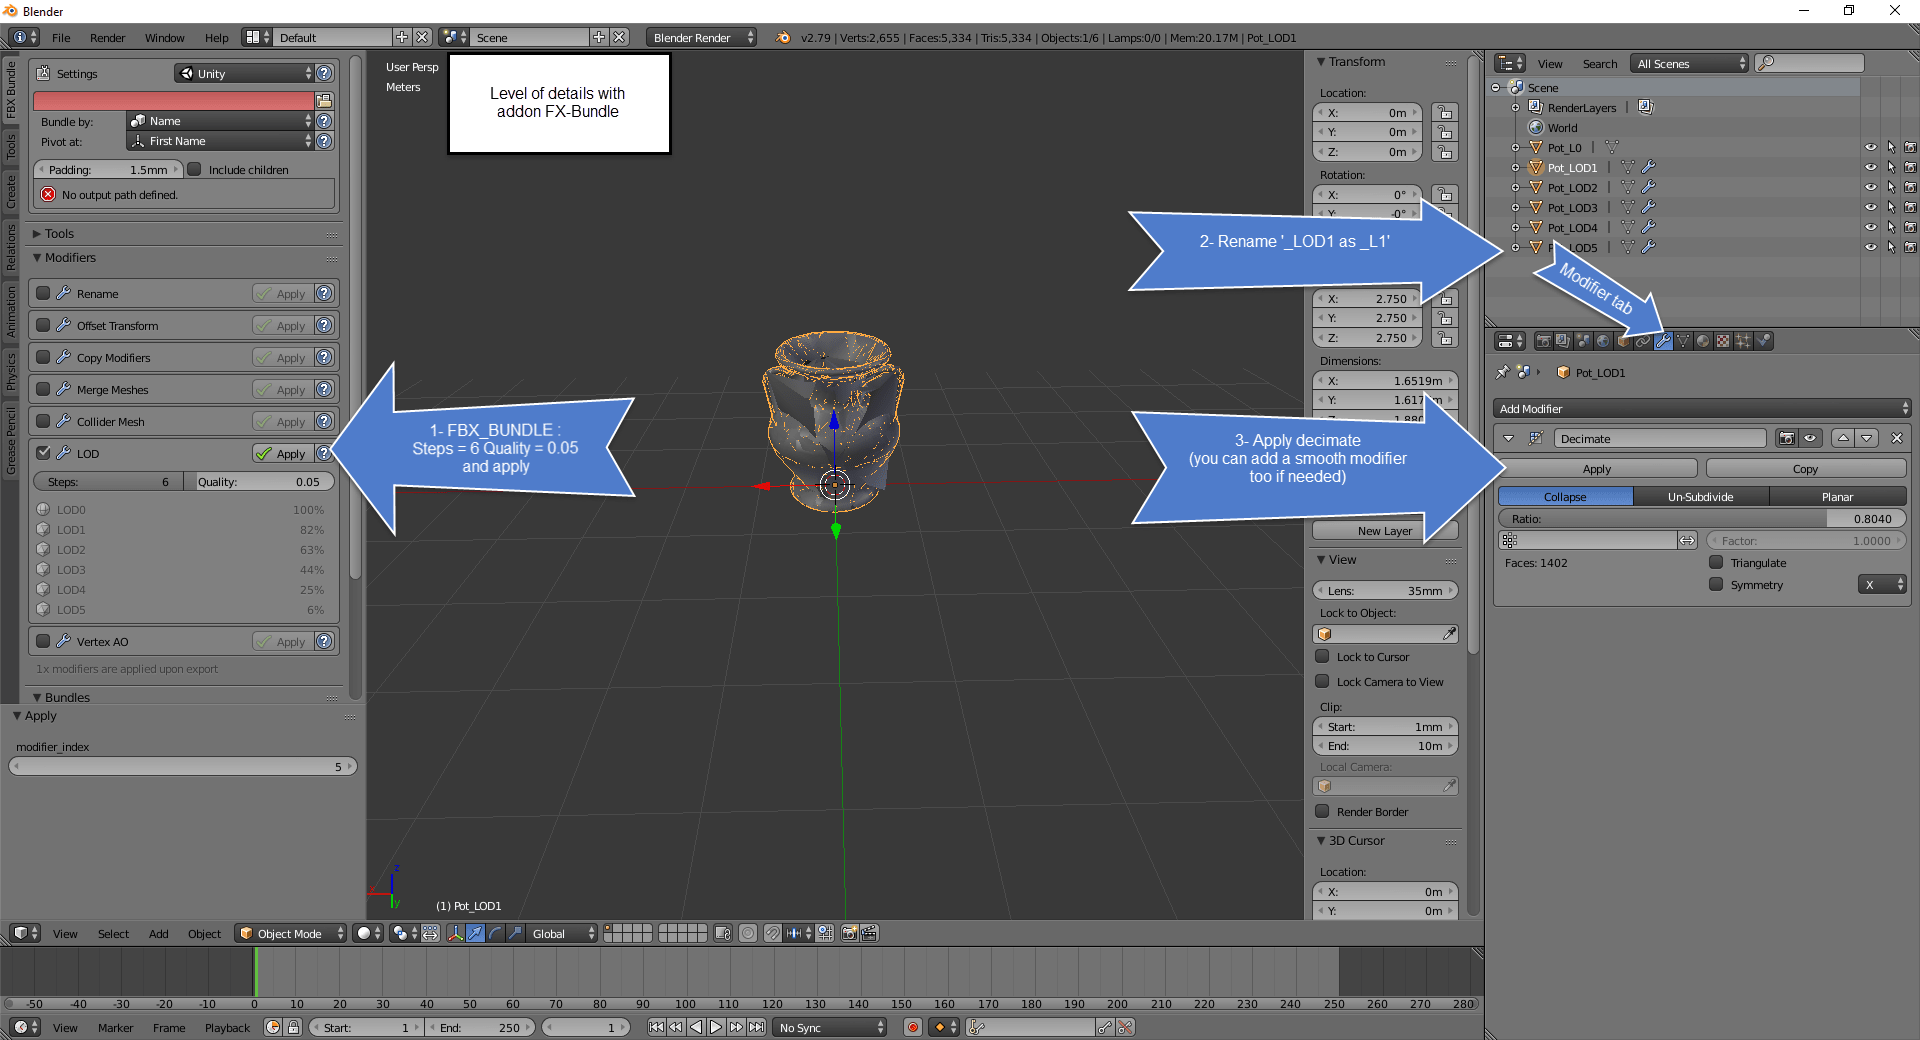
(Get that FBX Bundle: https://bitbucket.org/renderhjs/ble...BU_-FNaOiNokepSZJJRFTxI1ZUXQG783eo882qx82pq84)
You also need to confirm the modifier in the modifier tab, for each LOD model by pressing ‘apply’ decimate for each LOD.
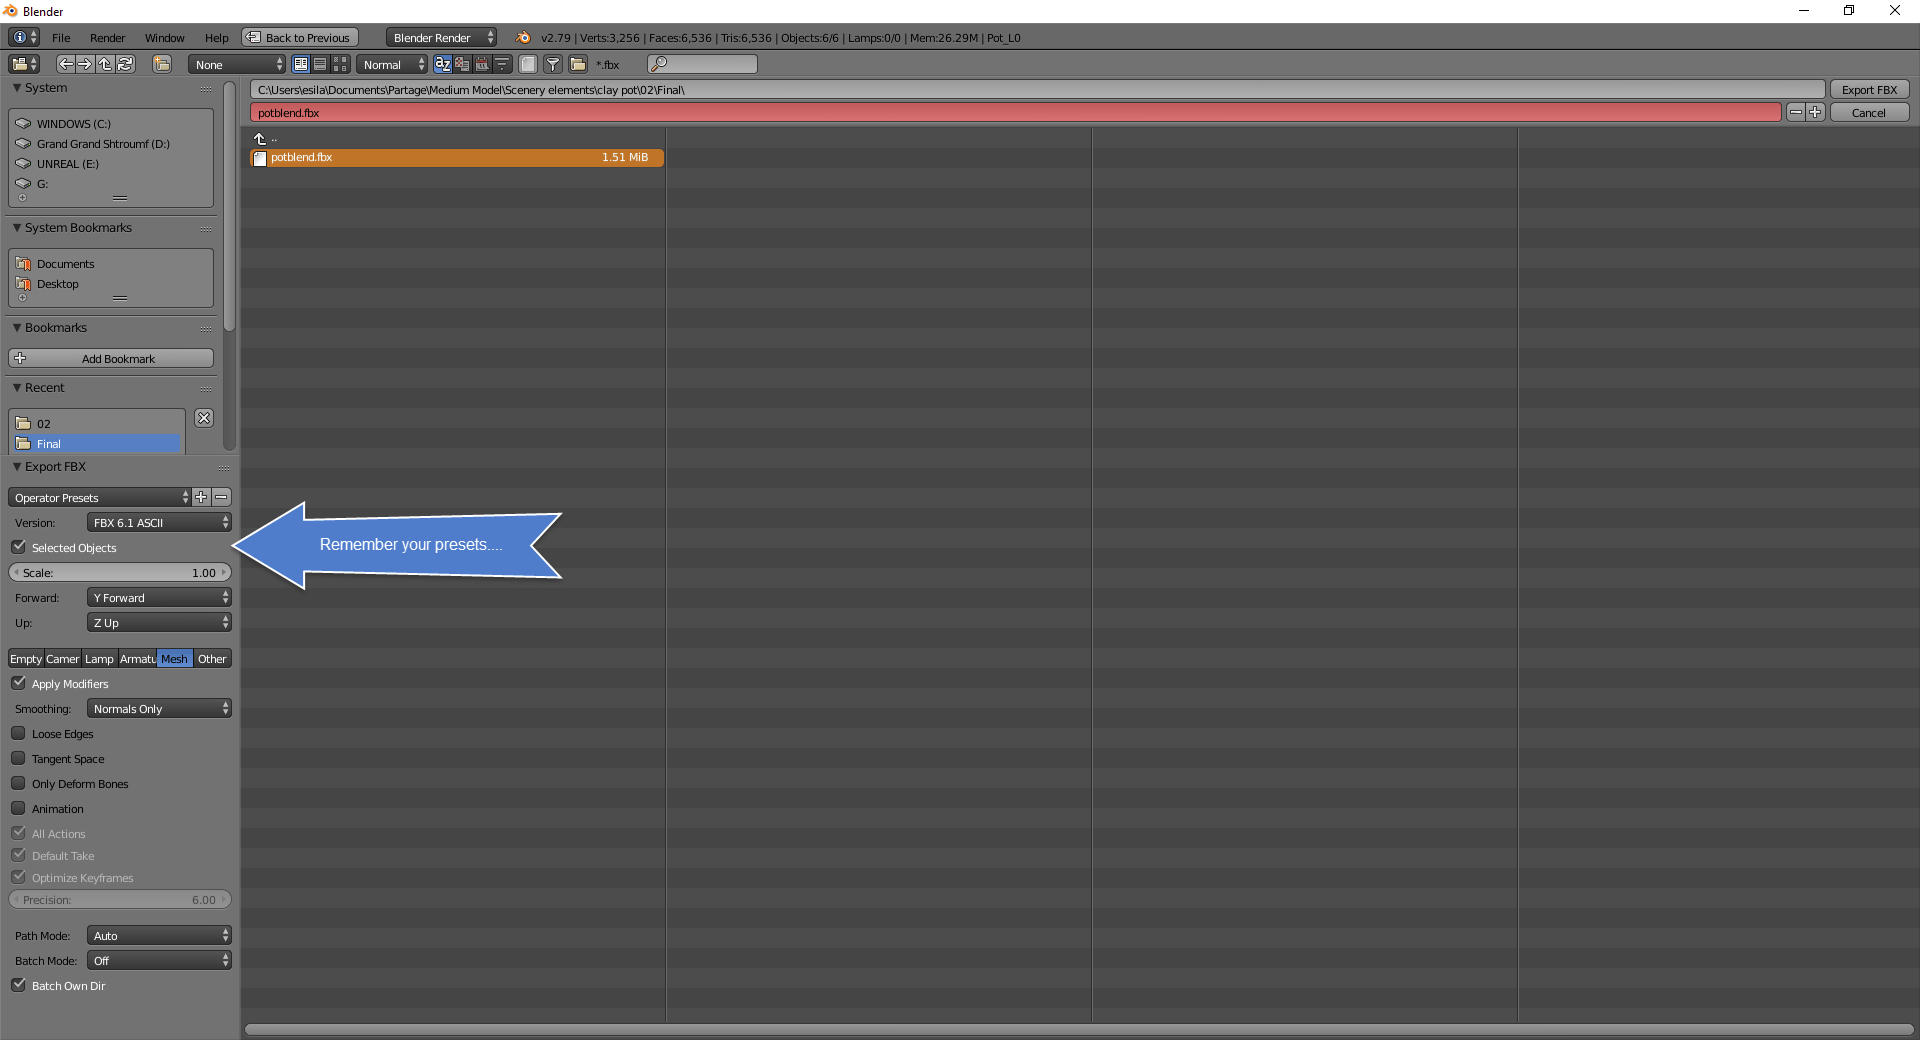
Export model from blender
Select all models, Menu File>Export>.fbx. Choose the correct settings for the toolkit specification : ASCII 6.1, Y forward, Z up, selected only… etc. (and save profile if you didn’t already).
Make icon and test
I like to take a small capture of the blender model to use as an icon for the very first one, but It can be whatever you want. You NEED to put a small icon.png.
Compress all the texture files, the model, the icon in a .zip. Send to the tmtk on the website, and test ingame (all options on the website are self explanatory).
If you’re happy, take a capscreen ingame to make the final icon.
If you want your icon to look like ingame : Clean the background so it’s transparent and use a sqare image. Compression of this image will reduce the size of your final file.
About file size
Compression of texture maps won’t change a thing. Number of maps won’t affect either (it's the workflow that matters), the resolution will affect the most.
Flexicolor layers can be saved at a lower resolution (256x256 usually do) and will help the file size too. All textures other than the flexi must be of the same size (512 is a very nice ingame resolution for moderately small objects and Mesh overlap). The texture resolution is what affect the file size the most. A model with correct LOD using max triangles (8K is your maximum for any file you send to TMTK) ends up being less than 1MB. The rest is mainly material information, so don’t put unwanted information on your texture map, use black in between islands with a little bleed (remember the LOD degradation will need a little wiggle room on your map, the same map applies to all LODs). You can overlaps your meshes on your texture map to optimize. Of course, the ingame size of the asset must be taken into account : a tiny asset ingame, or a uniform solid color don't need a lot of pixels, but a huge 8m x4m object do need hi-resolution to be any good. Test and compare results. Post your best!
Resolution/file size
So far, for me assets were under a MB for a 256x256 map set, 1.5MB for 512x512 and about 4.5MB for 1024x1024. You can crank it up to 2048x2048, witch is the maximum 'budget', your size should be around 12MB (with no animation). I hope that helps a little all this debate about the file size in the TMTK. All and all, I don't think that the handeling of graphics is any weak point of Cobra engine and Planco. But yeah, using huge size in assets for no particular reason is not good habbit, just make reasonable choices all along the process and this won't be a problem. (in other words, don't put solid unified textures at 2048x2048, it's just stupid!) With basic understanding of graphic arts, you should be ok!
That's it, you should have a perfectly original homemade asset to share on Steam !
Feel free to give me your feedback!
In details, the guide will explain 1) how to export a model from medium, 2) import it to blender, 3) adjusts the physics, 4) create the UV maping for texture, 5) create the texture using image files, 6) create the levels of details for your 3d model, 7) export and package the file. There's also a last section about file size to help you make the best choices in your creation process.
PS: Same guide is also available as Steam guide here
Enjoy!
--------
Create a 3D model in Medium VR
First make your model in medium. Each clay layer in medium will be a specific texture material and will produce a texture map. Each layer will also becore a model in blender, use Ctrl+'J' to merge them. The UV processing in medium is very chunky, very bad to work with. If you wanna put any texture over your model other than simple red/green coloring that you can filter later, you will have to remap the model in blender. In other words, forget about hand painting the model in medium to add more stuff later. You can keep the surface, but you’re gonna be stuck with it’s current finish (smooth-diffuse style).
Export the model
Export your model in FBX.
In the options activate texture>PNG, choose resolution for the texture (1024 is good), and try to select the mesh with % compression/degradation that bring you as close as 8000 triangles as possible. TMTK has a max of 8000. The export will create the whole set of texture maps but the normal map is no good (you can try, I never got anything out of them). The base color map works fine, but is unintelligible if you wanna add or transform anything (chunks too small, seams really wrong, etc.).
Jump to blender
Open Blender, create a new file (Ctrl+N), and empty the content (no lights, cube or camera).
Import the FBX model (Menu File>import>FBX) you just exported from Medium.
Check or rename material(s) in the material(s) tab. This is the name of all your texture maps + _suffix of the particular map. For the whole guide, I will be using the name : 'Material'. My basic color texture map must have the name Material_BC.png
Rename the model if needed.
It's also very wise to save the blender file right now to be able to revert any transformation that makes you unhappy later on.
With all the specifics of the toolkit with the names. It's also a good idea to work in a clean folder structure. Ex : each model have their own folder with 1 subfolder named 'originals' for the originals FBX coming out of Medium, a second subfolder for the reworked meshes and texture called something like 'Final' + one more subfolder for each version. Take the structure you want, but you shouldn't destroy or overwrite the original exports from medium. Keeping things clean will make the packaging much easier later.
It's also a good idea to come up with your own standard for naming your materials. Since I use the folder system, I personnally use the name : 'mat1_mtl', ('mat2_mtl', 'mat3...etc) for all my texture, no matter the 3d model. That way I can swap flat textures easily and I don't need to remember the name.
Adjust position and size
Place the model at the center. To adjust size… Go to physics tab, UNITS> Centimeter/Metric/Degree and then press ‘n’ to open the detail panel. Adjust size by pressing ‘s’ + [multiplier]. Ex: pressing ‘s’ +‘100’ will scale the model 100 times biger.
Now with the necessary weird rotation for the model to appear the right way in game
ress ‘r’+’x-90’ and enter. Also, Press ‘r’+’y180’ [i.e. rotate on x axis by minus 90 than, on the y axis by 180]. Recenter model : Ctrl+’a’>Rotation and scale, Ctrl+’a’>Location. Don’t ask me why, it’s just that way! By pressing '1' [frontview] on the num keypad, you should see the bottom of your asset to be the right way up in game.Make your mesh watertight
To clean up the mesh. Press ‘Tab’ to go edit mode. At the bottom menu : Mesh>Clean up> Fill Holes. You can also delete doubles and decimate geometry. But the filling of holes is very important or your model will be destroyed if it’s not watertight when you create the Level Of Details (LODs). Medium models are NOT watertight, they have cracks in them and they will become visible when you decimate the model making the LODs.
UV map the model
If you wanna keep the original texture file, skip this bit about UVs and texture, maybe you can change the resolution of the original or do some simple color sampling and filtering to create flexicolor options, but otherwise, this is the limit of the automatic mapping of medium. The name of your texture file MUST be the same as the material name in Blender + add '_BC' at the end. Only PNGs will be accepted.
To remake the UV map of the model, Go in edit mode, work your seams (where your texture will be cut up) if you can (Ctrl+’E’>marks seams), then press ‘U’ Smart UV unwrap. Open a second view port and use UV View to look at the map you created. You can work your seams; move the groups of faces on the map until you are satisfied. Unwrap as many times as you want. You can export the UV Layout by pressing (at bottom of the page) UVs>Export UV layout. The toolkit handle overlap very well but don’t support tillable generated (in other words…your mesh has to fit in the sqare map whatever the resolution).
Have fun playing with texture in Photoshop. Simply use the UV layout to play with different textures (use the ones made for 3D with normal maps, MT, AO etc).
You can also create free style (with bush or custom shapes on a transparent background) and use the photoshop filter > ‘create normal map' to create engravings with a copy of your decal. Merge the 2 normals (with your decal on top) to create the new one. (Nvidia also as an addon if you got an old photoshop, like I do).
To create the ambient occlusion map, use the drop shadow effect at distance = 0 and play with the size and spread. For the other maps of your decal, you can use similar method depending on the wanted effect (Changing opacity, or sometime an invert do just what you want to make a metalness map or roughness map).
Editorial section....
DON'T STEAL texures (and models for that matter). There's plenty of sites with open copyright for very good quality texture so you DON'T NEED TO STEAL STUFF! It's also totally fine to give credit to the artist even if he does't legally require it.
-end of the editorial-
Here's a ''gifts'' for you to play with : decal of princess Amelie. To the left you have the Basic color and to the right you have the normal map. Have fun!
Make a flexicolor
To make Flexicolors with your texture
Open your texture basic color in photoshop.
Make a copy of your basic color layer.
On the copy, Menu >Select>Color range – and select the color you want to be your first flexicolor than press 'OK'. Use the bucket with white on a blank layer with your selection still active. Create a new layer under the one you just made. Bucket black the whole layer. Save (Save for web Ctrl+Alt+Shift+S > PNG) the result as Material_F1.PNG The white bits will be colourable by the user.
Repeat process with another color….. name Material_F2.PNG etc…. F3… up to F4.
Last, you need to adjust the Basic color image (Material_BC.png) so that the flexi will have the desired strength. For maximum, use all white layers you created like they are white masks on the desaturated Basic Color layer. Save result as the new Material_BC.png file.
This particular texture comes from Poliigon - ... the guy from the donut tutorial..
Create Levels of details
Back to Blender...
Levels of details are the specific degradation of quality you plan for your model as the game user zoom away from it. [Wow that was so good a definition, can't believe I made it!]
To create Levels of Details (LOD) use Blender addon FBX Bundle. On the tab that will apear once installed : FBXaddon > modifiers> LOD : steps = 6, Quality = 0.05. Apply.
Also, change the names of models to end with their respective level of detail suffix. Ex: Model_L0/Model_L2/Model_L3/Model_L4/Model_L5…
(Get that FBX Bundle: https://bitbucket.org/renderhjs/ble...BU_-FNaOiNokepSZJJRFTxI1ZUXQG783eo882qx82pq84)
You also need to confirm the modifier in the modifier tab, for each LOD model by pressing ‘apply’ decimate for each LOD.
Export model from blender
Select all models, Menu File>Export>.fbx. Choose the correct settings for the toolkit specification : ASCII 6.1, Y forward, Z up, selected only… etc. (and save profile if you didn’t already).
Make icon and test
I like to take a small capture of the blender model to use as an icon for the very first one, but It can be whatever you want. You NEED to put a small icon.png.
Compress all the texture files, the model, the icon in a .zip. Send to the tmtk on the website, and test ingame (all options on the website are self explanatory).
If you’re happy, take a capscreen ingame to make the final icon.
If you want your icon to look like ingame : Clean the background so it’s transparent and use a sqare image. Compression of this image will reduce the size of your final file.
About file size
Compression of texture maps won’t change a thing. Number of maps won’t affect either (it's the workflow that matters), the resolution will affect the most.
Flexicolor layers can be saved at a lower resolution (256x256 usually do) and will help the file size too. All textures other than the flexi must be of the same size (512 is a very nice ingame resolution for moderately small objects and Mesh overlap). The texture resolution is what affect the file size the most. A model with correct LOD using max triangles (8K is your maximum for any file you send to TMTK) ends up being less than 1MB. The rest is mainly material information, so don’t put unwanted information on your texture map, use black in between islands with a little bleed (remember the LOD degradation will need a little wiggle room on your map, the same map applies to all LODs). You can overlaps your meshes on your texture map to optimize. Of course, the ingame size of the asset must be taken into account : a tiny asset ingame, or a uniform solid color don't need a lot of pixels, but a huge 8m x4m object do need hi-resolution to be any good. Test and compare results. Post your best!
Resolution/file size
So far, for me assets were under a MB for a 256x256 map set, 1.5MB for 512x512 and about 4.5MB for 1024x1024. You can crank it up to 2048x2048, witch is the maximum 'budget', your size should be around 12MB (with no animation). I hope that helps a little all this debate about the file size in the TMTK. All and all, I don't think that the handeling of graphics is any weak point of Cobra engine and Planco. But yeah, using huge size in assets for no particular reason is not good habbit, just make reasonable choices all along the process and this won't be a problem. (in other words, don't put solid unified textures at 2048x2048, it's just stupid!) With basic understanding of graphic arts, you should be ok!
That's it, you should have a perfectly original homemade asset to share on Steam !
Feel free to give me your feedback!