You are using an out of date browser. It may not display this or other websites correctly.
You should upgrade or use an alternative browser.
You should upgrade or use an alternative browser.
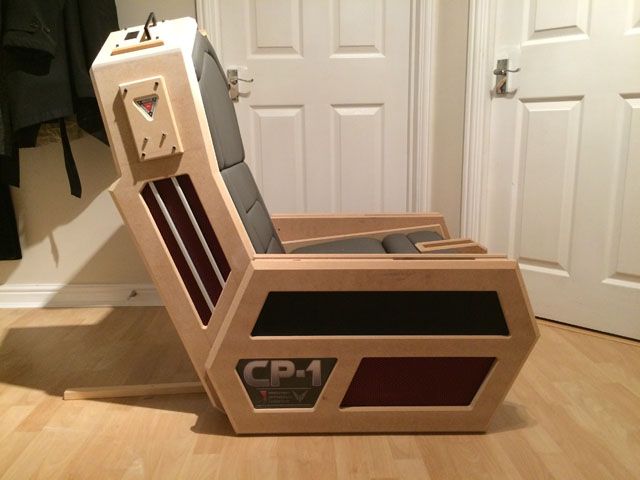
Community Event / Creation The C-Pod: A DIY Command seat (build log)
- Thread starter ThereIs0nly0ne
- Start date
Mine has a knowing "you owe ma a Cartier" look on her face. Well, it is our 20 wedding anniversary soon ...
We in the pigfumbler household are having a moments silence to mourn the passing of a large sum of money
")
Excellent work yet again TIOO, looking gorgeous and I think that ejection seat symbol and LEDs will be brilliant!
check out http://www.thewayiplay.com really good place for info on button box's and building your own stuff.
It's a joy following this thread! Good work Commander!
Thanks medwyn, I'm glad you're enjoying it !
Amazing work... I wish I had the patience & skill you have! Look forward to more pics.
Thanks R1Pilot and no worries there. More pictures incoming
We in the pigfumbler household are having a moments silence to mourn the passing of a large sum of money
Excellent work yet again TIOO, looking gorgeous and I think that ejection seat symbol and LEDs will be brilliant!
Thanks again PF and she absolutely deserves it. She's the type that will never buy things for herself unless I encourage her to do so!
check out http://www.thewayiplay.com really good place for info on button box's and building your own stuff.
Thanks Smackz and nice to see a fellow TWIP'er frequenter here! I've been active on that site since it first started - it's the only place I have all my projects logged
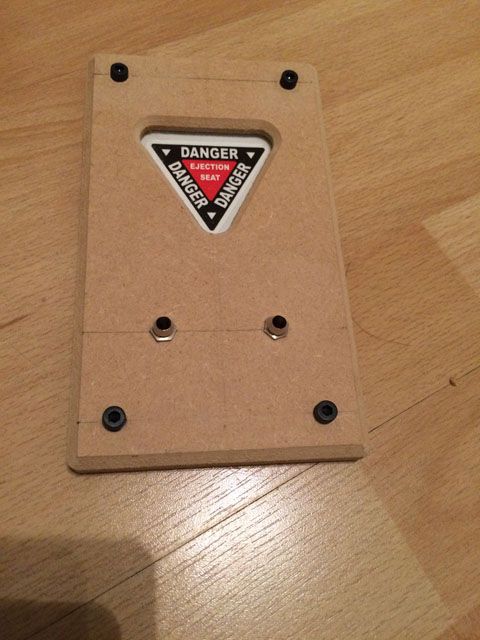
Yes, definitely a great place for building ideas and button boxes as is InsideSimRacing.These have taken about 3 hours to do so far. Side panels for the ejection seat and LEDs. I went wrong 3 times with these:

The side panels have been completed:
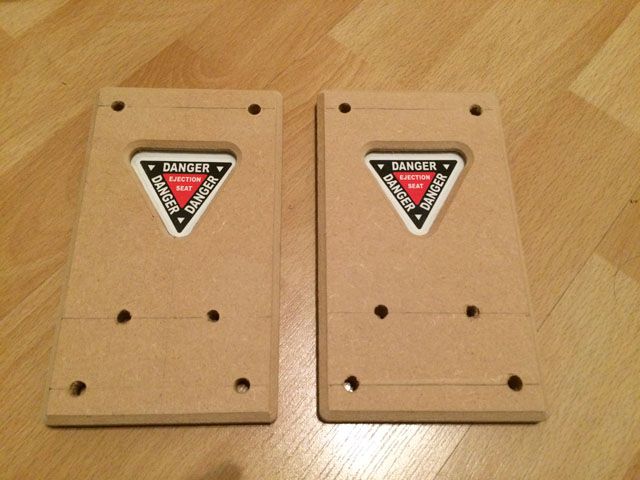
With LED bezels and cap head bolts (I will be using slightly larger ones when they arrive):

With LED bezels and cap head bolts (I will be using slightly larger ones when they arrive):

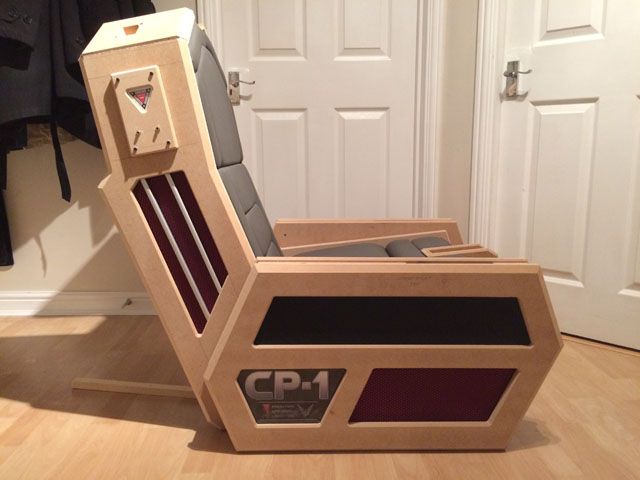
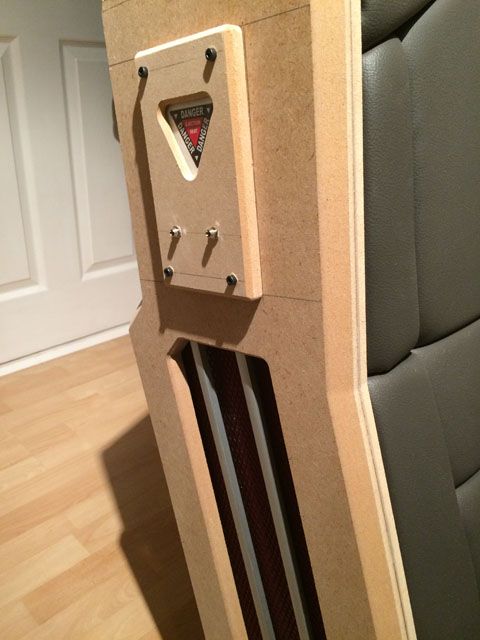
Panel fitted to the side:


Got space for a couple of bottles of Lavian Brandywine behind there??
Pretty sure Freeport Security Scans don't check the lining of your seat,
Unless they find the Slaves .. in the hold .. I suppose ...
Pretty sure Freeport Security Scans don't check the lining of your seat,
Unless they find the Slaves .. in the hold .. I suppose ...
Panel fitted to the side:
Oooooh yes. That looks sooo good!
Got space for a couple of bottles of Lavian Brandywine behind there??
Pretty sure Freeport Security Scans don't check the lining of your seat,
Unless they find the Slaves .. in the hold .. I suppose ...
Oh yes! They're encased in Thargoid chitin containers to keep them warm
Oooooh yes. That looks sooo good!
Thanks PF
They were a lot of work, much more than I thought. I'll be doing the panels for the tops of the shoulders next.The top handle / display panels have been made:


Everything you built so far looks amazing. Cannot be said often enough. Fantastic work!!
Your seat needs a cupholder though.
Your seat needs a cupholder though.
Thanks PsychoFish. Working on an anti gravity drinks dispenser
I've been keen to fill the sections where the side panels meet the shoulder panels just to ensure that everything lines up correctly.
Before:
After a first pass of filler:

One of the new panels fitted:
Powered:
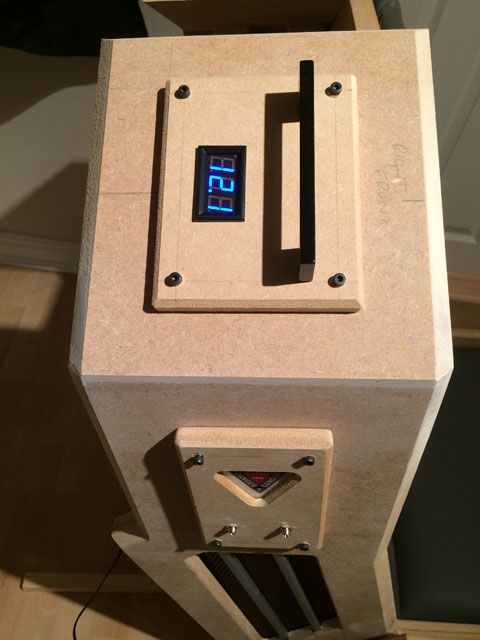
The balance of the design will be improved when the headrest is made. These will have the cutouts/windows which will use the ribbed rubber sheeting.
I've been keen to fill the sections where the side panels meet the shoulder panels just to ensure that everything lines up correctly.
Before:

After a first pass of filler:


One of the new panels fitted:

Powered:

The balance of the design will be improved when the headrest is made. These will have the cutouts/windows which will use the ribbed rubber sheeting.
Thanks PsychoFish. Working on an anti gravity drinks dispenser
I've been keen to fill the sections where the side panels meet the shoulder panels just to ensure that everything lines up correctly.
Before:
After a first pass of filler:
One of the new panels fitted:
Powered:
The balance of the design will be improved when the headrest is made. These will have the cutouts/windows which will use the ribbed rubber sheeting.
Thats a very nice bit of finishing TIOO and that panel looks cracking! Amazing work as always!
Avago Earo
Banned
It's an inspiration for sure.
Every time I look at this thread I end up looking at my tool box. I've got some MDF left over from building a vocal booth
Every time I look at this thread I end up looking at my tool box. I've got some MDF left over from building a vocal booth
Thats a very nice bit of finishing TIOO and that panel looks cracking! Amazing work as always!
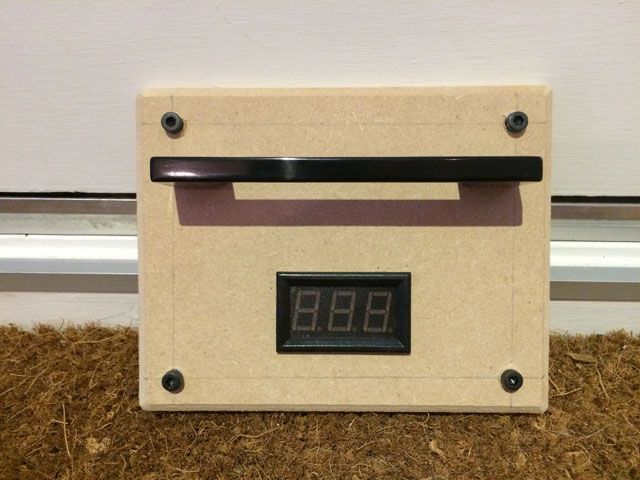
Cheers PF. I'm going to hook it up to an LED controller which will hopefully make the display change readings.
It's an inspiration for sure.
Every time I look at this thread I end up looking at my tool box. I've got some MDF left over from building a vocal booth
Thanks Avago
I can hear those tools and MDF sheets calling ... go on!Man not being able to see this beauty when you're wearing the oculus would be such a shame, maybe go full on nutter butters like this fellow (might not go over well with the missus )
https://www.youtube.com/watch?v=J5BmA3ejyHY
)https://www.youtube.com/watch?v=J5BmA3ejyHY
Rafe Zetter
Banned
My wife read over my shoulder and asked if I was going to build myself a "chair". Bless her, if only I could build like that, I would
Edit: Forgot to add: Headrest can play havoc with OR/DK2 and a headset. I constantly bump my headset from turning my head with the DK2 on, it turns the volume down on my G903's.
Edit2: Have you ever done a cost analyst vs. pine or maybe a hardwood? Imagine that in a Honduran Mahogany with brushed aluminium accents and charcoal grey upholstery........or like it is now which is equally as nice, just different
Oh you person of questionable parentage...... I'm almost drooling. But there is a way to get a super lux version... Veneer. Imagine a Padauk veneer version (Padauk is a reddish purple hardwood). If it wasn't for the fact my stash of Padauk veneer cost a weeks wages I'd use it
(Padauk Box - I swear ONE DAY I'll own a box like this)
Rafe Zetter
Banned
Hey Rog, yes it does. Here's a mini tutorial:
This is a technique I've used frequently and provides consistent results. There are doubtless many other ways of achieving similar results but this is one which I'm happy with. Preparation is always key for a good finish.
Tools and product used for this are as follows: P38 car body filler, sanding block, sandpaper (40/80, 180 and 300 grit or thereabouts), water based undercoat, water based blackboard paint, water based polyurethane varnish, paintbrush, small foam roller and tray.
The first step is to address the cut and beveled edges of the MDF as this soaks up paint and firs up horribly. Other people have recommended various other options such as sealing with PVA glue and using various 2-pac paints - by all means use/try these. Taking some P38, mix thoroughly and apply fairly liberally to the cut edges. This stuff dries very fast so you will need to work quickly. I would suggest working on larger pieces in sections and re-mixing/applying more as necessary rather than trying to cover the entire piece in one pass.


Have I mentioned my variation on this method? All of the above (well almost) but thin out the P38 body filler with fibreglassing resin. The two mix well no problems and it thins the filler to a point it can be painted on almost. Goes on thin and soaks into the fibres of the MDF as well giving a great bond.
It requires less sanding, makes the filler go further so less product used, and can be used to mold shapes and fill voids too.
Only thing to bear in mind is use twice as much catalyst, the retarding agent in the fibreglassing resin means it dries much slower - from liquid to rubbery about 20+ minutes if you use just the normal amount of catalyst, which sometimes this can be in your favor, but for angled, vertical surfaces it'll run all over the place if you don't speed it up !
For smaller areas buy el cheapo poundshop superglue (it's thin like water), I use it for toughening up the edges of thin plywood, so they don't split and fray, and can be sanded to a superfine finish. I've also used it instead of oil based varnish, it makes the wood tough as nails and resistant to dings.
Last edited: