We've all gotten tired of pulling up in a dogfight and having the joystick come with us, or explaining to the odd friend or relative that pushing the throttle so far forward that it tips the base on edge doesn't make you go any faster so I thought I would put together a short guide on making a very cheap, very simple desk mounting system that anyone with half an hour and limited tools can make. You will be blown away at how easy and effective this is. The measurements are designed to accommodate a Saitek X55, but will work just as well with an X52 or X52 Pro - Just double check the base dimensions.
The End Result:

I've gone for simplicity of design here. There is a great deal that can be done to improve the design but I wanted to put something up that would do the job well with as little effort and could have directions that are clear to someone with zero woodworking experience. There is a reason I titled it "Simply Sufficient".
**Disclaimer - Use all possible care when working on this or similar projects. It is very possible to cause yourself permanent injury when working with power tools or sharp objects. If you don't know how to work safely ask for help from someone who does**
Supplies
1/2" 2'x4' Medium Density Fiberboard - This is cheap splinter free wood that is easy to work with. It cost me all of $9.97 at home depot. The material is enough for 4 mounts, so you can make several mistakes and still have plenty of material to work with - or pass to a friend for their use.
Necessary Tools
Pencil - Measure then mark your cuts. Then measure again to be sure. Once you start cutting it's way too late to realize you've made a mistake
Measuring tape - See above
Eye Protection - Take care that you don't injure yourself by getting a foreign body in your eye.
Saw - The size of some of your cuts will be dictated by your desk and whether it has a lip or not. Plan ahead.
Recommended Additional Tools
Triangle and Square / Straight Edge - It was much easier to make certain that my cuts were straight when I knew my marks were straight themselves.
Dremel - I found that because I had to account for a lip it was much easier to work in the small area with a dremel than trying to cut it out using a saw. Alternatively you could probably use a drill.
Clamp - It will be easier and safer to cut the board if you clamp it in place first
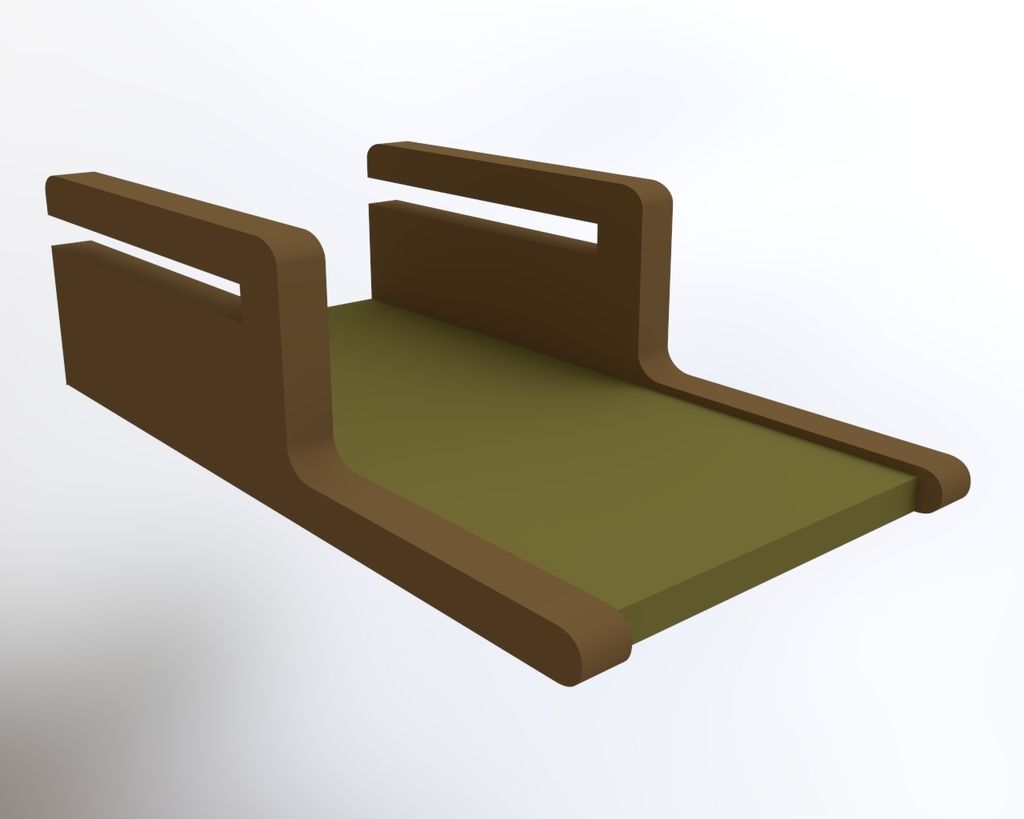
The Pattern:
 You'll need to mark out 4 of these, two for each part of your HOTAS.
Take measurements of your desk thickness and lip and make adjustments to the design where indicated in the image. If you do not have a lip on your desk you do not need to cut out the channel. Simply make the cut the same width as your desk is thick.
If you do have a lip be sure to save the excess wood you remove from the form as it makes an excellent shim. In my case my desk had a 1 inch lip - since the board is 1/2 inch thick I was able to place the 8 3/4 long pieces I'd cut out between the bracketing arms making for a very snug and secure fit.
If you use the board I suggested you can fit all four of these stacked length-wise on top of each other and will use only ~half the wood.
After you've gotten your four pieces, clean up any ragged edges. You shouldn't need to worry about splinters at all since it's particle board.
Slide two pieces onto your desk, parallel to each other at the position you want to have your joystick or throttle. If you need to do any shimming to secure them now is the time.

Once the two pieces are secure place your joystick or throttle in the cradle arms. If you've cut the pieces properly you'll get a snug, secure fit, without needing any hardware.
Repeat the process for your remaining component. Make certain that you have placed them securely before letting go.
The upper portions of the mounts should be long enough and positioned in such a way as to facilitate placement of your keyboard on top as I have done in the picture:

Room for Improvement
I'll include a few extra pictures below to give some better perspective of the design. I hope that this design will either be of use to you or will spark a bigger better idea for one of your own.


I've started on some improvements and finishing touches to this project that I will post in the next day or so as I finish it.
Got an idea of your own? Post it below and share with the rest of us!
The End Result:
I've gone for simplicity of design here. There is a great deal that can be done to improve the design but I wanted to put something up that would do the job well with as little effort and could have directions that are clear to someone with zero woodworking experience. There is a reason I titled it "Simply Sufficient".
**Disclaimer - Use all possible care when working on this or similar projects. It is very possible to cause yourself permanent injury when working with power tools or sharp objects. If you don't know how to work safely ask for help from someone who does**
Supplies
1/2" 2'x4' Medium Density Fiberboard - This is cheap splinter free wood that is easy to work with. It cost me all of $9.97 at home depot. The material is enough for 4 mounts, so you can make several mistakes and still have plenty of material to work with - or pass to a friend for their use.
Necessary Tools
Pencil - Measure then mark your cuts. Then measure again to be sure. Once you start cutting it's way too late to realize you've made a mistake
Measuring tape - See above
Eye Protection - Take care that you don't injure yourself by getting a foreign body in your eye.
Saw - The size of some of your cuts will be dictated by your desk and whether it has a lip or not. Plan ahead.
Recommended Additional Tools
Triangle and Square / Straight Edge - It was much easier to make certain that my cuts were straight when I knew my marks were straight themselves.
Dremel - I found that because I had to account for a lip it was much easier to work in the small area with a dremel than trying to cut it out using a saw. Alternatively you could probably use a drill.
Clamp - It will be easier and safer to cut the board if you clamp it in place first
The Pattern:
Take measurements of your desk thickness and lip and make adjustments to the design where indicated in the image. If you do not have a lip on your desk you do not need to cut out the channel. Simply make the cut the same width as your desk is thick.
If you do have a lip be sure to save the excess wood you remove from the form as it makes an excellent shim. In my case my desk had a 1 inch lip - since the board is 1/2 inch thick I was able to place the 8 3/4 long pieces I'd cut out between the bracketing arms making for a very snug and secure fit.
If you use the board I suggested you can fit all four of these stacked length-wise on top of each other and will use only ~half the wood.
After you've gotten your four pieces, clean up any ragged edges. You shouldn't need to worry about splinters at all since it's particle board.
Slide two pieces onto your desk, parallel to each other at the position you want to have your joystick or throttle. If you need to do any shimming to secure them now is the time.
Once the two pieces are secure place your joystick or throttle in the cradle arms. If you've cut the pieces properly you'll get a snug, secure fit, without needing any hardware.
Repeat the process for your remaining component. Make certain that you have placed them securely before letting go.
The upper portions of the mounts should be long enough and positioned in such a way as to facilitate placement of your keyboard on top as I have done in the picture:
Room for Improvement
There is a great deal of room for improvement in this design. Eventually I would recommend securing the two pieces of each bracket together so that they cannot slide apart. This will drastically improve the security of your HOTAS. You could also add an eyebolt and nut to each desk attachement to provide a mechanism for tightening the brackets onto your desk. Lastly, the lip at the back is tall enough to allow you to cut some of the remaining wood into a shelf to sit in the brackets directly under your throttle and joystick, allowing you to secure them with bolts.
Once you've gotten everything the way you want I would also recommend painting them as they'll last longer and look better.
Once you've gotten everything the way you want I would also recommend painting them as they'll last longer and look better.
I'll include a few extra pictures below to give some better perspective of the design. I hope that this design will either be of use to you or will spark a bigger better idea for one of your own.
I've started on some improvements and finishing touches to this project that I will post in the next day or so as I finish it.
Got an idea of your own? Post it below and share with the rest of us!
Last edited: