DIY Head Tracker For A Tenner

GUI not Conneting Properly to Tracker

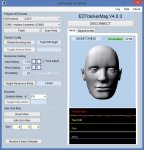
I am having trouble with a new EDTracker. I had built one with a 6050 chip and it worked a treat. When the micro USB was broken of the Arduino I decided to build a new one with a 9150 and I cannot get it to connect to the GUI (4.0.4) The GUI recognizes the Arduino (but does not call it an EDTracker), and it says that it is flashing the EDTracker2_9150 4.0.3 frimware on to the device, but but after the flashing, it is not connecting. At the top right where it says "EDTrackerMag V4.0.0" in the manual it says "Not Connected". The magnetometer tab does not appear over the head. Clicking "Connect to Tracker" does nothing other than change the box below that to "connected" no movement and no ability to calibrate. I have uninstalled and reinstalled the Arduino drivers, and tried all the different USB ports on the computer. I have redownloaded the GUI and tried the earlier versions. I am at the end of my debugging abilities. Do I have a bad chip? Did I screw up the building? Is there something else to download or update. Any help you can provide would be appreciated, I am really new to building this sort of stuff.

Windows 7 64bit SP-1
i5-4670k 3.4 GHz
8 GB ram
NVIDA GTX 760

EDIT: Windows sees it as "Arduino Leonardo" even after calibration. (Sorry to reply via Edit, but apparently the anti-spam software is not sure whether I am a bot or not...)

Edit 2 Several Hours Later.: I tried using the sparkfun drivers for the pro-mico and windows will recognize it now as a "Sparfun Pro-Micro", but flashing with the GUI will not cause it to be recognized as an EDTracker. I tried flashing the 2.5.3 sketch and the GUI will give temp reading, and recognize the flash, but no motion.
 
Last edited:
My 9150 does exactly this with every new flash update. I then just kill the GUI, unplug the EDTracker and plug it back in the same port, then restart the GUI and calibrate. If I plug it into any other USB port it will not be detected, strange I know. Is it detected as EDTracker in Windows devices & Printers once you have flashed it, i.e. does windows detect it?
 
Is it detected as EDTracker in Windows devices & Printers once you have flashed it, i.e. does windows detect it?
After I flash it, Windows still sees it as "Arduino Leonardo" on comport 5. This is how the GUI labels it as well.

After sleeping on this, either the flash is not successful or the 9150 is not being recognized and the wrong sketch is being flashed, or?

Edit 2 Several Hours Later: I tried using the sparkfun drivers for the pro-mico and windows will recognize it now as a "Sparfun Pro-Micro", but flashing with the GUI will not cause it to be recognized as an EDTracker. I tried flashing the 2.5.3 sketch and the GUI will give temp reading, and recognize the flash, but no motion.
 
Last edited:
I am having an issue with yaw drift. it seems that no matter how long I leave it calibrating, when in game and I turn it on after extended periods of not using it I will be looking over my shoulder. how long do I need to leave it to gather yaw drift information? is 1 hour not long enough?
 
I am having an issue with yaw drift. it seems that no matter how long I leave it calibrating, when in game and I turn it on after extended periods of not using it I will be looking over my shoulder. how long do I need to leave it to gather yaw drift information? is 1 hour not long enough?

10 minutes should be plenty. If it's warmed up first, at least. 6050 model I assume? Have you got auto-centering turned off?
 
Okay after 6 hours of working on this I give up. No matter what driver I use (Arduino or Sparkfun), version of the GUI (I tried them all), admin privileges, user accounts, plugging and unplugging, booting and rebooting, the GUI will not recognize the tracker after flashing. Since I am fresh out of goats to sacrifice, I give up...
 
If your in windows 8 did you do an advanced reboot into the mode that accepts unsigned drivers?

Also when you boot, go to the device manager and look at your sparkfun or whatever device it shows as under com. Press the button, see if the hardware changes to something else like unrecognized. You might have to install the drivers twice once for each com port it uses.

That's the problem I had early on when the edtracker was still in it's early days of development last summer.
 
I am using windows 7.

During the flash it changes to "Arduino Bootloader" and after the flash it changes back to whatever it was before. I have installed the drivers multiple times in every order I can imagine.

I am stuck.
 
Moxxie, have you tried a different PC?

Reason I ask is that I've built both a 6050 and 9150 and on both, the initial setup with the Arduino drivers etc went well on my main machine but neither would flash the first time. I tried another PC and that was the same. In desperation I tried my wifes laptop and it worked! When I plugged it back into my main PC, it was recognised correctly and I can now flash sketches properly. Why this should be the case I have not a clue other than flaky WIndows USB drivers. I don't think it's a construction problem, keep trying, at least try a different machine.

USB is becoming the "Black art" that printers and scanning were when I was a youngster :)
 
Hi Brumster, Dead Fred and Pocketmoon.
Thanks very much for all your work on this (and anyone else who's been involved), much appreciated.
I ordered the HobbyComponents kit with the mag, I had a couple of hours of fun putting it all together and was pleasantly surprised when it all worked first time.
Biggest problem I had was finding wire small enough to go through the holes in the protoboard - Maplin had some but it was a 25m roll. Total cost was approx. £25 for me. I followed BartyBee's excellent guide as per your recomendation. If a 55-year old with crap smouldering skills and not so steady hands can do it, it must be pretty easy :)

A couple of observations that might help others thinking of going this route:
I had a set of 'Helping Hands'- invaluable
I cut the protoboard a bit differently to how BartyBees recommended and with care you can actually get enough for two out of a 3cmx7cm board. Not necessary but I hate waste :)


Some of my soldering ended up a bit higher than I intended, so I was a bit worried about some of the solder points on the board touching the components on the Pro Micro board so I placed a strip of insulation tape over my crap soldering before I attached the Pro Micro.
Lastly, using the protoboard ends up with he smallest version - I ordered the 'proper' PCB from your website to build one for a friend. It is lovely and easier but it is a bit larger, so if like me you want the smallest possible device on your headset, this is the best one to go for.

What it all looked like in the end:

I had no difficulty following your instructions for setup, I did need to install the arduino driver though despite having connected several in the past and having the full suite of software installed. Once done, flashing and initial setup went flawlessly. What a super bit of kit! I am well impressed with how it works in game.
Some info for users on what I have found when using it with and without Opentrack:

Without OT:
Pros - very easy to setup and tweak settings
Easy to setup in Elite
Worked like a charm :)
Can map a joystick button to turn off headlook - very useful when in station UI
Cons - No fine control of response - I found that the movement between 'just out of the deadzone' and 'looking over my shoulder' to be very small
No roll axis

With OT:
Pros - The ability to map the curves is great
asymmetrical mapping is useful with pitch where you can look down as far as you can up
You get roll as well
Cons - you can't easily switch it off using TrackIR as the protocol, so deadzones need careful adjustment so screens like the commodities stay 'flat' on the screen
very fiddly getting all the settings optimal EDIT: In Opentrack 2.2 you can map a key to toggle TrackIR on or off. Thanks to Blairvoyach for the tip.

On my rig I found that setting the EDtracket UI response scaling settings to higher values than the recommended ones meant the curves in OT can be shallower and this means that response is smoother - this makes it much easier to hold a particular point steadily rather than having some jittering when you are looking away from the centre of the canopy. You can also then lower the smoothing value too.
Edtracker.jpg

I then have curves like this:
Opentrack-Yaw1.jpg
Instead of this:
Opentrack-Yaw2.jpg
Hopefully someone might find this info useful.
 
Last edited:
Cons - you can't easily switch it off using TrackIR as the protocol, so deadzones need careful adjustment so screens like the commodities stay 'flat' on the screen
very fiddly getting all the settings optimal

Don't know what version of Opentrack you are using but in V2.2, click on KEYS and you can set a default centre AND toggle hotkey so you can disable OT and EDTracker in game. Works very well. Good tip about the scaling, I hadn't tried that.......
 
Last edited:
Don't know what version of Opentrack you are using but in V2.2, click on KEYS and you can set a default centre AND toggle hotkey so you can disable OT and EDTracker in game. Works very well.

Doh! Missed that somehow. Thanks, that's great, just what I needed to know. That means I can re-adjust my deadzones.
 
10 minutes should be plenty. If it's warmed up first, at least. 6050 model I assume? Have you got auto-centering turned off?

Yeah i ordered a pre built one for alpha/beta so I assume it's an oldish one.

I had auto centre set to "soft", should I try with it off?
 
Moxxie, have you tried a different PC?

Reason I ask is that I've built both a 6050 and 9150 and on both, the initial setup with the Arduino drivers etc went well on my main machine but neither would flash the first time. I tried another PC and that was the same. In desperation I tried my wifes laptop and it worked! When I plugged it back into my main PC, it was recognised correctly and I can now flash sketches properly. Why this should be the case I have not a clue other than flaky WIndows USB drivers. I don't think it's a construction problem, keep trying, at least try a different machine.

USB is becoming the "Black art" that printers and scanning were when I was a youngster :)

I remember the "Plug-n-Pray" days as well. It was about the time I quit messing with this stuff....

Since the last post:

- I wiped everything off my computer that said Arduino or EDtracker. Deleted all the old USB connections with USBDeview. Redownloaded the Arduiono and EDtracker stuff to try from the start - Same Result.

- At your suggestion (Thank you), I tried it on my work laptop - Same result

- Going back to home computer - Still Nothing

- Setup the Arduino IDE and flashed a modified blinky sketch for the pro-micro - It is blinking happily, so the computer and Arduino are communicating and the Pro-micro has at least some functionality.

I may try the java command prompt updater next, or I may toss it in the woodstove - My patience has worn a bit thin.
 
Last edited:
I remember the "Plug-n-Pray" days as well. It was about the time I quit messing with this stuff....

Since the last post:

- I wiped everything off my computer that said Arduino or EDtracker. Deleted all the old USB connections with USBDeview. Redownloaded the Arduiono and EDtracker stuff to try from the start - Same Result.

- At your suggestion (Thank you), I tried it on my work laptop - Same result

- Going back to home computer - Still Nothing

- Setup the Arduino IDE and flashed a modified blinky sketch for the pro-micro - It is blinking happily, so the computer and Arduino are communicating and the Pro-micro has at least some functionality.

I may try the java command prompt updater next, or I may toss it in the woodstove - My patience has worn a bit thin.

Update: The updater tool gave this error: "Can't load IA 32-bit on a AMD 64_bit platform thrown while loading gnu.io.RXTXCommDriver" with both the 64-bit and 32-bit tools.

@Moxxie

What 9150 did you buy? maybe yours is using like mine the 0x69 adress instead of 0x68

The vendor (World Chips) says it is an InvenSense MPU-9150. I would not know how to check the address.

I see now there is a trouble shooting thread. I guess I will wade through that as it is too warm for a fire today.....
 
VICTORY!

After many hours of frustration I desoldered the whole thing and placed it on a breadboard - and still nothing. I swapped out the arduino for another one I had, reinstalled the drivers, rebooted the computer and held my mouth in exactly the right position and Ta Da it worked. Not sure yet if it was a bad Arduino or a bad build, I tend to think the former as I was really careful with initial soldering and checked it all with a multimeter before soldering the chips, however, I am pretty new to this sort of work and it is possible I mucked it up. Long story short, breadboarding this would have saved me an entire weekend of swearing and self-doubt....
 
Back
Top Bottom