Community Event / Creation The C-Pod: A DIY Command seat (build log)

Rafe Zetter

Banned
Very nice, I will be following this!

/My own project of replacing arm rests on an old leather seat with controller and stick seems kind ridiculous in comparison...

This is exactly what I did with my office chair, a platform either side, simple as that. Not even painted yet or anything.

Oh and I did make new metal brackets to increase the headrest height so it's actually supporting my head *go me, yay!*....

I think this is a great project, I'd love to do the same, but I don't have the space to dedicate to it.
 
Thanks Rafe.

As long as the design works, it's worth doing. Maybe post some pictures to give people some ideas? You've got me interested; I'd like to see it!
 

Rafe Zetter

Banned
GamingChairhack2_zpsd212b128.jpg


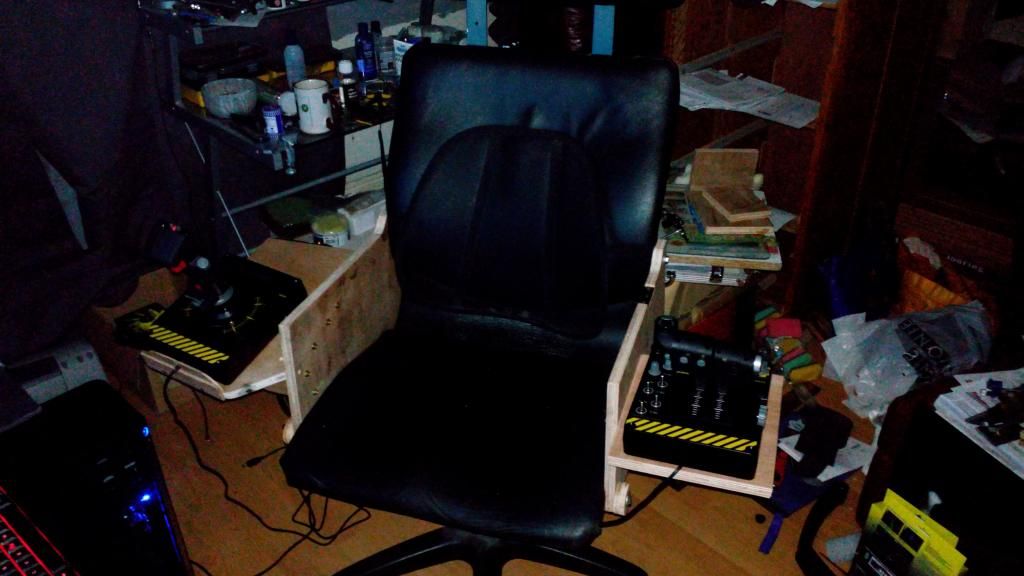
Here's my simple hack. I'm lucky that the chair arms were simply bolted on, so it was easy to mark the holes on some 20mm ply, then make up the sides to a rough shape, they aren't in the final shape yet as I think they need some finessing so they don't look like slabs of plywood bolted onto the chair.... I clamped the actual joystick controllers to the new sides and placed them where I thought would be most comfortable with height and angle, marked up where the bottoms would need to be and made the supports to suit. They are both angled down as I sit with the chair reclined when gaming.

I then worked out the best size for the support platforms and added extra support brackets underneath from more ply.

On the left side one (as you look at it) you can see a small stop end plate, which is there to prevent a mouse slipping off the mat when I'm not using the joysticks.

on the underside of the left one at the back there's hooks screwed in to hang my headset and it's separate volume controller.

I also plan to add USB sockets using extention cables to the seat so that I can plug peripherals directly into it, increasing the amount of cable distance I can have, as currently it's a bit tight.

Another plan is possibly to add a keyboard support too, so I can still type without having to sit forward with the KB still on the desk - whether this will be a desk extention platform or built onto the chair I dunno yet.

So far I'm very pleased with it and wish I'd done it years ago, as sitting right forward with joystick and controller on the desk wasn't optimal, and was prone to make my wrists ache.

I've been wondering about how to decorate it though. I was thinking of metal plates, possibly riveted for the sides (using salvaged soda cans) sort of aircraft style, black for the side supports etc, but your idea of granite grey pleather sounds really good, and the whole thing could do with a refurb; the foam in the seat area is mostly flat now, and I'd already bought some to renew it.

(excuse the terrible mess in the back - those are some other woodwork projects (plus my modelling desk) and with winter now coming they all need to come indoors, so they are not affected by the damp air).
 
Looks very effective Rafe, nice and sturdy, particularly as you've bolted it into position. The only suggestions I could make would be to trim the sides back so they don't interfere with your arms, round the edges off and paint it black. It would come out looking fairly neat I would imagine.

I don't mind the mess, it's reversible. My rooms always descend into utter chaos when building. I took some pictures of mine at its worst state:


And after tidying up:


Nothing a bit of time can't sort out!
 

Rafe Zetter

Banned
Well the side section height is actually just about right to rest my arms on if I wanted, and I made an extra arm rest pad for the right side to support my elbow and forearm so that when I'm using the throttle I just slide back and forth in a straight line. Both of these are going to get some sort of foam cover to make them softer, at the very least in the section where my elbows are.

You say you don't mind the mess, nothing a little time can't sort...when are you free?

I think you're right about posting pics though, now it's out in the open once I'm back from a trip, I think I should crack on and get it done so it's all respectable like ready for E D, or ppl may think I'm some sort of junker pilot.
 
Ah crap...
I have a feeling that i must move my hotas from the desk onto my chair soon...
Thanks guys, i was afraid i wouldnt know what to do with my spare time the coming weekends ;)
 
I wish I could do a simple mod to attach the Hotas to my chair. But my computer chair has no armrests because I also use it when I play the guitar to record myself on the PC...
 
Well the side section height is actually just about right to rest my arms on if I wanted, and I made an extra arm rest pad for the right side to support my elbow and forearm so that when I'm using the throttle I just slide back and forth in a straight line. Both of these are going to get some sort of foam cover to make them softer, at the very least in the section where my elbows are.

Gotcha. I understand your reasoning now. I had a thought about the foam cover - maybe some pipe insulation?


@Attackmack. Looks like Rafe's given you some incentive to get building :)

@Zephyriel, are there any fastening points for arms on your chair? If there are, maybe you can use some star knobs to allow for easy attachment / removal?


Edit: I ordered some more material which has now arrived so I can complete the seat paneling this weekend.
 
Last edited:
Subscribing to this thread. Might do something similar myself in future when the commercial version of the Rift launches :)
 
Subscribing to this thread. Might do something similar myself in future when the commercial version of the Rift launches :)

If you do, make sure you post a build log :)

The weekend is nearly here which means it's time to figure out what I'll be concentrating on.

Plans are to:

-Complete the seat paneling (said that last week but ran out of material - have now re-stocked).
-Establish a comfortable position for the HOTAS.
-Attach the centre console mechanism.
-Construct the shells/cases to mount the stick and throttle to the side units.
-Create an emblem mount for the E : D keyring to fit between the top shoulder pieces on the seat (the headrest will now accommodate the LED clusters I purchased).
-Figure out how I'm going to attach the rudder pedals to the seat base - I'd like to make these removable but they need to be stable.
-Possibly make a first side piece.
 
Something small to bear in mind. I made some small platforms either side of my desk for my x52 pro to attach to. I thought if I put them a bit wider than I would normally I could leave them in place and still access my desk as normal.

This worked out fine until I got my oculus rift recently.

Now when I look down at my hands in the game they are actually not where they should be in the game. It doesn't sound like much but it's surprising how much this irritates!

If you like I could estimate the distance between the two in the Rift. Should be able to make a rough guess by moving them closer and checking in the Rift.
 
Thanks very much for that. The layout I have should work out pretty accurately then. The width of the seat is 50cm.The distance between the throttle and stick will be about another 15cm or so once fitted to the sides.
 
Last edited:
Building time ...

After giving the assembly approach some thought, I've decided to fabricate the HOTAS cases first. I need to get a view of location and proportions of these so it's time to get the boxes out.

Picture to determine how long the base panel for the throttle needs to be. When constructed, it will sit a little higher (but not too high) and further forwards. I want my shoulders to be in a relaxed position when using it - not hunched up:

 
YAY TIOOs weekend buildoff!

Its nice to see the build in overview, that last pic looks so good!
Ill be away until tomorrow so will have to catch up on the progress then!
 
Cheers Attackmack :) Hopefully there will be a reasonable amount of progress. I've had to re-think a couple of things so it's going a little slower than I'd hoped. Quality over quantity is the nature of the business.

First set of case pieces cut and shaped:


Edit:

I'm intending to make a top cover for the Warthog out of 6mm MDF possibly topped with artwork / labels.

Original sketch as a reminder (I want to keep this as close to my original design as possible, only including enhancements):

 
Last edited:
Back
Top Bottom