Taranis: as before, Ixbalan doesn't push out to PN-T c3-8, so it presumably takes PN-T c3-5 and PN-T c3-7 is the backtrack for a fifth Alert instead.
Oya: all working fine here, backtrack to HIP 3006 as predicted
Thor: also correct here, as no surprise 5th Alert this week
Inside-only Maelstroms as usual all correct.
Had a look at a few range-based theories for Ixbalan - no luck: AV-Y b3 to AV-Y b0 at Oya this week is a larger Control-Target distance and a larger difference in Control-Titan and Target-Titan distances.
But it seems to be consistent behaviour now, so there's presumably some identifiable factor here.
Alongside the remaining Alert analyses, I think INIV has a developing need to look at the more collapsed Maelstroms differently. The target list is invaluable for starting and maintaining a collapse of the number of Thargoid systems, and that remains exactly what we would prescribe for M. Raijin, but for M. Hadad we have now almost all of our space back—with an ongoing Alert upkeep, which others are repelling most kindly. We can take back HIP 30502 and Vasupari whenever we want, but I worry for that rising collective Alert strength.
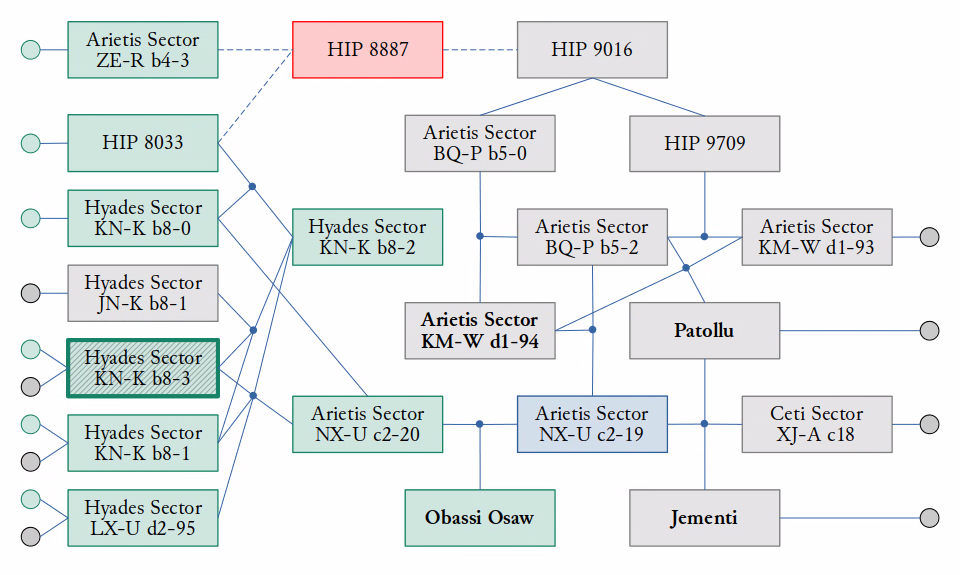
Regardless of whether stronger Alerts are still defensible, I would love very much to know if there are any regions of space which would, if recaptured, reduce the average Alert strength. If several Control systems are causing several Alerts with average weekly strength A, but clearing away the full group plus one or two bridge systems would leave those future bridge Alerts with something less than A, those are the cases I seek. Our venture at M. Leigong contains both a good example and a good anti-example:
This was updated at the beginning of last week; Hyades Sector LX-U d2-95 is now clear, but that does not affect the examples:
Repetitive attacks at Patollu and Jementi, plus some other nearby empty systems, have been reduced to defending only the middling-strength Arietis Sector NX-U c2-19. This had no immediate effect on the number of attacks, but definitely it reduces the average combined strength. As an aside, a general case need not involve a Maelstrom-adjacent system.
Conversely, taking also the unary group Obassi Osaw and its bridge Arietis Sector NX-U c2-20 would then increase the average strength. In the Control context the bridge strength would be an approximate doubling, but either way the comparative aspect makes it is quite fine to use an estimation curve with loosely the correct shape, regardless of magnitude.
Expanding the group could yield a new bridge set with decreased strength potentially, but in this case we encounter a Matrix system, ending that possibility.
With that in mind, would it be possible to devise a way to identify good isolated Control system groups which present some estimated Alert burden now, and some lower burden if removed?
The disconnected Control reports are automatic perfect examples of this because the post-clearance burden is zero, at least in cases not involving a Matrix system—speaking of which, anyone using those lists would need to see which are Matrix systems. More generally though, I am interested to know whether groups of connected Control systems can be identified, if the post-clearance surface strength is lower than the present surface strength.
Finally, worth a closing mention ought to be the dual of that idea—groups of isolated clear systems which are receiving Alerts uselessly, and could be left alone for the Thargoids to take without any further spread possible. Whether our wonderful Alert defenders would allow it is another matter of course, but nonetheless it is a conceivable helpful notion!
Systems are listed in order of priority, and in general the first five would be expected to be hit by Alerts. Predictions made early in the week may be reissued later if Control recaptures materially affect them. If the Control Sphere Edge is reached and targeting mode switches, predictive confidence is lower and the consequences of recaptures may be more significant.
Table key
Name: Name of system considered at threat of Alert. Bold if in Control-based prioritisation it would be eligible for backtrack targeting. Distance: The distance in LY to the Maelstrom. A primary component of Thargoid prioritisation. Attackers: A list of potential Controls to launch the attack from, partial if there are 4 or more. Controls disconnected from their parent maelstrom are marked in italics; controls attacking a system closer to the maelstrom than themselves are underlined; controls which may be skipping an inner uninhabited system to strike an inhabited system further out are struck-through; controls containing a barnacle matrix are bold. Once targeting switches to Control-based rather than Target-based prioritisation, only one is listed here. Inhabited: Whether the system contains standing human population.
By recent standards this will likely be a fairly high number of inhabited attacks - seven are predicted, mostly in situations which would be difficult to avert.
-------------------------------------------
Calculating Taranis
Read 32 control systems and 962 targets.
Total connected: 28 Disconnected Controls
Looks like this should be a 4-attack week at Taranis, provided that the uninhabited Alerts are dealt with. Of course, one of those attacks is the inevitable Njorog.
-------------------------------------------
Calculating Leigong
Read 24 control systems and 970 targets.
Total connected: 21 Disconnected Controls
Clearance of uninhabited systems at Indra continues to pay off - despite its continued large size, its number of inhabited attacks is down substantially.
-------------------------------------------
Calculating Oya
Read 26 control systems and 967 targets.
Total connected: 25 Disconnected Controls
With no backtracking available, Poqomathi (or possibly somewhere else, given the small sample size on HIP 8525's behaviour) should be safe this time. As always at Oya, the prediction would be substantially affected if an uninhabited Alert got through.
-------------------------------------------
Calculating Cocijo
Read 75 control systems and 918 targets.
Total connected: 72 Disconnected Controls
System
Distance
Kurumanit
20.23692672
Col 285 Sector WY-F b12-1
20.85255624
Col 285 Sector OS-T d3-106
23.03364557
Col 285 Sector YT-F b12-2
24.23140798
Furthest Control: 28.116 LY
Target
Target Distance
Control Distance
Attackers
Inhabited?
Col 285 Sector YT-F b12-6
20.034
17.824
Mapon;
No
Col 285 Sector ZE-P c6-10
20.476
20.237
Kurumanit;
No
Col 285 Sector ZT-F b12-8
21.247
16.728
Col 285 Sector ZT-F b12-3; Col 285 Sector ZT-F b12-4; Col 285 Sector ZT-F b12-2; etc
No
Col 285 Sector TS-H b11-0
22.551
21.295
Col 285 Sector TS-H b11-4; Col 285 Sector TS-H b11-2;
No
Col 285 Sector XT-Q c5-1
22.888
16.621
Ulche; Col 285 Sector UN-H b11-4; Col 285 Sector UN-H b11-5; etc
No
Col 285 Sector XT-Q c5-22
22.973
18.193
Col 285 Sector UN-H b11-4; Col 285 Sector UN-H b11-5; Col 285 Sector UN-H b11-2;
No
Col 285 Sector SS-H b11-0
23.090
15.964
Col 285 Sector VY-Q c5-17; Col 285 Sector VY-Q c5-18;
No
HIP 36901
23.391
19.376
Col 285 Sector UN-H b11-5;
No
Col 285 Sector YY-F b12-0
23.772
23.150
Col 285 Sector XY-F b12-6;
No
Col 285 Sector YT-F b12-7
23.878
24.231
Col 285 Sector YT-F b12-2;
No
A quiet week at Cocijo, perhaps.
-------------------------------------------
Calculating Thor
Read 50 control systems and 945 targets.
Total connected: 45 Disconnected Controls
Col 285 Sector NG-E b12-5; Col 285 Sector NG-E b12-2;
No
-
-
-
Control Sphere Edge
-
Col 285 Sector NG-E b12-3
24.094
17.596
Col 285 Sector NG-E b12-2;
No
Col 285 Sector EA-Q c5-1
25.234
18.984
Col 285 Sector JA-G b11-1;
No
Col 285 Sector IG-O c6-18
25.852
19.631
Col 285 Sector MG-E b12-2;
No
Col 285 Sector EA-Q c5-7
23.756
20.096
Col 285 Sector EA-Q c5-6;
No
Col 285 Sector EA-Q c5-9
23.870
20.882
Col 285 Sector OC-V d2-79;
No
Col 285 Sector EA-Q c5-2
25.089
20.924
Col 285 Sector JA-G b11-0;
No
Col 285 Sector RW-D b12-2
28.863
22.642
Col 285 Sector KB-O c6-3;
No
It's not NG-E b12-2 placing those backtracks into EA-Q subsector, so there should just be four attacks this week, in theory. Prediction should be solid against Thargoid Alert successes.
-------------------------------------------
Calculating Raijin
Read 100 control systems and 893 targets.
Total connected: 101
Furthest Control: 27.097 LY
Target
Target Distance
Control Distance
Attackers
Inhabited?
Nu Guang
19.330
11.760
Snoqui;
Yes
HIP 116360
20.902
16.841
Pegasi Sector IH-U b3-0; Pegasi Sector BQ-Y d71;
Yes
Pegasi Sector NN-S b4-4
21.135
15.433
HIP 112823; Pegasi Sector NN-S b4-5; Pegasi Sector NN-S b4-3;
No
Pegasi Sector DG-X c1-6
21.188
20.143
HIP 115162;
No
Pegasi Sector RE-N a8-0
21.214
19.355
Pegasi Sector VK-L a9-0;
No
Pegasi Sector NY-O a7-1
22.028
21.106
Pegasi Sector MY-O a7-5;
No
Pegasi Sector OI-S b4-4
22.349
16.077
Sholintet; Chinas; Pegasi Sector JH-V c2-13; etc
No
Pegasi Sector KH-V c2-7
22.514
16.575
Kaurukat; Pegasi Sector PI-S b4-5; HIP 113785; etc
The disconnected Control reports are automatic perfect examples of this because the post-clearance burden is zero, at least in cases not involving a Matrix system—speaking of which, anyone using those lists would need to see which are Matrix systems. More generally though, I am interested to know whether groups of connected Control systems can be identified, if the post-clearance surface strength is lower than the present surface strength.
Rewriting the connection algorithm to base its initial points on Matrix systems rather than the Titans gives:
- Hyades Sector BV-O b6-4 at Taranis: It can't be retaken if lost, it is just about usable to attack Ebisu with at times, which would probably trade a 20LY inhabited for a similar range uninhabited in those weeks.
- Liu Huang and Akbakara at Oya: Would stop attacks on BV-Y b2 every three weeks (and perhaps others as well) which should reduce the average difficulty at Oya (though it might throw HIP 8525 back into attacking places like Poqomathi, so you'd be trading 15 LY uninhabited for 22.5 LY inhabited - is that worthwhile?)
- Kurumanit, WY-F b12-1, OS-T d3-106 at Cocijo: they can't hit anything particularly important, but Kurumanit at least does attack and is often the only attacker for its targets so you'd be pushing the average attack strength down marginally if it couldn't.
- Rajuarpai branch at Thor: how much one-off effort are you willing to put in for a marginal gain? Taking out this branch would stop attacks from Chanyaya and maybe a couple of others, which in Thor's state would make losing Alerts entirely more likely, and push its attacks out further otherwise. The catch is you'd have to take Rajuarpai (and three other tough inhabited systems besides) which would certainly at least temporarily cause a massive increase in surface difficulty
The other four have all of their systems at least indirectly connected to a Matrix.
Throwing the net a bit wider, the following systems are at least 3 hops away from their nearest Matrix (*d systems are 4 or more away).
Taranis:
System
Distance
Hyades Sector HW-W d1-52
15.28179319
Hyades Sector EQ-O b6-1
16.91849141
HIP 24723*
18.20558594
5 Mu Leporis*
19.14189409
(these don't look to be attacking right now, so their main use would be as recaptures to draw fire away from inhabited systems at a slightly greater range, but Taranis is fairly good for that already)
Leigong: none, every remaining system is either adjacent to a Matrix or adjacent to that, so I think the only case where you could make the perimeter easier to hold would be to retake systems which can attack something nearer Leigong than they are.
Indra:
System
Distance
Arietis Sector LM-V b2-5
22.14489748
Arietis Sector LM-V b2-2*
25.46468526
Hyades Sector ON-S b4-7
26.7657299
(too far out to make any difference if recaptured)
Oya:
System
Distance
Kanus*
12.49468637
HIP 13179
15.21220342
Cephei Sector AF-A c9
15.68118025
HIP 8525*
17.92004268
A very expensive option here: Kanus is out at the end of a branch, so take that out, then take out HIP 8525 so it can't be recaptured, leaving Oya with only HIP 13179 to try to get back into that whole region, which should be a slightly favourable trade over defending HIP 7338 as things are now. But retaking Kanus would be tough.
Cocijo:
System
Distance
Col 285 Sector SS-H b11-6
17.7736693
Col 285 Sector UN-H b11-2
21.22215547
Col 285 Sector TS-H b11-4
21.29475985
Col 285 Sector KM-V d2-109
21.99904561
Col 285 Sector OS-T d3-69
22.72257533
Col 285 Sector XY-F b12-6*
23.15000759
Col 285 Sector TS-H b11-2
23.23336098
Most of these look too far out to make much difference, except for potentially being closer targets than an inhabited system.
Thor:
System
Distance
HIP 19198
17.09432129
Vaipacnali*
18.64349962
Col 285 Sector RM-C b13-1*
20.96828427
Nothing obvious for reducing the perimeter difficulty in and of themselves: it'd only directly protect uninhabited systems which are already further out. But as part of a plan to recapture inhabited systems it could work - push through here to retake MG-E b12-0 as well, and then you'd only need to hold MG-E b12-0 to keep the Thargoids out of that whole region (which would also secure Unktety). Possible that it'd pay off by stopping Thor placing 5 Alerts more often.
Raijin:
System
Distance
Pegasi Sector GW-W d1-115
22.71840612
Sugalis
23.49095986
Pegasi Sector TK-L a9-5
24.64297805
Pegasi Sector PE-N a8-4
26.41309083
Nothing obvious out here, I think
Hadad: all remaining systems are at most 2 jumps from a Matrix.
It looks like everywhere is either too well-anchored, or already cut off, for the most part. Might be possible to look at opportunistic cases (inhabited system only targetable by slightly closer uninhabited system; backwards attacks) as they come up but I think Leigong and Hadad were the big strategic opportunities if reducing difficulty (as opposed to retaking further territory without significantly increasing difficulty) is the aim.
Goodness; thank you! Those are many good thoughts and options, certainly enough to keep defence plans supplied for the moment, and particularly helpful are those systems disconnected from Matrix sites—now that we know the connection to a Maelstrom system is not meaningful directly. Without having considered it fully yet:
The loose systems at M. Cocijo and M. Taranis definitely are solid choices. The M. Oya pair poses that interesting question; given that an empty 15 Ly system almost exactly matches an inhabited 22.5 Ly system, the default preference by far is inhabited due to the more activities. That actually would be worth accepting a strength increase, although in this specific case the inhabited actually is lower by around 16; 3086 versus 3102.
The effort is in return for restoring our space! Effort-for-space permitting, the surface strength change is a side-effect which I hope to balance:
A slight increase seems acceptable for the moment; our expectation is that some empty Alerts succeed, where we then step in and take a Control in return, so with all Alerts being stopped I think there is still some room for strength-increasing annexations.
If the strength matches then the choice is immediately decent.
A reduction makes the choice absolutely excellent!
Looking at the Rajuarpai campaign plan—ultimately, we could do that! With one system per week, plus an average of 9000 per week stored for Rajuarpai, I think that would end it all before any of those systems attack each other again.
Leigong: none, every remaining system is either adjacent to a Matrix or adjacent to that, so I think the only case where you could make the perimeter easier to hold would be to retake systems which can attack something nearer Leigong than they are.
That seems like it could become a more general rule; if any system anywhere is the sole attacker of something stronger, I think it is always as well to remove the attacker. If it is not the sole attacker, clearing it could increase Alert strength if it has an attacker of its own, although I imagine it depends on the positions.
Nothing obvious for reducing the perimeter difficulty in and of themselves: it'd only directly protect uninhabited systems which are already further out. But as part of a plan to recapture inhabited systems it could work - push through here to retake MG-E b12-0 as well, and then you'd only need to hold MG-E b12-0 to keep the Thargoids out of that whole region (which would also secure Unktety).
This I like! I feel as if poor little Unktety has been through a lot, almost like Muruidooges without as much popular support, and Col 285 Sector MG-E b12-0 is one of the lower-maintenance bridges around.
Thank you once again; that yields much opportunity for retaking much of M. Thor defensibly. Fleet Admiral Patreus approves!
Updated predictions after a week of surprises - of course, since we don't know what a recaptured Matrix will do, the surprises might not be over. Despite the recaptures changing the wider strategic picture a lot, the only prediction where the expected Alerts themselves are affected is at Taranis.
Systems are listed in order of priority, and in general the first five would be expected to be hit by Alerts. Predictions made early in the week may be reissued later if Control recaptures materially affect them. If the Control Sphere Edge is reached and targeting mode switches, predictive confidence is lower and the consequences of recaptures may be more significant.
Table key
Name: Name of system considered at threat of Alert. Bold if in Control-based prioritisation it would be eligible for backtrack targeting. Distance: The distance in LY to the Maelstrom. A primary component of Thargoid prioritisation. Attackers: A list of potential Controls to launch the attack from, partial if there are 4 or more. Controls disconnected from their parent maelstrom are marked in italics; controls attacking a system closer to the maelstrom than themselves are underlined; controls which may be skipping an inner uninhabited system to strike an inhabited system further out are struck-through; controls containing a barnacle matrix are bold. Once targeting switches to Control-based rather than Target-based prioritisation, only one is listed here. Inhabited: Whether the system contains standing human population.
Minor change from previous reports - as previewed during the week, the Disconnected Controls report now reports Controls which cannot chain to any Matrix system, rather than those which cannot chain to the Titan. This makes relatively little difference in most cases.
Implicit assumption: a Matrix system which doesn't have Control state can't attack. No reason to believe it could, but it's a potential source of error.
Edited to fix issues with cooldown on former Matrix systems - thanks Kira Goto
-------------------------------------------
Calculating Taranis
Read 27 control systems and 968 targets.
Total connected: 26 Disconnected Controls
Backtrack to CV-O b6-3 should go through to get a fifth Alert here, though there is room for further activity to change this.
-------------------------------------------
Calculating Leigong
Read 22 control systems and 972 targets.
Total connected: 22
Furthest Control: 24.034 LY
Target
Target Distance
Control Distance
Attackers
Inhabited?
Arietis Sector NX-U c2-19
17.164
14.064
Arietis Sector NX-U c2-20; Obassi Osaw;
No
Arietis Sector FG-Y d66
18.068
17.037
Arietis Sector WJ-R b4-1;
No
Arietis Sector JM-W d1-56
18.294
24.034
Arietis Sector MX-U c2-19;
No
Hyades Sector JN-K b8-1
19.754
11.929
Hyades Sector KN-K b8-2; Hyades Sector KN-K b8-3;
No
-
-
-
Control Sphere Edge
-
Arietis Sector KM-W c1-15
24.725
15.102
Arietis Sector YE-R b4-3 (9.945 LY);
No
Hyades Sector LY-I b9-5
24.326
16.214
Hyades Sector KN-K b8-3;
No
Four inner attacks should guarantee no fifth outer attack. The KN-K b8-3 Matrix has been confirmed in early observations to be in Counterstrike state, though whether this could affect the result depends on what else gets retaken with it.
-------------------------------------------
Calculating Indra
Read 82 control systems and 910 targets.
Total connected: 80 Disconnected Controls
There's a strong counterstrike push at Raijin already, so this might not stay the case for long, but nothing out of the ordinary so far.
-------------------------------------------
Calculating Hadad
Read 57 control systems and 935 targets.
Total connected: 57
Furthest Control: 24.320 LY
Target
Target Distance
Control Distance
Attackers
Inhabited?
Col 285 Sector JW-M c7-10
17.369
12.113
Col 285 Sector PM-B b14-0; HIP 30502;
No
Col 285 Sector KW-M c7-16
20.418
13.947
Col 285 Sector KW-M c7-14; HIP 31223; Col 285 Sector KW-M c7-15;
No
Col 285 Sector OR-B b14-4
20.752
17.346
Col 285 Sector US-Z b14-1; Col 285 Sector SX-Z b14-0;
No
Col 285 Sector KW-M c7-29
21.254
13.877
Col 285 Sector KW-M c7-4; Col 285 Sector QM-B b14-7; Col 285 Sector KW-M c7-30; etc
No
Col 285 Sector RM-B b14-6
22.792
17.395
Col 285 Sector QM-B b14-7; Col 285 Sector KW-M c7-30; Col 285 Sector KW-M c7-28;
No
Col 285 Sector SX-Z b14-2
22.853
19.079
Col 285 Sector SX-Z b14-0;
No
Col 285 Sector VS-Z b14-1
22.869
15.344
HIP 31223; Col 285 Sector KW-M c7-15;
No
Col 285 Sector VS-Z b14-6
23.515
24.118
Col 285 Sector VS-Z b14-3;
No
Col 285 Sector NR-B b14-1
23.674
19.276
Col 285 Sector PM-B b14-1;
No
-
-
-
Control Sphere Edge
-
Col 285 Sector OR-B b14-9
25.303
17.550
Col 285 Sector KW-M c7-30;
No
That far Control at 24.32 LY has already been recaptured, but the next one in is a non-counterstrike Matrix at 24.12 so it doesn't affect the prediction.
Code:
-- Recaptures above (2 if confirmed, probability otherwise; exhausts below at exactly 1)
-- Taranis
HIP 25654:1
Hupang:1
Trianguli Sector BA-A d85:1
Hyades Sector BV-O b6-4:1
-- Leigong
Arietis Sector XJ-R b4-0:1
HIP 7277:1
HIP 9643:1
Hyades Sector KN-K b8-1:1
Arietis Sector AQ-P b5-0:1
-- Indra
HIP 19098:1
Arietis Sector IG-X b1-4:1
HIP 20480:1
HIP 20577:1
HIP 20916:1
-- Oya
HIP 10778:1
Niu Yun:1
HIP 13179:1
Liu Huang:1
-- Cocijo
Mapon:1
Kurumanit:1
Col 285 Sector ZT-F b12-3:1
Col 285 Sector TS-H b11-4:1
Ulche:1
-- Thor
Col 285 Sector LV-F b11-1:1
Col 285 Sector QB-E b12-0:1
Col 285 Sector NG-E b12-5:1
Col 285 Sector NG-E b12-2:1
-- Raijin
Snoqui:1
Pegasi Sector IH-U b3-0:1
HIP 112823:1
HIP 115162:1
Pegasi Sector VK-L a9-0:1
-- Hadad
Col 285 Sector QM-B b14-1:1
Col 285 Sector SH-B b14-4:1
Col 285 Sector KW-M c7-7:1
Col 285 Sector RN-T d3-78:1
HIP 31648:1
Implicit assumption: a Matrix system which doesn't have Control state can't attack. No reason to believe it could, but it's a potential source of error.
Is one wary enough to suppose that a freshly-completed Matrix system may be different to an already-empty Matrix system as far as attacks are concerned? The prediction update acknowledged (correctly!) that the completed Matrix system Trianguli Sector EQ-Y b0 cannot attack, where as with every other aspect of the attacks with particular notice of the Maelstrom radii changing, such occurs after moving forward one time-step where the would-be attacker is now in every way identical to a clear system.
Even stranger than having apparently-clear systems attack us would be such a unique example of a fresh eviction differing from a previous eviction!
Is one wary enough to suppose that a freshly-completed Matrix system may be different to an already-empty Matrix system as far as attacks are concerned?
That was roughly the root of the issue spotted above - the way I was processing Matrix data (a holdover from the very early days when the lists were being put together) meant that they were getting treated as a Control for predictive purposes in the current week, but as a non-Control system for checking historic or expected future data.
I think it should be consistently treating them as identical to Controls except for being impossible to attack directly and being the root nodes of the connectivity graph, but there may still be some bugs left.
FDev just reset the progress on a Raijin barnacle matrix counter strike to 0% from 76%. Pegasi Sector NN-S b4-3
Validated with journal files.
I'm expecting their wrath to be more on Monday haha
Bit of an experiment with using GraphViz to generate connectivity graphs from the existing data.
Here's the graph for Oya, as it's the simplest for now. Left and right don't mean anything, systems closer to the Titan are generally nearer the top but not always (distances in brackets), arrows point away from the Titan. Matrix systems and their connections in red, inhabited Controls are darker green.
If it would be helpful I'll generate a full set of eight next week once things have settled slightly.
Impressively close to ideal! The way it reveals Kanus and HIP 8525 as a little spur is quite nice, and the way it reveals that the entire right-hand side could be isolated from Matrix systems is nice conceptually, impractical in this case only due to the strength of the bridges. In that sense, there could be some value in colouring those high-strength systems similarly to the Matrix systems with a lighter shade, insofar as either can be considered immovable¹ in practice.
With these compressions from three to two dimensions, they really start requiring some brevity with the edges! For large groups of systems which can all see each other, is it possible to remove their direct links and add instead the graph equivalent of a barycenter to which they all link? It could be a small solid circle in the middle, just to absorb the multitude of edges in a way which still shows that they are all close enough, while other links are drawn normally.
For example, that M. Oya map contains a group of seven systems which I think all see each other and their K₇ edges are cluttering the picture a bit; Eoto, Cephei Sector XO-A b1–b3, Baiabozo, HIP 21165 and Lyncis Sector WU-P b5-0. Would it be feasible to check for the largest groups first and, in this case, replace their 21 edges with a new entry in the middle and 7 small edges linking to that?
Aside from that, occasionally it helps also to see the immediate non-Control systems!
1. Of course, the Matrix systems now are moving gradually, but I presume redefining the red systems is a relative minutia.
I did this when I was first experimenting with disconnecting a branch of systems near Leigong (using networkx/matplotlib in python) I think i found the Kamada Kawai layout worked best. I can post the code which is a pydantic model for the dcoh stuff and like 50 lines of python code in jupyter notebooks.
This is the look i settled on (data not up to date from 03-23-2023)
Impressively close to ideal! The way it reveals Kanus and HIP 8525 as a little spur is quite nice, and the way it reveals that the entire right-hand side could be isolated from Matrix systems is nice conceptually, impractical in this case only due to the strength of the bridges. In that sense, there could be some value in colouring those high-strength systems similarly to the Matrix systems with a lighter shade, insofar as either can be considered immovable¹ in practice.
It probably makes sense to keep the Matrix systems a different colour as at the very least they're somewhat tougher to move for the same range. I might make the borders a bit more solid for the close-in ones.
With these compressions from three to two dimensions, they really start requiring some brevity with the edges! For large groups of systems which can all see each other, is it possible to remove their direct links and add instead the graph equivalent of a barycenter to which they all link? It could be a small solid circle in the middle, just to absorb the multitude of edges in a way which still shows that they are all close enough, while other links are drawn normally.
Theoretically, yes, though in practice once it gets that dense the exact edges stop mattering anyway, I think - either you're committing to capture the entire blob, or you're committing to hold the bits you want as a border, or you're leaving it alone.
Yes, certainly for the smaller maelstroms. Something like Raijin is large enough already that another layer of edge systems makes the graph excessively tangled. I can do both easily enough.
I did this when I was first experimenting with disconnecting a branch of systems near Leigong (using networkx/matplotlib in python) I think i found the Kamada Kawai layout worked best. I can post the code which is a pydantic model for the dcoh stuff and like 50 lines of python code in jupyter notebooks.
I've got a few options for that sort of "spring" layout in GraphViz, which might work out okay, though it does tend to make the precise connections even less clearer in denser areas. Still, worth a try since the vertical hierarchy isn't critical for understanding.
Theoretically, yes, though in practice once it gets that dense the exact edges stop mattering anyway, I think - either you're committing to capture the entire blob, or you're committing to hold the bits you want as a border, or you're leaving it alone.
Using that idea and ignoring non-Control systems for the moment, I drew it after collapsing its large complete sub-graphs so that tessellating systems mean that all see each other. There were two choices for the K₇, and I chose the alternative versus above because the outgoing system in that swap had more connections elsewhere. There were also two choices of K₄, although those systems were equally-connected. It looks like this:
Because having two choices for a complete sub-graph such as K₇ is a bit unfortunate in lacking one link to become K₈, and given that we are considering it dense enough that one missing edge matters not, I drew it again with tessellation to show those "almost-complete" sub-graphs:
Probably an appropriate "almost-complete" rule would be to impose a minimum size of a genuine K₄ missing one link to become K₅, due to K₄ K₅ being the first complete non-planar graph. This is quite good though; now it shows clearly that Cephei Sectors XO-A b1 and AF-A c11 could be bridges for capturing a full group of five systems, strengths permitting.
Aside from that, perhaps there may be also some value in noticing a few bipartite areas and removing a few more crossed lines:
Something like that would be lovely, realising very much the improbability of generating it. If a thing to generate pictures like that does not exist yet, it ought to!
The trickiest thing about doing something similar to that with GraphViz would probably be automatically determining the subgroupings - especially since for the same connectivity wider considerations such as system strength might imply different subgroupings made sense.
For something like Thor the groups overlap quite a bit more, for example.
Or alternatively using a spring-like model (not quite Kamada Kawai, but similar) often gives a potential clearer result in terms of where the clusters are, at the cost of needing a much bigger picture to show it at all