Close! It was actually inspired by a Boeing 7xx navigation computer.Nice, reminds me of the Apollo Capsule Computer panels.
You are using an out of date browser. It may not display this or other websites correctly.
You should upgrade or use an alternative browser.
You should upgrade or use an alternative browser.
Community Event / Creation DIY Controller and Throttle
- Thread starter Cataclysm72
- Start date
Ok so today was kind of a let down. I tried lasercutting some panels for the keypad but i failed miserably. My attempts at creating a printable set of keys didn't look good enough so the whole day was a bit of a letdown. Anyway, that's part of the prototyping stage: learning what does and doesn't work. At least i can focus on new angles now i know my current approach is clearly a mistake.
in other news i made a cowl for my triple screen setup. It's only 16cm deep but it really has a nice effect on thr immersion as your eyes are no longer distracted by what's behind the screen. A bit tough to explain actually, but believe me it works!
in other news i made a cowl for my triple screen setup. It's only 16cm deep but it really has a nice effect on thr immersion as your eyes are no longer distracted by what's behind the screen. A bit tough to explain actually, but believe me it works!
Ok so today was kind of a let down. I tried lasercutting some panels for the keypad but i failed miserably. My attempts at creating a printable set of keys didn't look good enough so the whole day was a bit of a letdown. Anyway, that's part of the prototyping stage: learning what does and doesn't work. At least i can focus on new angles now i know my current approach is clearly a mistake.
in other news i made a cowl for my triple screen setup. It's only 16cm deep but it really has a nice effect on thr immersion as your eyes are no longer distracted by what's behind the screen. A bit tough to explain actually, but believe me it works!
I know what you mean! I think you'll notice an improvement as well by enclosing the area under the monitors to the floor. Nothing permanent required, just a simple black curtain material should do so you can still easily access from the rear if required.
Hey no day is really a let down Cat... ") [lifts spirits]
[lifts spirits]
You learned something new and hopefully had fun doing it otherwise stop doing it. heh
Murphy's always finds a way...
[lifts spirits]You learned something new and hopefully had fun doing it otherwise stop doing it. heh
Murphy's always finds a way...
Perhaps not well visible on the photos but the new console below the monitors takes care of that quite well. It doesn't go all the way to the floor but at least it blocks your view until below the knees (picture below)I know what you mean! I think you'll notice an improvement as well by enclosing the area under the monitors to the floor. Nothing permanent required, just a simple black curtain material should do so you can still easily access from the rear if required.
Seeing how much progress I made in the past year I consider this one of those rare days in which 'nothing goes well' and 'all good things come in three'. To comically paraphrase Cesar: "Veni, Vidi, Oopsy", "I came, I saw and I made a mistake". Seriously though; i put a lot of energy to find a way to make nice backlit pushbuttons that match the rest of my setup, unfortunately I must admit 'I'm sorry, Captain, we don't have that technology yet'.Hey no day is really a let down Cat...
You learned something new and hopefully had fun doing it otherwise stop doing it. heh
Murphy's always finds a way...

Perhaps not well visible on the photos but the new console below the monitors takes care of that quite well. It doesn't go all the way to the floor but at least it blocks your view until below the knees (picture below)
Seeing how much progress I made in the past year I consider this one of those rare days in which 'nothing goes well' and 'all good things come in three'. To comically paraphrase Cesar: "Veni, Vidi, Oopsy", "I came, I saw and I made a mistake". Seriously though; i put a lot of energy to find a way to make nice backlit pushbuttons that match the rest of my setup, unfortunately I must admit 'I'm sorry, Captain, we don't have that technology yet'.
http://i.imgur.com/5JIiqdq.jpg
Yeah, I think the cowl really helps bring it together. [up]
I sat and stared at it for about 5 minutes trying to figure out if there was anything I would change. The only thing I could think of is moving all the red buttons / MFD to the side instead of on top. It seems you could make a larger MFD based on the boxes you're making, lots of horizontal room. Look'n pretty good!
Hey whatayaknow, i change my mind and I am now working towards a horizontal layout. The biggest challenge is not to make it look like a keyboard.
The yellow line is the dimension of the entire panel, between the white lines is the 'safe' area (where there is free room), which leaves me a vertical 82mm for controls, compare that to the previous design where I only had 50mm.
http://i.imgur.com/FUuTVMH.png
Looks good! [up] Still thinking about adding a MFD next to it?
What do you want to have? Lit engravings or lit keys with coloured engravings?
In any case i would use "opalized" 2mm or 4mm acrylic like this: http://www.ebay.de/itm/Acrylglas-PL...-mm-3-mm-und-4-mm-wahlbare-Mase-/111855324129
And either paint it with black paint and then engrave it on a CNC mill or engrave it and then fill the engravings with paint.
Will look like this:
[video=youtube_share;LTDYI1BeZFc]https://youtu.be/LTDYI1BeZFc[/video]
I think you could do similar with a laser cutter on low intensity.
Well of course!Looks good! [up] Still thinking about adding a MFD next to it?
thanks for the links and the video, that looks good! i got the backlight stuff sorted now, i'm doing the panels like i did the others (i already got six) but the diy buttons take extra thought. Somewhere between korry switches and a apple low profile keypad. I actually found 6x6mm tact switches with a led inside. So the plan is to nake the backlight plate tankgrey/engraved (to fit the others) and the keys black and engraved (white letters).What do you want to have? Lit engravings or lit keys with coloured engravings?
In any case i would use "opalized" 2mm or 4mm acrylic like this: http://www.ebay.de/itm/Acrylglas-PL...-mm-3-mm-und-4-mm-wahlbare-Mase-/111855324129
And either paint it with black paint and then engrave it on a CNC mill or engrave it and then fill the engravings with paint.
edit: i also found this page with loads of info for builders: http://forums.eagle.ru/showthread.php?p=2313758
Last edited:
Just a quick update on the keypad designs.
Below are the near-to-final design drawings of the keypad. The right side is basically finished. I thing the dimensions are right this way and everything is on it. I may choose to adjust some of the backlighting decals but that is of little relevance. As long as the dimensions are ok this is probably what it is going to be anyway.
The left side isn't finished, I first want to experiment with a lasercut panel to hold the switches. The panel is 8x20cm; if I want to have a PCB made for it, it'll cost me about $60 (and then I need another one for the left side, and probably 4 more for the other panels) so I am kind of hoping that I can get away with lasercutting a acrylic panel and solder/wire them together; if I can pull that off it'll save me a tremendous amount of work. On top of that, what on earth am i going to do with 9 spare pcb's for the one-off keypad anyway? (my china pcb factory just ships 10 regardless on how many you want).
So that's it for now.
Here's the picture, click for large.

Awesome, simply mind blowing. Great work, well done.
I would almost pay ridicilious amounts of money for just playing with this rig for an half an hour. And then I would shot myself because I can never play ED at home again, having only the regular X52. ;-)
I would almost pay ridicilious amounts of money for just playing with this rig for an half an hour. And then I would shot myself because I can never play ED at home again, having only the regular X52. ;-)
Wow this looks awesome. I want the monitors the most though.. being able to see my 'peripheral' vision without mouse look would be great stuff. I wonder.. can you go vertical with multi-monitor? I would LOVE to see up though the sunroof on my ship in flight.
Anyway, +reps and I can't wait to see it finished!
Anyway, +reps and I can't wait to see it finished!
Thanks guys!!! The comments are awesome and press me to go on!
Removing the bezel from the display was the biggest improvement. Even though the bezels are really small these days it still takes up about 1cm of the screen. More have done this: http://www.overclock.net/t/1397263/the-official-debezelled-monitor-club
You also see in the link that there are guys who put there monitors vertically for improved height.
For a ridiculous amount of money you are free to stay for a few days and indulge yourself.Awesome, simply mind blowing. Great work, well done.
I would almost pay ridicilious amounts of money for just playing with this rig for an half an hour. And then I would shot myself because I can never play ED at home again, having only the regular X52. ;-)
Wow this looks awesome. I want the monitors the most though.. being able to see my 'peripheral' vision without mouse look would be great stuff. I wonder.. can you go vertical with multi-monitor? I would LOVE to see up though the sunroof on my ship in flight.
Anyway, +reps and I can't wait to see it finished!
Removing the bezel from the display was the biggest improvement. Even though the bezels are really small these days it still takes up about 1cm of the screen. More have done this: http://www.overclock.net/t/1397263/the-official-debezelled-monitor-club
You also see in the link that there are guys who put there monitors vertically for improved height.
The left side isn't finished, I first want to experiment with a lasercut panel to hold the switches. The panel is 8x20cm; if I want to have a PCB made for it, it'll cost me about $60 (and then I need another one for the left side, and probably 4 more for the other panels) so I am kind of hoping that I can get away with lasercutting a acrylic panel and solder/wire them together; if I can pull that off it'll save me a tremendous amount of work. On top of that, what on earth am i going to do with 9 spare pcb's for the one-off keypad anyway? (my china pcb factory just ships 10 regardless on how many you want).
Hey, if you want to: sent me some Eagle or target3001 files and i will see what i can do on the mill.
It makes very nice PCBs
[video=youtube;jMXxjT4nNxg]https://www.youtube.com/watch?v=jMXxjT4nNxg[/video]
May take a moment, i am fresh out of pare PCB material
Hello Loetmichel,Hey, if you want to: sent me some Eagle or target3001 files and i will see what i can do on the mill.
It makes very nice PCBs
http://www.cyrom.org/palbum/main.php?g2_view=core.DownloadItem&g2_itemId=14509&g2_serialNumber=2
https://www.youtube.com/watch?v=jMXxjT4nNxg
May take a moment, i am fresh out of pare PCB material
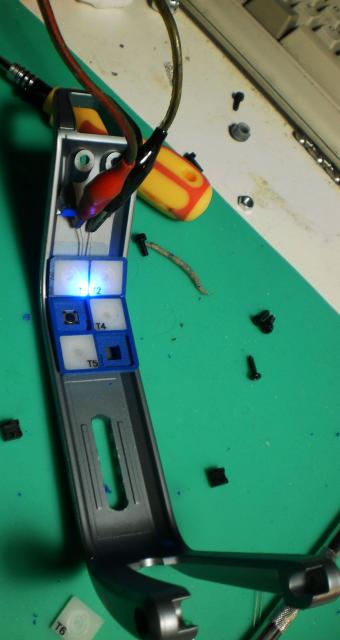
Well that certainly is a very kind offer! But it looks like it won't be necessary to get my prototype running. Yesterday I managed to get some lasercutting done and today I wired up the button matrix. If you look at the pictures where are blue and yellow wires to drive the rows and columns for the buttons. But i will have to add a second matrix to power all the leds in those tact switches!! I'm wondering how that'll work out.
First i want to see if I can get started on the firmware for the keypad before I continue on the tedious job of fabricating the 59 engraved keys.
Anyway thanks for the offer.


Hello Loetmichel,
Well that certainly is a very kind offer! But it looks like it won't be necessary to get my prototype running. Yesterday I managed to get some lasercutting done and today I wired up the button matrix. If you look at the pictures where are blue and yellow wires to drive the rows and columns for the buttons. But i will have to add a second matrix to power all the leds in those tact switches!! I'm wondering how that'll work out.
First i want to see if I can get started on the firmware for the keypad before I continue on the tedious job of fabricating the 59 engraved keys.
Anyway thanks for the offer.
http://i.imgur.com/jB1LC6F.jpg
http://i.imgur.com/7XkQ1Ib.jpg
http://i.imgur.com/l0fysXk.jpg
HEH, ugh...
Exactly why I do PCBs now on almost anything I do.
I commend you Cat as handwiring is a p.i.t.a ...
Good start there...
I usually do all my boards in Eagle and get them made in China for a lot of reasons. This one however is an absolute one-off and i couldn't wait 3 weeks and find out that i actually forgot the pullup resistors (duh). On top of that this board would be 200x80mm (pricey!) and require 4 layers or a insane amount of vias. I could not make you go through that. So for now i make a small exception and try it by hand.
I usually do all my boards in Eagle and get them made in China for a lot of reasons. This one however is an absolute one-off and i couldn't wait 3 weeks and find out that i actually forgot the pullup resistors (duh). On top of that this board would be 200x80mm (pricey!) and require 4 layers or a insane amount of vias. I could not make you go through that. So for now i make a small exception and try it by hand.
Heh, yup. I can't tell you how many times I forget a cap or a pull-up. So irritating.
I just had to resolder all 59 switches because i made all the leds common anode instead of common cathode. Sigh.