You are using an out of date browser. It may not display this or other websites correctly.
You should upgrade or use an alternative browser.
You should upgrade or use an alternative browser.
Community Event / Creation The C-Pod: A DIY Command seat (build log)
- Thread starter ThereIs0nly0ne
- Start date
Lovely.
Cheers Sanderson
")
Hmmmm, my brother is up for a few days next week..... He's a joiner by trade
He'll be up looking after pets, Wed - Sun while I'm away
*edit*
Anyway - Shouldn't the be the ED-POD pronounced 'ead pod
Hmmm ... did you remind him to bring his toolkit with him?
ED-POD, C-POD, CP-1. Decisions, decisions!
Applied filler to the stick case sides:

I've been thinking about the top panels and what I can do with them. I was going to make multiple panels but I've decided on a different approach. The reason for multiple panels was to avoid the artwork overlays slipping around. I can solve that by using some threaded inserts with socket cap bolts (M4 size) for the panel and use a laminated artwork. I'll use the same method for some artwork in the joystick panel section. The socket caps will be fairly small, unobtrusive and black.
Threaded inserts and socket cap bolts:

Now to figure out the artwork. I'll go with an orange theme. I've always liked orange ...
Hmmm ... did you remind him to bring his toolkit with him?
Yup, because he's doing some flooring for me in the man-cave, so he might as well mock up some additions to my already comfortable chair
Yup, because he's doing some flooring for me in the man-cave, so he might as well mock up some additions to my already comfortable chair
Sounds cool! What have you got in mind?
Just trying to throw some ideas for basic shapes and colours for the throttle overlay. This is just something knocked together for now. The actual size of this will extend top and bottom to fit the panel:

Ideas on this very welcome. Artwork is not my strong suit.
Sounds cool! What have you got in mind?
Just trying to throw some ideas for basic shapes and colours for the throttle overlay. This is just something knocked together for now. The actual size of this will extend top and bottom to fit the panel:
Ideas on this very welcome. Artwork is not my strong suit.
I like the orange lines .. but I think, if it was me, I'd try to retain something of the white markings, of the original, rather than the blue labels ..
BIG pic ..

I think I'd keep it looking quite technical still. The white lines and labels evoke a real and complicted machine, to me ...
It maybe that you wouldn't be able to finalise until the game releases, so ideally, if placed under clear perspex, can you keep the facia updated by swapping the underlay later?
EDIT: what will the over/ underlay be printed on? Some kind of polymer ideally?
Making nice round holes, in paper, sounds like a tricky trick.
Last edited:
I like the orange lines .. but I think, if it was me, I'd try to retain something of the white markings, of the original, rather than the blue labels ..
BIG pic ..
I think I'd keep it looking quite technical still. The white lines and labels evoke a real and complicted machine, to me ...
It maybe that you wouldn't be able to finalise until the game releases, so ideally, if placed under clear perspex, can you keep the facia updated by swapping the underlay later?
EDIT: what will the over/ underlay be printed on? Some kind of polymer ideally?
Making nice round holes, in paper, sounds like a tricky trick.
Thanks for the ideas Winterwalker, I think you're right with the markings.
The idea is to make a top plate for the throttle (6mm MDF) and use laminated artwork over the top. I'm really fussy about fit and finish and would like this to be a sleek as possible. All the buttons and switches are perfectly accessible even with the additional height of the panel.
Yes, cutting round holes in card is a tricky business trying to get an even finish. I've done this before with my arcade machine using the panel itself as a means of guiding the cut.
Another alternative is to make multiple panels and attach different legends to each one.
Definitely a work in progress thinking-wise!
Maybe a transfer for lettering? ... created somehow,
or "maybe" a two colour screen print, though then you're into realms of having to make stencil letters
(might work OK for orange lines though)
What drawing program are you using, to draw your test plate above? (sake of interest)
or "maybe" a two colour screen print, though then you're into realms of having to make stencil letters
(might work OK for orange lines though)
What drawing program are you using, to draw your test plate above? (sake of interest)
Maybe a transfer for lettering? ... created somehow,
or "maybe" a two colour screen print, though then you're into realms of having to make stencil letters
(might work OK for orange lines though)
What drawing program are you using, to draw your test plate above? (sake of interest)
I use Photoshop mainly. The template was produced by someone on the Rise of Flight forums but was in a format incompatible for Photoshop so I converted it to a jpeg.
The other option I could consider is printed adhesive sign vinyl to stick directly onto the MDF top plate.
Edit: thanks for the interest/input with this btw.
Maybe this method worth exploring ... [ link ]
I think if you apply the PVA carefully enough, and as smoothly as you're used to doing in your pics above, could get you a smooth finish over the blackboard paint ... ???
NOT sure how you print WHITE letters with an inkjet though !!!!
(Transfering black, over with a white show-through, maybe a stretch .. unless done a small area at a time .. maybe ..)
Adhesive vinyl would look good .. though it sounds like a bit of a handful, with long thin decals, to my sticky hands! I think you're much more used to dealing with ..
I use Photoshop mainly. The template was produced by someone on the Rise of Flight forums but was in a format incompatible for Photoshop so I converted it to a jpeg.
The other option I could consider is printed adhesive sign vinyl to stick directly onto the MDF top plate.
Edit: thanks for the interest/input with this btw.
Another common and pretty simple way is to print the artwork and place it between two pieces of acrylic glass. Its quick and cheap but acrylic can be a hassle to work with and the finish, altough neat looking, still comes out feeling somewhat cheap due to the overly glossy finish. Might look better on your otherwise matte throttle though.
If you can get the printing done in high quality, and figure out a good way to work the plastic, it might be worth a thought, quick, cheap and backlight ready
I think at the end you need to paint the walls of your room as well to fit the cockpit.
Shh ^ .. hadn't mentioned this idea to him yet ..
Personally I hope to see the "Cobra shaped conservatory / extension" on Google Earth soon (tm)
I think the acrylic sandwich idea is a good one too .. holes are tricky, but transfer techniques may be a real bogger ..
"frosted" perspex might help? less of a shiny finish ... shiny I think would detract .. I'm sure these nice people LOVE to send samples [ link ]
EDIT: it's a bit of a ponderable ....
Last edited:
Shh ^ .. hadn't mentioned this idea to him yet ..
Personally I hope to see the "Cobra shaped conservatory / extension" on Google Earth soon (tm)
I think the acrylic sandwich idea is a good one too .. holes are tricky, but transfer techniques may be a real bogger ..
"frosted" perspex might help? less of a shiny finish ... shiny I think would detract .. I'm sure these nice people LOVE to send samples [ link ]
EDIT: it's a bit of a ponderable ....
No no no, he needs to build a landing pad replica!
No no no, he needs to build a landing pad replica!
Or is that the garage?
Next build then! .. or .. kitchen conversion into a pressurised-cargo-bay
(it's where I keep MY baked bean cannisters anyway ... )
Looks like I have a new home ... I've been kicked out of the party and into the back yard
Thanks for the ideas. It's possible to have vinyl decals cut as well so that's also an option. I don't want anything too fiddly and would prefer a flat finish though.
That would be a really neat idea - Acrylic had crossed my mind and was my preferred option but I dismissed it due to the number of acrylic sheets I've managed to ruin over the years! This is going to be a complex piece. I guess it would be possible to have it custom made as I have the measurements. Backlighting would be awesome too. I may give this a go if other options don't turn out well.
Don't be giving me those types of ideas!
Frosted / opal acrylic is lovely stuff. I have some on my arcade cabinet for the light bar. I'll check the link out. Thanks for that.
Well I've just printed out the template and done a test fit on the throttle. The measurements seem to line up nicely:
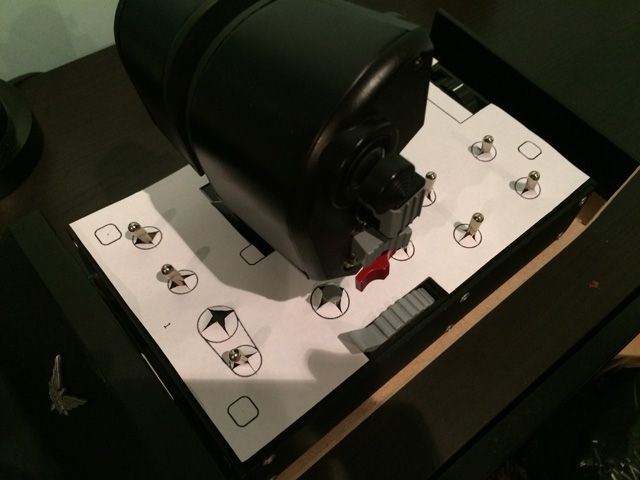
I'll see if I can get one cut tomorrow.
Maybe this method worth exploring ... [ link ]
I think if you apply the PVA carefully enough, and as smoothly as you're used to doing in your pics above, could get you a smooth finish over the blackboard paint ... ???
NOT sure how you print WHITE letters with an inkjet though !!!!
(Transfering black, over with a white show-through, maybe a stretch .. unless done a small area at a time .. maybe ..)
Adhesive vinyl would look good .. though it sounds like a bit of a handful, with long thin decals, to my sticky hands! I think you're much more used to dealing with ..
Thanks for the ideas. It's possible to have vinyl decals cut as well so that's also an option. I don't want anything too fiddly and would prefer a flat finish though.
Another common and pretty simple way is to print the artwork and place it between two pieces of acrylic glass. Its quick and cheap but acrylic can be a hassle to work with and the finish, altough neat looking, still comes out feeling somewhat cheap due to the overly glossy finish. Might look better on your otherwise matte throttle though.
If you can get the printing done in high quality, and figure out a good way to work the plastic, it might be worth a thought, quick, cheap and backlight ready
That would be a really neat idea - Acrylic had crossed my mind and was my preferred option but I dismissed it due to the number of acrylic sheets I've managed to ruin over the years! This is going to be a complex piece. I guess it would be possible to have it custom made as I have the measurements. Backlighting would be awesome too. I may give this a go if other options don't turn out well.
I think at the end you need to paint the walls of your room as well to fit the cockpit.
Don't be giving me those types of ideas!
Shh ^ .. hadn't mentioned this idea to him yet ..
Personally I hope to see the "Cobra shaped conservatory / extension" on Google Earth soon (tm)
I think the acrylic sandwich idea is a good one too .. holes are tricky, but transfer techniques may be a real bogger ..
"frosted" perspex might help? less of a shiny finish ... shiny I think would detract .. I'm sure these nice people LOVE to send samples [ link ]
EDIT: it's a bit of a ponderable ....
Frosted / opal acrylic is lovely stuff. I have some on my arcade cabinet for the light bar. I'll check the link out. Thanks for that.
Well I've just printed out the template and done a test fit on the throttle. The measurements seem to line up nicely:

I'll see if I can get one cut tomorrow.
Another idea. Get some laminated artwork printed, use a wood template (and another piece of wood underneath to clamp/sandwich the artwork in place) and drill through it with a spade bit to make the holes. The straight lines should be easy to cut.
Last edited:
Looks like I have a new home ... I've been kicked out of the party and into the back yard
You can extract revenge...
You have to build the whole ship now around the cockpit!
:Sha ha ha!!
Cheers!
Keep up the good work master craftsman!