Elite / Frontier Every Version of Elite

hmmm

The Australian editions ALL had Commodore 64 in red above the elite logo and all said Gold edition. This was Oct/Nov 1985.

There is no version I have ever seen for the C64 without it saying C64.

Could you put up some pics of the covers ?

Yes the C64/128 has different labelling yes. Not red but gold/yellow background on the label above the logo.
 
The Australian editions ALL had Commodore 64 in red above the elite logo and all said Gold edition. This was Oct/Nov 1985.

The Australian editions are as you have described and contained the original standard C64 disk version which did not play music on the 'LOAD NEW COMMANDER?' screen
There is no version I have ever seen for the C64 without it saying C64.

Could you put up some pics of the covers ?
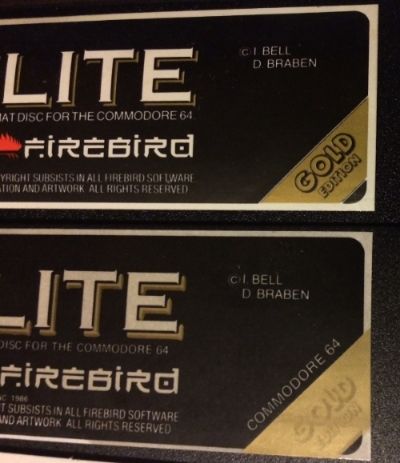
It is not the box cover, but the label on standard disk itself that does not have 'COMMODORE 64' printed across the top of the 'GOLD EDITION' logo. The later version does have 'COMMODORE 64' printed across the top of the 'GOLD EDITION' logo. Both versions have '1541 FORMAT DISC FOR THE COMMODORE 64' printed under the main ELITE logo.

The two disk versions are:

6966467e-e427-4086-a2d1-f84d171216f2_zpsa02c5509.jpg


The top disk is the original version that came with the UK/Australian C64 box and the bottom disk is the updated version that came with the USA C64/C128 box.
 
Last edited:
You're typing with too many line spaces again :D

Isthatmylastofficialwarning:D

Ozoli said:
The Australian editions are as you have described and contained the original standard C64 disk version which did not play music on the 'LOAD NEW COMMANDER?' screen

That's strange because I was living in Australia (As I am Now.) when I brought my very first Elite game back in 1986 and I'm pretty sure that means it's the Australian version and it plays music at the title screen. It's that well know midi tune.

BTW, you have replied to me about the scans I sent to you Ozoli.

Will those do, or do you want them done re-scanned properly and edited again?
 
That's strange because I was living in Australia (As I am Now.) when I brought my very first Elite game back in 1986 and I'm pretty sure that means it's the Australian version and it plays music at the title screen. It's that well know midi tune.

I have found out that there are two distinct C64 disk software versions which are the with and without title music versions. The other difference between these two is related to a hack that was published in Zzap64! which allowed the save file to be modified in the earlier version. The 'bug' was reportedly fixed in the later version.

It is possible that the later version was packaged in UK and Australian releases post implementation of the fix which would account for your recollection. Do any other UK or Australian '80s C64 Elite players recall music on the disk version at the 'LOAD NEW COMMANDER Y/N?' screen?

So that puts us at three confirmed different boxes for C64 disk versions (plus possibly one German language disk version) and two different software versions. Any others that we know about?
 
RE: Leroy's Helpbook

I found what appears to be a text version of Leroy's Helpbook:

http://www.emuparadise.me/GameBase%20Amiga/Extras/Hints,%20Tips,%20Cheats%20&%20Walkthroughs/E/Elite.txt

Here's the text (I've created the paragraph breaks on my own to assist with reading, I have no idea if that's where they actually were; also the section on dogfights and multiple enemies was missing):

Leroy's Helpbook for ELITE

By David Palmer

Introduction

The majority of video games, whether in the arcade or for home computers, cannot claim to be something that develops meaningful and realistic skills in the player, while at the same time giving entertainment. This is not true for the so-called first-person or simulator games, however. In these games, the player finds himself inside a spaceship, jet, tank, or other vehicle, rather than having an objective or "third-person" view of the action that is usually found in video games.

This first-person perspective is of course the only natural one that a pilot or driver can have, and in mastering these games the player actually develops the skills involved in the real-life activity. Those who train real-life pilots certainly realize this, and today we find that the most sophisticated first-person games are in fact simulators used in Air Force, Astronaut, and other professional programs. And although the average person doesn't have access to this kind of high-priced equipment, a number of worthy simulators have been created for both the arcade and home computers.

This has been my area of interest for several years, and I fell I've had enough experience to know a winner when I see one. It was thus with great pleasure that I had my first playing experience with Elite. In game play, realism, and attention to detail, this may be the best first-person game ever devised. The graphics and game complexity are things not usually regarded as possible for today's low-priced microcomputers.

In this book, I share with the reader those strategies I developed (through over 200 hours of play) that brought me Elite status and a multi- million credit fortune. This is not intended as a substitute for the instruction manual that comes with the game; before reading it, you should study the manual and learn some basics of game play through actual practice. This book is intended as a complement to the manual, something that develops strategy and techniques for specific parts of the game. Although it will be of most help to relative beginners, advanced players should also find items of interest.

Whatever your present level of experience in the game, may your long-awaited attainment of Elite status be as exciting to you as it was to me!

CONTENTS
1. Basics of Flight.................................................... 1
Maneuvering.................................................... 1
Scanner........................................................ 2
Refueling...................................................... 3
Other Screens.................................................. 4
Control Limitations............................................ 4
Saving Games................................................... 5​
2. Combat............................................................... 7
Aiming......................................................... 7
Dogfights...................................................... 8
Multiple Enemies............................................... 9
Newcomers......................................................10
Running........................................................10
Insurance......................................................10
Fuel Scoops....................................................11
Defense Against Missiles.......................................11
Types of Enemies...............................................11
Thargolds......................................................12
Combat Rating..................................................13
Hunting........................................................14​
3. Rendezvous and Docking...............................................17
Disappearing Stations..........................................18
Approach.......................................................18
Docking........................................................19
Margins of Error...............................................20
Other Ships....................................................21
Docking Computers..............................................21 iv​
4. Making a Profit......................................................23
Trading........................................................23
Contraband.....................................................24
Prices.........................................................24
Cop Out?.......................................................26
Return Trip....................................................26
Other Goods....................................................26
Narcotics Officers.............................................27
Diverse Economies..............................................27
Risk Without Yields............................................27
Little Stuff...................................................28
Specific Planets...............................................28​
5. Saving Time..........................................................31
Excessive Data Load............................................32
Hyperspace Timers..............................................32
Minor Objects..................................................32
One Last Jump..................................................34
Disappearing Stations Again....................................34
Window Shopping................................................35​
6. Incoming Messages....................................................37
Constrictor....................................................37
Thargoids Invasion.............................................37
Further Encounter..............................................38
Attention......................................................39
Trumbles.......................................................39
Constrictor Again..............................................40
Stealth Ship...................................................40
7. Starting From Scratch................................................41
First Run......................................................42
Second Run.....................................................42
Third Run......................................................43
Following Runs.................................................44
A Better Way...................................................45
Hunting........................................................46
End Game.......................................................47
Dangerous Rating?..............................................47 v
1. BASICS OF FLIGHT

Elite gives you the option of either keyboard or joystick control over the maneuvering of you ship. By all means use a joystick, since little is as awkward as trying to control motion with a bunch of buttons. For maximum performance you should also shun the Atari 2600 style joystick, or any like this that are short, clumsy, and have an independently-mounted fire button. You need something like the Wico Command Control stick, with the pistol-grip option: a stick that allows for precise control, is tailored for the human hand, and has a thumb-mounted fire button. The joystick should be securely mounted to a table or desk, with adhesive pads you can buy at hardware stores. Position the computer keyboard just behind the stick and to the side, for rapid manipulation of its function with your other hand. Such simple rules make a tremendous difference in one's success, and it's amazing how often they're overlooked.

Maneuvering

Your ship is fast and precise in its maneuvering, although the mechanics of control are rather unique and take some getting used to. The only way you'll get good at steering and aiming is to practice extensively, but it may clarify matters a little if I explain what's going on in terms of simple geometry.

In most first-person flying games, pulling the stick causes the nose to pull up, while pushing it forward causes the nose to drop. This is also true for real aircraft, where these pitch changes result in climbing and diving (through aerodynamic forces).

A similar pattern is followed by Elite, where a pitch change doesn't just rotate your ship, but puts it on a new heading. Apparently your ship has engines that automatically accelerate it in the direction in which you point it and scrub off speed from the old heading. In most first-person flying games, pushing the stick to the right will steer the craft in that direction, and likewise to the left. A change in yaw is achieved (the nose of the craft moves right or left) as well as a corresponding shift in heading. If the game is an aircraft simulator, this joystick action will also be accompanied by a roll (banking) to the right or left, since such a rolling maneuver is needed in aircraft to achieve maximum turning force and also to make turns more comfortable.

In Elite, pushing the stick to the right or left will only roll the spacecracft: in the same pattern as the rolling of an aircraft, but without any change in yaw or heading. Many situations require changes in yaw or horizontal heading, as where a target lies to the side of your sights. This change in yaw and horizontal heading must be achieved indirectly, by rolling so as to place the target (or desired heading) above or below the sights, and then executing a pitch change to place it in the sights.
 
Last edited:
RE: Leroy's Helpbook, Part 2

Scanner

This is one of the most sophisticated features of Elite, and to my knowledge is the first 3-dimensional scanner in a game. The coordinate system of the scanner always shows objects in relation to your ship. Its horizontal plane is the plane of the "wings" of your ship, with your ship at its center. The green "v" on the far side of the plane is the angle of view provided by your forward screen. An object's distance above or below the plane of your ship is shown by the height of the column connecting it with the plane.

Police craft, pirates, freighters, and other ships are shown in yellow (with the exception of Thargoids which are orange when alone, greenish when surrounded by Thargons). Escape pods and cargo cannisters are also shown in yellow. Asteroids are in red, while space stations and missiles show as green. If an object shows on your scanner which you wish to bring onto your forward screen, you should follow a pattern similar to the one for bringing a target into your sights. First, roll in whatever direction will most quickly place it in an imaginary vertical plane centered on your ship (in other words, the target designator on the scanner should be directly above the "I" in "ELITE"), then pitch up if it's above the scanner plane, pitch down if it's below.

Refueling

Although you can refuel at a sun, this is basically a waste of time in serious play. You should refuel while trading at a station. If you wish to refuel at a sun, you'll need a fuel scoop and to pass close enough to almost destroy your ship (not the cabin temperature gauge at left). As soon as "fuel scoops on" appears on your screen, pull away and make your escape. -3- Finding the sun in the first place can sometimes be a problem, and you should use a systematic scanning technique to locate it: using the planet as a reference point pitch through a full 360 degrees, then roll about 40 degrees, then pitch another 360 degrees, and so on.

Other Screens

The right, left, and rear screens of your ship can also be outfitted with lasers, however these are basically useless in combat. The reason is that the aiming mechanics are all shifted around when operating from a different perspective, and it would result in great confusion to try to go from the system you learned for the forward screen, to another one. In the case of the rear screen, pushing the joystick forward, for example will result in your ship seeming to climb (since the rear of a spaceship will rotate upward when it dives). You could "correct" this by freezing the game and reversing the "Y-channel" of the joystick (see the Quick Key Control Guide that comes with the game). Since it doesn't take long to make a 180 degree turn and just use the forward screen, the value of such a move could be questioned. You will be moving away from most objects showing on your rear view, so it will be intrinsically harder to shoot a target from this perspective. Things are even worse for the right and left screens, where a pitch change looks like a roll maneuver, and a roll looks like a pitch change.

Control Limitations

Note that because of limitations in the design of the computer, in this game you cannot simultaneously operate the joystick and the keyboard functions (speed control, ECM system, etc.). The joystick operations always take precedence, and to use a keyboard function you must momentarily let off the controls.

Saving Games

It is good insurance to periodically save your game to disk, not just when you end a session. You should also back up your disk on occasion. In a beginning game, when you have not yet equipped your ship, you should, in fact, save it every time you dock. You may wish to use a system of saving such as: Commander1, 2, 3...25, etc. This will allow you to keep track of your games for retrieval and study. Even if your Elite disk is capable of holding saved games, you should save to a blank formatted disk instead. The reason for this is that saving even once on the master disk will eventually ruin the disk and force you to have it replaced and begin your game from scratch. Note: when you are ready to save, you simply remove your Elite disk and insert a blank formatted disk into the drive.

2. COMBAT

The pulse laser you start out with is woefully inadequate - it takes so long to wear down the shields of most opponents, that you'd better try to avoid conflicts if you want to survive. Your missiles aren't much better, since they take a long time to reach a target and are vulnerable to ECM systems. Once you have a beam laser, you can pretty well take care of yourself, offering as it does several times the firepower of a pulse laser. Once you have an ECM system--and an extra energy unit to feed these hungry weapons--you're in good shape for combat. The ultimate is the military laser, which you should certainly acquire, even though it does not offer much of an improvement over a beam laser as the latter does over a pulse. Fortunately your enemies never have anything beyond pulse lasers and missiles, so you'll be able to outgun them all. Also, few of them have shields as strong as yours.

Aiming

Accurately aiming at a distant target is a challenge, especially if it's moving across your line of sight. You should not indiscriminately fire, as this will quickly overheat your guns. You should fire in bursts of "test shots", trying to get a fix on the target. If you get it positioned, then fire off a full volley.

Newcomers

Whenever you have enemies around you at close range, you should always ignore them temporarily and go after newcomers at a far range, since they are in the best position to shoot you. This might not work if you have a pulse laser (since they'd stand a good chance of getting in close before you could destroy them), but you're probably dead anyway under these conditions if you don't have at least a beam laser.

Running

It won't do any good to try to outrun your enemies. Not only can many ships outrun yours, but you'll place yourself in an ideal position to be shot even if your ship is slightly faster: You'll be a steady target in their sights while you're fleeing. Something that will definitely help is to hyperspace out of your present system if you get into trouble. If you're unsure of your survivability, then you should try to avoid making long hyperspace jumps that won't leave you enough fuel to escape. When you have enough fuel, have the hyperspace cursor set ahead of time for another system, so you can make a fast escape.

Insurance

The energy bomb and escape pod are expensive, and should only be used as devices of last resort. Use the escape pod if your energy bank is only a second or two away from being totally drained by enemy fire. When you arrive at a station, check the equipment of your new ship: you'll only receive what you had at the moment you jettisoned, and you may have lost something before this point that you'll need to replace. An energy bomb is useful if you're faced with multiple enemies and you know you won't have enough energy to safely eliminate them. If you think you should use it, do so immediately and don't wait till your energy is even lower.

Fuel Scoops

These have a value in combat, and you should buy them even if you don't plan on sun-skimming or cargo-scavenging: they will protect the lower half of your screen from collisions with errant cargo cannisters and escape pods.

Defense Against Missiles

Lacking an E.C.M. system, there are only two ways to deal with an enemy missile: shoot it, or hyperspace away. You cannot outrun or out-maneuver a missile forever; it will never run out of fuel. It is easiest to shoot a missile when it is fired in front of you, but it is also possible (though difficult) to out-maneuver an unseen missile long enough to get it in your sights. If you choose the option of hyperspacing to safety, your chances for success are much greater if you have the hyperspace cursor pre-set for a jump. To avoid the missile while your hyperspace timer is ticking down, continuously loop for a close missile, and accelerate away for a distant one.
 
Last edited:
RE: Leroy's Helpbook, Part 3

Types of Enemies

Most of your opponents will fall into two categories: police ships (vipers), and pirates/bounty hunters. Police will appear one at a time, although several may accumulate if you're slow to dispose of them. They have pretty strong defensive shields, although a beam laser will readily dispatch them. Bounty hunters are solitary and so may be pirates, although it is more common for pirates to be in groups of 2, 3, or 4. The weaker ships--which only require a few hits to destroy - tend to seek strength in numbers. If a group of ships comes onto the field, it may initially be too tightly packed to show as multiple designators on the scanner, but you can almost always identify it as a group by the fact that this single designator will be flickering on and off.

When faced with a pack, it is imperative that you reduce their numbers quickly, since 3 or 4 lasers simultaneously firing at you will quickly drain your shields. After you destroy one or two, though, the debris clouds may obscure the others. Here, you should use the survivors' laser fire as a guide to their location. Lacking this, you can probe through the cloud with your guns, searching for the tell-tale sound of your lasers strafing the hull of a ship. Any ships that appear straight ahead of you are non-aggressive and will only defend themselves: freighters, fellow traders, etc.

Thargoids

These are your most formidable adversaries, consisting of a mother ship with strong defensive shields and an ECM system, together with its host of small thargons which it discharges. On the scanner, such a group will initially have a greenish cast to it, which serves as a reliable method of identification. In normal space, Thargoids will appear randomly now and then, and it isn't all that hard to dispose of them. After their mother ship is destroyed (and its debris cloud vanishes), the Thargons stop firing and will drift aimlessly through space. If you have fuel scoops, you can collect and sell the Thargons at the going rate for "alien items" (note that you can pick up these items even if you have a full cargo hold). More difficult is the occasional scenario where a Thargoid mother ship with Thargons AND a pack of up to 4 pirates simultaneously appear in space. If you have a military laser and are skilled in its use, you can safely take these out. Otherwise, I would advise you to detonate an energy bomb if you have it (this will clean out everything but the mother ship). The Thargoids are truly deadly, however, when they succeed in trapping you in interstellar space. This is always identified by a double passage through the hyperspace tunnel, and your star chart will show you as located between systems.

Here there will be four mother ships, together with Thargons, for a total of at least eight ships (twelve is the maximum number of ships the computer can place in space but you can only view eight at a time). It's possible to eliminate them all if you have a military laser, although survival is problmeatical even when so equipped. The only safe approach is to immediately select the star chart and hyperspace to a planetary system. Note: an energy bomb will only destroy the Thargons; mother ships are immune to it, and will simply discharge new Thargons to replace those you destroyed. If you destroy this squadron of Thargoids, interstellar space will remain empty: cruise for as long as you like, and you will encounter neither ships, nor asteroids, nor planets. As a rule, you never change your position on the star chart by cruising or "jumping", either in this interstellar space or in normal planetary space (if you start out at a planet and work away from it, you'll eventually come back to it). Sometimes when you're trapped in interstellar space, you won't have enough hyperspace fuel left to make it to a planet; this spells the end of the game.

Combat Rating

Your combat rating is proportional to the number of "kills" you have made (ships of any type, as well as asteroids and boulders). Moving through each bracket requires many more kills than did the previous one. Some shiops are worth more as kills than others, as regards your combat rating. Outlaw ships such as pirates and Thargoids provide the biggest boost to your rating, while police Vipers are almost worthless. It is not true, as the manual states, that you may move from "harmless" to "mostly harmless" if you survive your first skirmish. Actually, around 20 kills are required for this. The table (page 14) shows the approximate number of kills required to move through each bracket and on to the next. The exact number of kills required will vary from game to game.

Harmless 20 kills
Mostly Harmless 25 kills
Poor 35 kills
Average 60 kills
Above Average 115 kills
Competent* 700 kills
Dangerous 3500 kills
Deadly 7000 kills

*NOTE: Competent requires 200 kills when Constrictor destroyed

After Deadly you become ELITE ! ! The computer will compliment you with a "Right On Commander!" at intervals of 350-700 kills which provides some sense of progression when moving through the ranks. Two of these are required to move through "competent" (unless you destroy the Constrictor), seven for "dangerous" and fourteen for "deadly" with the attainment of the status of ELITE at this point. When "hunting" (see below), you can see one "right on cammander!" about every two hours, so to attain a status of ELITE by itself with no work to earn extra credits will take at least 50 hours of play.

Great skill is not required to become ELITE, just a total of around 11,000 kills. In getting there, you can save to the disk as often as you wish. "Dying" will not directly penalize you; you must simply start again where you last saved the game.

Hunting

The fastest way to accumulate kills is to go to an anarchy planet and simply keep jumping through space, destroying all ships that appear. The reason to use an anarchic planetary system is that it teams with ships: you'll meet at least one with every jump, unlike a corporate or democratic world where you may waste a lot of time jumping between your encounters with ships. Also, there is a cash reward for most ships destroyed in an anarchy.

At times you will need to rest between jumps to cool your lasers and rebuild your shields; I would not advise seeking new opponents unless your forward shield is at least half energized, since you could meet up with a pack of four pirates with your next jump. You should carry an energy bomb when in an anarchic system, and have your hyperspace cursor set and ready to take you to safety. You should also avoid encounters with police when hunting, since they will do little for your rating, and will take time away from the pursuit of more valuable targets. You can do this by not carrying any illegal goods when in the anarchic system, and by improving your legal status ahead of time to at least "offender" (see Chapter 4). If you fail to do this, you will take around 25% longer to reach a given combat rating.

3. RENDEZVOUS AND DOCKING

As you make your approach to the planet, the space station will appear at some random point to the side or in front of the planet. You also can't predict just how far from the planet you'll be when you first spot it. Any outlaw craft (pirates or Thargoids) attacking you will veer away when you enter the domain of a station, and no new adversaries will appear (and sometimes this will save your life). However, any police attacking you will continue their assault.

Any ship making its first appearance after you enter the station's domain is either a shuttle, freighter, or trader. Shoot at this or the station, and the police will come pouring out like wasps out of a hive. Moreover, you can't dock under these conditions: try it and you'll be destroyed as you enter the docking bay. You may destroy a hostile police craft that made its appearance before you entered the station's domain, without the station's forces being aroused.

The station cares nothing about your legal status. Apparently, the station is a purely business organization, and will welcome you so long as you serve its economic interests. Its own police force will attack you only if you interfere with its profit-making operations. You won't be attacked if you accidentally run into another ship (or intentionally for that matter), although such an incident will brand you as an "offender" or even "fugitive". Annoyingly, this will happen even if the accident was obviously the other ship's fault. By the way, it's impossible to destroy a space station; even an energy bomb detonated as you enter the docking bay will have no effect.

If the station's forces are aroused, you must flee or warp out of the system. Once out of range of the station, you can reapproach the planet with impunity - these guys seem to have pretty short memories!

Disappearing Stations

As you approach the planet and come within the station's domain, the station may initially be out of visual range. In this case, simply center it on the compass and you'll soon spot it as a bright, steady "star". However, an irritating (and rather illogical) problem may occur under these conditions: swinging toward the station can cause your instruments to "lose" it, and you'll have to start over and wait till a different station makes its appearance. This can be an actual hazard if you're getting close to the planet, where station after station tantalizingly appears, only to disappear and lead you on till you either crash or pull away. The way to avoid this problem is the edge toward the station in increments, taking about 20 seconds to swing toward any station that is beyond the border of your screen; this will give your instruments a chance to "lock it in".

Approach

The docking bay of a station always faces the planet; thus you should make an approach that takes you under the station. When you visually locate the station, maneuver so that the planet is at the bottom if your screen and the station is at the top of your gun sights. Maintain a steady cruise for the time being, which will take the station higher and higher on your screen as you approach. Once the station appears on your scanner, it should be moving toward you at a moderate elevation above the plane of the scanner. As soon as it's directly above you, scrub off most of your speed and swing up to face it. This will often position you well enough so you can go straight in, although corrections will usually be required.

If you find yourself too far to the side of the docking bay to to in as-is, maneuver to place the entrance in your sights and the rest of the station directly below the sights. Pull up until the compass dot is at the bottom of the compass (meaning that the station is below you and you're facing a point about 90 degrees away from it). Then accelerate for a short distance, stop, and turn back toward the station. A series of such operations will always place you in a correct docking position. As you gain experience, you'll get better and better at judging the time of this operation, and be able to make a correction in one maneuver, even though you can't directly see how your position is changing. Sometimes when the station first appears, it will be between you and the planet. Here, a different initial approach is called for: go past it toward the planet, then decelerate and loop back.
 
RE: Leroy's Helpbook, Part 4

Docking

Once you are positioned directly above the opening, you can accelerate towards it, but you must be going at dead slow speed as you enter. -19- The manual that comes with the game tells you to keep the port horizontal on your screen. Not only is this very difficult, but it's totally unnecessary: even if you're not correctly aligned when you enter, the rotation of the station will soon result in a correct alignment, at which point you will be instantly "locked in". You may first scrape the walls a few times and lose some shield energy, but you'll make it safely. In fact, you can "find" the correct alignment even faster if you roll you ship in the OPPOSITE direction from that of the rotation of the station, as you enter the docking bay (joystick pushed to left). The combined rotations will ensure that you have little time to scrape the walls.

Margins of Error

It's not necessary that you be perfectly centered above the docking bay to successfully enter. The illustrations show the limits that I recommend you don't exceed without making corrections: If you approach the docking bay when this far off-center, you may find that you seem to be veering off-course when you get close to the surface of the station, in that the port will move away from your sights and even off your screen, DO NOT try to make corrections; just keep going straight and maintain a rolling maneuver, or you'll end up at an even worse angle.

Other Ships

When you're approaching the station, shuttle craft will often be leaving the docking bay, threatening a collision. Although you can steer away from them, I usually just plow ahead and run into them if I'm near the station. You have enough shield energy to take the hit, and steering away at this range would require a complete repositioning in order to dock. However, the danger does exist of running into two shuttles in a row, which together with scraping the walls of the docking bay may drain all your energy and kill you. The degree of risk is directly proportional to how long you hang around in front of the station, so by all means get in as fast as possible. With experience, you'll develop the timing required to approach the port at fairly high speed and decelerate to a crawl just before entering it.

Docking Computers

An experienced player will be able to dock just as safely and quickly without docking computers as with them, but you'll probably want them for their ease and luxury (I'll admit that I use them most of the time). Be careful, though: the computers aren't all that smart, and can kill you if you don't set things up properly ahead of time. Even with docking computers, you should come up under the station, and have the port visible before you activate them. If you come in on the wrong side and activate the computers, they can actually run you into the blank wall opposite the docking bay!!

4. Making a Profit

There are a couple of ways of making money other than trading. For one, you can be a pirate/bounty hunter. If you destroy all ships that appear, you'll receive a cash reward for most (most ships are pirates), and in many cases there will be a cargo cannisters and alloy slabs that you can pick up and sell. Also, you can pick up any escape pods (including those of the police), turn their occupants into slaves, and sell them! However, this life style is not a lucrative one, and you'll make money at a far faster rate by trading intelligently. After all, bounties are typically worth only around 10 credits each, and it takes a long time to fill your hold with scavenged cargo cannisters. Another alternative is asteroid mining, for which you need a special mining laser. When you shoot asteroids, they'll eject masses of minerals which you can collect and sell. But again, the profit per unit is small. Also, combat with pirates will present very serious problems, since the mining laser isn't suitable for fighting: not only does it lack fire power, but the sights are so big and ugly that you can hardly see targets through them!

Trading

Though trading has great profit potential, you won't make much if you flit from planet to planet hoping to find a deal on any one of the 16 commodities bought and sold. If you rely on chance like this, you'll be lucky to pay for your fuel. On the other hand, if you trade with the right goods at the right planets, you can make a profit as high a rate as 30,000 credits per hour. In short, you can pretty well eliminate the element of risk. In a sense this will make for a less exciting game, but if you're after the big credits then it's the only way to go.

Contraband

The core of your program should consist of narcotics trading. This is because there exists here the greatest potential difference between buying and selling prices of any commodity--as much as 100 credits/ton. This potential profit comes with an apparent risk: the price for narcotics is more volatile than that of any other commodity, and you risk going to a planet giving a price even lower than what you paid for it. However, there are ways to reduce and even eliminate this risk. In general, the narcotics price is higher at agricultural planets than at industrial ones, so you should usually buy at industrial and sell at agricultural. But how do you guarantee that you'll find good buying and selling prices with each "run" between planets? To explain this, I'll need to describe the basis of the pricing structure.

Prices

Each planet has its own fixed set of possible market prices for each commodity. Every time you visit a particular planet, the computer will randomly select a price from this set of possibilities. So although agricultural planets, for example, tend to offer higher prices for narcotics, some will have better sets of possibilities than others. The same goes for the buying prices on industrial planets. However, every planet will also have a number of very poor prices which you obviously don't want to get stuck with. The way out of this problem is to select an agricultural planet and an industrial planet which are very close together as well as having attractive prices. Preferably, they should be less than one light-year apart.

With this arrangement, you can keep hopping between planets until you find a good price to buy at the industrial, or to sell at the agricultural. Every time you hyperspace, the prices are randomly selected with no relation to previous prices. For example, you may find a price for narcotics at a given planet of 5 credits/ton, only to leave it and return immediately to find a price of 95 credits/ton. You can examine market prices in a given system immediately upon making the hyperspace jump, so this price-scanning operation will only take a few seconds. The closer the planets are together, the more jumps you'll be able to make in trying to find the right price, before you run out of fuel. I use the criterion of anything less than 40 credits/ton as a good selling price.

However, on average you should be able to find buying prices of 20 credits/ton and selling of 85 credits/ton. If you've just about used up your fuel with repeated jumps, you'll either have to settle for a price that's not as good as you'd like, or trade in other goods, or not trade at all and just buy your fuel. But in the case of planets that have good price spreads and are 0.4 light-year apart, it's possible to find good prices in practically every trading run. In addition to price, you also have to worry about quantity for sale if you're on the buying side of the market. If I have large cargo bay and enough capital to fill it, I won't bother with less than 20 tons of narcotics, even if the price is right (in the early part of a game, however, a small amount might be all I could afford).

If you buy narcotics but there aren't enough to fill your hold, or you have to stop at an industrial planet without finding and acceptable narcotics buy, you won't go wrong buying computers. You can almost always sell them at an agricultural planet for a profit of 30 credits/ton. The same goes for firearms, where you can make a reliable profit of almost 30 credits/ton. That's about it as regards good buys at industrial planets. Although there are other commodities that offer a profit when sold at agricultural planets, such as machinery, the profit margin is much lower.

Cop Out?

Actually, there is a way to guarantee finding excellent buying and selling prices every time, even where planets aren't close together. If you save the game every time you dock, then you can simply start it over whenever you hyperspace to the other system and aren't satisfied with the price; you can do this as many times as you like. However, I myself consider this to be a rather artificial way to play successfully, and prefer to develop efficiency through intelligent game strategy. If you go to the work of finding the right planetary systems, you can make profits at just as high a rate, as well as avoid the inconvenience of constantly having to save and restart games. However, there is one solution where I'd recommend you play this way--in the Elite Tournament (see Chapter 7).

Return Trip

You should also strive to make a profit on the return journey to the industrial planet (in picking up another load of narcotics). The best commodities to buy at an agricultural and sell at an industrial planet are usually furs, which you can typically sell at a profit of 10 to 40 credits per ton. Next in line is liquor, with a reliable profit of 10 credits/ton. And while the market in slaves is a little too volatile, careful purchases here will net you 15 credits/ton/ Other

Goods

If you're starting a game from scratch, then the trading rules are a little different. With little capital to work with, such commodities as food become attractive in trading. Although only offering a profit margin of 2 or 3 credits/ton, this will double your investment when making a run from an agricultural to an industrial planet.

When working with limited capital, you should buy almost as much as you can in the way of more-expensive large-profit-per ton items (like narcotics. furs, liquor, and computers), then use the leftover money to top off your cargo bay with such low-priced items as food and slaves. In any event, in each run you should try to structure your inventory so that you invest as much of your capital--and fill your cargo bay as full--as you can, provided each item is sure to yield a profit. In selecting what items to buy and how much of each, you can use the following formula: multiply the number of tons of an item you're thinking of buying by the expected profit per ton, do this for all other commodities you'd also be carrying, and add all these profits together. Select an inventory that will maximize this total profit.

Narcotics Officers

Trading in narcotics will, of course, get you in trouble with the police. You'll be branded an offender, which will sooner or later cause the police to attack you, and in defending yourself you'll become a fugitive. But you've got to be able to handle combat situations if you're going to play this game, and in any event the pirates are tougher opponents than the police (coming as they do in packs).

Diverse Economies

Don't attempt to trade at planets that are listed as "mostly agricultural" or "mostly industrial". Most profits come from the fact that you're trading between an agricultural and an industrial planet, so these 60%-40% planets only offer intermediate prices where good buys and sales are hard to find.
 
RE: Leroy's Helpbook, Part 5

Risk Without Yields

Although it is a little more profitable (at times) to trade at unstable worlds, the profits at safer worlds can be just as good. The major difference between political systems is the chance of your being attacked by pirates: you may or may not be attacked in a "safe" system when making a trading run, whereas you will probably be attacked several times at a feudal or anarchic planet. You should stay away from the more dangerous planets when you are inexperienced and/or have not yet fully equipped your ship, though they shouldn't present problems leter on.

Little Stuff

There are three commodities you can buy that don't take up cargo space: gold, platinum, and gem-stones. So if you have the capital, you can still invest in these after filling your cargo bay. However the profits you can realize are quite limited. In general, the prices are higher in industrial worlds, so this is where you should usually sell. Buy at agricultural planets. You should buy gold when 37 credits/kg or lower, platinum when 67 credits/kg or below, gem-stones when 18 credits/g or lower. Sell gold when 40 or higher, platinum when 73 or higher, gems when 22 or above. When trading in these items you should never alter your itinerary on their account, but it's something you might like to play with when the opportunity presents itself.

Specific Planets

In the first galaxy, the pair of planets nearest your starting point offer decent narcotics opportunities are Relaes and Zasoer. These planets are 0.8 light-year apart and lie 10 light-years to the upper left of Lave, and are where you should earn the funds to equip your ship. However, for extended work on building a fortune, you should select an agricultural and industrial pair lying only 0.4 light-year apart. Offering excellent opportunities are Atbevete and Aerater., located in the upper right quadrant of the first galaxy.

However, your mission to destroy the Constrictor (see Chapter 6) will soon take you out of the galaxy. A similar problem exists in the second galaxy, where your mission against the Thargoids will soon demand your presence in the third galaxy. But there isn't much in the way of lucrative trading opportunities anyway in the second galaxy. Better to just concentrate on improving your combat rating and getting the missions out of the way. The third galaxy is also deficient in good trading opportunities; you should move on to the fourth galaxy after completing your mission against the Thargoids.

Perhaps the best place to settle down for long-term profit making operations are the planets Rilaan and Esrireti in the 4th galaxy. You've gotten your missions out of the way, and these two planets are as good as any you'll find. They lie 0.4 light-year apart, and 23 light-years below your starting point in this galaxy. Two light-years away from this pair is the anarchic planet Arrege, where you can go to improve your combat rating. I found it easiest to get through these rather tedious upper levels if I worked for a while at building wealth, then combat rating, then back to wealth, and so on. Decent trading opportunities can also be found in the last four galaxies, if you wish to journey there. Just select the long-range chart and access data on pairs of planets so close that their designator are touching or almost touching. If you find an agricultural/industrial pair, they will probably offer good potential.

5. Saving time

If you've done much work with Elite, you've no doubt noticed the way that the action on the screen moves much faster than others. This is a result of limitations in the computer's power: the software is a little much for it! When a lot of things are going on at once, the computer must slow down, the result being that the action can come to a virtual crawl. This phenomenon takes some getting used to, as it will cause a variable speed in the maneuvering of your ship, as well as the rate of fire of your guns. It also consumes a great deal of time, but if you know some tricks to get around it, you can cut your space flight time in half (and thus almost double the rate at which you accumulate credits).

There are three tasks which the computer must perform: carry out the simulation, generate the graphics, and monitor the controls for player input. It must divide its time between these three functions, and if you can take away part of its load, it will be able to conduct a faster simulation. The major parameter under your control is the graphics: if you select a screen on which no graphics are showing (other than stars), then things move much faster!

Of course, you can't do this when shooting at targets, manually docking, etc., but there are many situations in which you can freely do so. In particular, when approaching the planet you should select another screen (look at the rear view, and notice how much faster the stars go past when the planet isn't showing). If asteroids or hostile spacecraft come within range as you're approaching the planet, then you can switch back to the forward view. The scanner is all you need to alert you. You can cruise toward the space station with just the scanner, and thus dispense with the time-consuming graphics of both the station and the planet. Once you activate the docking computer, you can also forgo a view of the station (here you should select a side view, as a rear view will show the planet.

Excessive Data Load

Another important time saver is to eliminate the graphics of debris clouds from destroyed ships; these are the most complex and time-consuming of all the graphics. If you're hunting ships--jumping through space to find another one as soon as you destroy the last--then you should select another screen and push the "J" key continually after destroying the current adversary. This will enable you to make another jump as soon as possible--just as soon as the debris cloud disperses. Then switch back to the front scanner when you jump and a new ship appears on the scanner. When it's out of view, the debris cloud from a single ship will take around 3 seconds to disperse, while it will take about 6 seconds if it's in view. Multiple debris clouds will take longer.

Hyperspace Timers

Another way to save some time is to switch to a side view (which doesn't show the planet). or to a non-graphic screen after you launch from a station and while the hyperspace is ticking down. The two rates at which the timer ticks down is an especially dramatic illustration of how much faster things go if you eliminate the graphics.

Minor Objects

You can also simplify the simulation part of the computer's job by reducing the number of non-aggressive objects in space. By this I mean asteroids and cargo cannisters (and escape pods if you're callous). Asteroids should be shot anyway, since there is danger of running into them (they appear straight ahead of you) and they count as "kills" toward your combat training. Cargo cannisters don't count as kills and will rarely hit you, but shooting them when they're good targets will save some time. Just don't go out of your way to shoot them, or you'll end up causing a net waste of time. Also not that they're hard targets to hit, as they are much smaller than ships and are often moving across your line of sight.

Another reason to shoot cargo cannisters (when convenient) is that this will unclutter your scanner and prevent possible confusion between them and enemy ships. However, with experience you can almost always tell them apart by their initial location, even if you didn't spot the actual arrival of the ship: enemy ships can be either above or below the plane of the scanner, but at a characteristic range and always in the front half of the scanner's space. Note that neither cargo cannisters, escape pods, or asteroids will inhibit making jumps, unlike a ship or its debris cloud. They will also travel along with you when you jump, so aside from destroying them the only way to get rid of them is to cruise until they get out of range. There is one situation in which cargo cannisters cause things to dramatically slow down: when you shoot a loaded freighter. So many of them will be thrown out in space (together with alloy slabs) that this will consume alot of computer power, even if all the objects are off your viewing screen.

It is best to simply let such a ship go out of range: while it will prevent you from jumping for awhile, it's cargo will really slow things down and continue to haunt you for some time. And whatever you do, don't fire off a sub-lethal number of shots at a freighter--it may dump its cargo, which means that you're stuck with both a lot of objects in space slowing things down and a ship that will prevent you from jumping. Freighters won't shoot at you if you don't shoot at them; you can always identify them by the fact that they will appear straight ahead of you. They will sometimes come almost straight toward you and pass by very close, but they will never run into you unless you steer toward them.

One Last Jump

Another thing that can save time is making sure that you get as close to the planet as possible through jumping, since covering a substantial distance by cruising is a very slow process. Often your ship won't jump any more when you're still fairly far away from the planet, since an additional jump at this point would take you closer than the allowed distance or even run you into the planet. You'll save a substantial about of time if you get an additional jump through the following technique: turn 180 degrees away, then cruise for a short period of time, then turn back toward the planet and make a jump. How long you must cruise away depends on how far you are from the planet; you can check you range by (momentarily) selecting the rear view, and with experience you'll be able to tell by apparent size of the planet that you're ready for a jump.

If, after your initial jumps, the planet almost reaches from the top to the bottom of your screen, then you should simply cruise toward it. Although you could in theory get closer by jumping, to get this additional jump you would need to cruise away from the planet for so long that you'd suffer a net expense of time. When cruising away from the planet, don't place the sun on your screen, as its graphics will slow things down. Select a side view if necessary.

Disappearing Stations Again

If you recall, I earlier advised the player to go slow when turning toward a station that has just appeared, to keep it from vanishing. Actually, you can usually save some time by causing such a distant station to vanish in this way, and waiting for a second one that is likely to be closer. But if you're getting dangerously close to the planet--or have an ill equipped ship and need the station's protection--then you have no choice but to carefully "lock in" any available station, no matter how distant.

Window Shopping

You can also save some time by examining the market prices and planning your purchase while you're cruising through safe space toward the station, rather than after you're docked. Although this might seem to be taking time-saving measures to the extreme, any means of playing faster is important if you're taking part in Firebird's Elite Tournament, to which I will turn my attention in the last chapter.
 
RE: Leroy's Helpbook, Part 6

6. INCOMING MESSAGES

As soon as you come into port with 5,000 credits you will be greeted by a very persuasive gentleman offering to sell you "the rarest thing in the known universe". The choice to buy is yours. Further clues are revealed in the last part of this book.

Constrictor

For the time being you should stay in the first galaxy, because a special mission awaits you!!! After you attain the rank of "Competent" and are complimented with "right on commander!" you will be commissioned by the Space Navy to find and destroy a TOP SECRET ship that was stolen. It has shields as tough as nails and nothing but a military laser will even dent it. The Space Navy will give you the name of a planet where he was last seen. Of course, he will have left when you get there. By docking and hitting "6" for information, you will receive more clues as to his location. After completing this mission you will receive 5,000 credits and become "Dangerous". Again, if you get really stuck go to the last section of this manual.

Thargoid Invasion

After you have seen three more "Right On Commander!" messages, take a trip to the third galaxy where another special mission awaits you! (provided you completed the first one). The Space Navy will once again enlist your services, this time, as a courier to carry information about the Thargoids' home world. What they do not tell you is that the Thargoids find out about the plans and will harass you all the way to your destination; it is hard but not nearly as hard when you get trapped in hyperspace with them. Upon completion of this mission, you will receive a Navy specifications extra energy unit that will recharge your ship at almost twice the rate of the normal extra energy unit (which in itself is twice as powerful as the one your ship originally came with).

Further Encounters

The quest against the Thargoids is the last of the special missions but there is one instance worthy of notice. Late in the game you will encounter a "stealth" ship, this ship is as tough as the Constrictor but with an extra catch. It will not show in the scanner. It has a special cloaking device. You will not get a message telling you what to do, but it can indeed be to your benefit if you play your cards right. Do not be discouraged if you do not figure it out right away. You will encounter this ship periodically.

If you really get stuck, the last part of this manual will offer more help. There are two awesome-sounding things listed in the manual that I was unable to find in the game, and Firebird acknowledges that they were simply written in as a flourish: space dredgers and generation ships. However, rumor has it that a sequel to Elite is in the works, and that it may include dredgers and generation ships. While rare, Rock Hermits can be found in Elite. Sometimes when you shoot at an asteroid, a fighter will emerge and circle around in space. If you continue to fire until you destroy the poor guy's home, alloy slabs and cargo cannisters will be thrown out into space.

ATTENTION

Read no further unless you wish to know the solutions!

This section will give answers to:
o "THE RAREST THING"
o "THE CONSTRICTOR"
o "THE STEALTH SHIP"
o "RAISING YOUR COMBAT RATING FAST"
o "TIPS ON PLAYING IN THE ELITE COMPETITION"

TRUMBLES

So you got curious, did you? You fell prey to a con artist. You bought TRUMBLES! These little things eat all your food and narcotics and multiply at every hyperspace. They will eventually cover your screen, and fill your cargo bay. To get rid of them you can try using an escape pod, but there is always one especially affectionate trumble in the group that cannot bear to part from you and sneaks into your escape pod. If you ever watched Star Trek, you may remember "Trouble With Tribbles"; Trumbles are Tribbles' distant cousins. The only way you can destroy them is to fly to the sun until your ship is at the point of melting. This will destroy the Trumbles.

The Constrictor Again

This powerful ship is very elusive. When you receive the mission to find him, you will be sent on a wild goose chase. Do not worry as you will eventually catch him, but not in the first galaxy. You will be sent to the second galaxy, but when you arrive you will not find the Constrictor nor any clue to his whereabouts. If you still cannot find him, try a planet named Orarra. Note: If you can not destroy the Constrictor, it is probably because you are not using a military laser.

The Stealth Ship

This unseen ship has a special cloaking device. When you destroy him you can, in fact, pick it up and use it, thus becoming invisible to your enemies radar. Note: The stealth ship has shields as strong as the Constrictor so it is no easy task to destroy him. The arrival of the stealth ship will typically be signaled by an inability to make any more "jumps", even though nothing shows on the scanner. If you can't locate him visually, or lose him later on, you should employ a systematic scanning technique similar to the one for locating a sun. -

7. STARTING FROM SCRATCH

You may have already gotten a game started and saved on the disk, but you haven't really gotten the difficult, early part of the game out of the way if you're thinking about taking part in Firebird's Elite Tournament. In this competition, all players must start from scratch and will (according to current plans) be given exactly 2 1/2 hours to reach the highest combat rating and number of credits that they can. The winner will be the one with the highest combat rating or if more than one attain the same rating, the one among these with the most credits. In this chapter, I will show how to get a game going in the safest and fastest way, with emphasis on the tournament.

The basic goal will be to attain "competent" status and around 30,000 credits in a 2 1/2 hour period. In such a contest, it is an unfortunate fact that luck plays an important role: because the appearance of enemies and the selection of prices is largely a random process, some games are harder to survive than others. But there is much that the player can do in the way of strategies that will tilt the odds in his favor. The principles I will outline will in general apply to any beginning game, but where things are different for a non-competitive game, I will point this out.

First Run

But 2 tons of narcotics at Lave. Although this is not a good price by the usual criteria (at 49.6 credits/ton), it's the way to earn the most credits in the first run. Immediately head for Reorte, 4.4 light-years above Lave. Check the market prices when you enter this system, and start the game over if the narcotics price isn't over 80 credits/ton. If the price is right, immediately start jumping toward the planet. But if you encounter ANY ship when jumping, start the game over again. Not only is your survival problematical (at least when there's a pack of ships), but you'll waste too much time if you engage the enemy: It can take almost forever to destroy a ship when you only have a pulse laser, and you should save your missiles for later.

You'll save time in the end by restarting the game however many times it takes to get near the planet without encountering any ships. Once docked, sell your narcotics and buy all the slaves you can if the price is 12 credits/ton or lower. With any remaining cash, buy liquor and/or food. At this or any other planet, buy fuel after selling your cargo and before buying a new cargo: you don't want to be short of cash and have to waste time trading back part of your cargo to buy fuel.

Second Run

Head for Relaes, 6.8 light-years to the upper left. This is the most crucial run, since you have made a substantial time-investment in the game and don't want to start over. You don't have enough fuel to hyperspace to another system if you get in trouble, so the risk is high. You should immediately engage all ships that appear, although you may well be a goner if a squadron of pirates appears. The police may also attack you, since you have traded in illegal goods. If faced with a pack of pirates, fire missiles as well as your lasers. Be careful not to shoot your own missiles, or waste shots on ships that your missiles are tracking.

When faced with several enemies, maintain your speed so you can quickly get past them if you can't destroy them immediately. Next, carry out the low-speed looping maneuver to bring them back onto your screen. When a single ship appears, it is most likely a police viper with missiles. You must do everything you can to destroy him before he gets past you, since police craft will often fire missiles at this point. He may also fire a missile when he's in front of you, but at least you have a chance to shoot it under these conditions. The best strategy with a police craft is to lock a missile on him, but try to destroy him early on with your lasers.

Only fire your missile if it looks like he'll get past you. In any event, you must eliminate all ships just as fast as you can, not merely to protect yourself from them, but to avoid the disastrous occurrence of other ships coming onto the field while you're fooling around with the first one. If these conditions last, you won't make any progress toward the planet, and will have your shields and energy banks worn down till you die. If you make it safely to the station, you'll probably survive from this point on if you're an experienced player. You are now in what amounts to a double system: Relaes and Zasoer, two planets close enough together (0.8 light-year) that you can hop back to the other one if you get in trouble when making a run. Sell your cargo at Relaes, and buy narcotics if they are available and if the price is right. If not, buy computers.

Third Run

Hyperspace into the Zasoer system, with your first task being to set the hyperspace course back to Relaes so as to make the fastest possible escape if need be. Next, examine the prices and if you're carrying narcotics, skip over to Relaes and back to Zasoer if the price isn't right. Here you should employ the criterion that any price over 60 credits/ton is acceptable. -43- Carry out this operation until you find a decent price or until you're almost out of fuel. ALWAYS keep enough fuel to hyperspace out of the system if you get in trouble. Normally, when working in the markets of a closely-spaced agricultural industrial pair, you should only concern yourself with the narcotics price of the agricultural planet when you want to sell. But here, you should also examine the price when skipping back to Relaes, since you have no guarantee of finding a good price at Zasoer and you want to conserve as much hyperspace fuel as you can for insurance. When making this trading run, immediately hyperspace out of the system if a pack of four pirates shows up. Otherwise, engage all aggressors until you either destroy them, or your energy reserves run low (at which point you should hyperspace away). If you must leave the system because of low energy, rest in the other one as long as possible--that is, until an aggressor appears.

Following Runs

When you sell your cargo at Zasoer, you can generally select a good return cargo from slaves, liquor, or furs. Carry out trading operations between these two planets until you have at least 1,000 credits, at which point you should probably buy a beam laser (actual cost 600 credits, since you're refunded 400 credits for your pulse laser). I realize that this will cause a big loss in investment capital, but without a beam laser your survival is still somewhat in doubt. With it, there is not only very little that can harm you, but you'll eliminate enemies so fast that the time you save will pretty much make up for the loss in capital. Continue to trade, and when you have over 400 credits left after filling your hold, buy a large cargo bay. Next, you should work toward aquiring enough money for an ECM system, the an extra energy unit, and finally a military laser, but don't sacrifice investment capital to buy any of this equipment: always keep enough cash to fill your cargo hold.
 
RE: Leroy's Helpbook, Part 7

A Better Way

The above picture changes considerably if you wish to save the game to disk whenever you dock--and if the rules of the tournament permit this (at the time of this writing it looks like they probably will). Not only can you avoid much risk, but you can make profits at a much faster rate. The second run--to Relaes--looses its great risk, since it's comparatively painless to start over at Reorte if you get in trouble. If you wish to take this technique even further, you can use it to demand a good narcotics buying price (and quantity for sale) at Relaes, as well as a good price to sell whatever you're shipping from Reorte (usually slaves). Guaranteeing that you make big profits in these first few runs will make a huge difference in total efficiency, since you will be able to equip your ship much faster, as well as quickly build investment capital (after all, it takes money to make money).

It can also be very helpful to save the game at every stopover when trading between Relaes and Zasoer, not only for insurance but for increased profit, If you use up all you fuel looking for a good narcotics buying or selling price and don't find it, you can simply start over at the station and continue until you do find it. Although this operation takes time, the increased profits per run will result in far greater overall earnings per unit time. With this technique, you can also be more demanding as regards narcotics prices, since you have in essence an unlimited fuel supply; I insist on selling my narcotics at over 80 credits/ton. You can also do without sacrificing investment capital to purchase a beam laser as early as possible: you will always have good insurance from having just saved the game. Instead, the first piece of equipment you should acquire is a large cargo bay. If a pack of pirates appears before you acquire a beam laser, simply start the game over and you'll not only avoid great risk, but save time.

Hunting

After you have a ship equipped with an ECM system, extra energy unit, and a military laser, you can stop trading for now and work at improving your combat rating. If the game isn't a competitive one, you will probably wish to fully equip your ship before moving on, with such items as docking computers, an energy bomb, fuel scoops, and an escape pod. In the tournament, you should never buy these items, since you can't afford the cost, or the time to earn the required funds. Your hunting ground is the anarchic planet Quator (3.2 light-years to your lower right), which makes a close pair with the planet Ra.

But first pick up a load of computers at Relaes and ship it to Ra. You need to buy fuel at one of the two planets (Ra and Quator), so you might as well make a profit while you're at it. After unloading, buy a shipment of furs or liquor (but not slaves, because you don't want to waste time fighting the police craft that don't contribute much to your combat rating). You should carry out hunting operations in the Quatar system until you attain "competent" status.

This is (probably) the most you can anticipate in a 2.5 hour game (see below for a possible exception). There is such urgency as regards time, that you should take greater risks than you normally would in hunting operations: carry out jumps to find new ships even if your forward shield is only partly energized. Except when seriously drained, you can't waste any time rebuilding your shields between adversaries.

However, something that can give you a little more insurance is to have the hyperspace cursor set on Ra, so you can make an escape if you get in trouble. Something you should do when hunting is to steer away from the planet and sun, and place them at a great distance. You want to avoid the time-consuming calculations involved in not only their graphics, but their mere proximity. And of course follow all the principles of time-saving that I outlined in Chapter 5. Unfortunately, you won't be able to save the game to disk at any point in this hunting operation, unless you are willing to spend several minutes in docking. If you dock, do so at Ra, since this will be faster than working your way back to Quator.

End Game

Check on your combat rating often when it's getting about time for a shift from "above average" to "competent". When you reach this goal, hyperspace back to Relaes and Zasoer. Continue this for as much time as you have left. Actually, if you have a good sense of timing, or keep track of your number of kills, you can save some time by resuming trading before reaching "competent" status. You can then use the inevitable confrontations that will arise in trading to take you over the edge into the "competent" bracket. Make sure that you're docked before the 2.5 hours runs out, and trade your military laser in for a beam laser. This will give you a 5,600 credit refund, and with both skill and luck you may have over 30,000 credits at this point.

Dangerous Rating?

Believe it or not, it is possible to attain the rating of "dangerous" within 2.5 hours (I have done it). This is accomplished by finding and destroying the Constrictor through a shortcut: heading him off at his final destination planet, rather than following his trail as you normally would. This may or may not have importance in relation to the tournament. The problem is that this goal is extremely tight: the one time I did succeed, I did so with only a couple of minutes to spare.

Even if I were to play with a very high level of skill, they would probably require the opportunity of playing several games within the tournament, to consider this a feasible goal. In any event, here is the plan: Start the game in the usual manner, and save the game at every stopover. Buy a large cargo bay as your first piece of equipment, and when you have money beyond the needed investment capital, purchase a beam laser and an ECM system. At this point you should start saving money for a galactic hyperdrive. For now, we will forgo the extra energy unit and military laser; you can purchase these with the profits you make in traveling toward the planet Orarra in the second galaxy (the Constrictor's destination world). When you dock at Relaes and have 5,000 credits left over after buying a load of narcotics, purchase a galactic hyperdrive, and use it. You will find yourself in the Ororra system, not to be confused with the Constrictor's destination of Orarra.

If the narcotics price is right for selling, proceed to dock; if not start the game over at Relaes and try again however many times you must. Next head for Resori, and restart the game at Ororra as many timmes as it takes to find a good buying price for narcotics. Then sell your narcotics at Zaaxeve, buy at Ceiner, and sell at Zatebiso. You will next arrive at Orarra, and by this time should have enough cash for a military laser and an extra energy unit (note that you can purchase both for only 6,500 credits, if you first buy the military laser and get the 1,000-credit refund on your beam laser).

You are not yet ready to tackle the Constrictor; you must first see "right on, commander!" before you will be given the mission. Your hunting ground is the feudal planet Tiriusri, 2.4 light-years above Orarra. Although not quite as good as an anarchy, it will have to do, since you'll have to go too far out of your way to find an anarchy. Hyperspace into this system, but don't dock. You should also not carry any illegal goods, and should only have a legal status of "offender" (don't bring anything illegal to Orarra, and you will be demoted from "fugitive" by this point). You don't want to be battling the police, which do little for your combat rating. As soon as you see "right on, commander!", head back to Orarra and dock, so as to receive your mission. Then head out from the station, and you will soon encounter the Constrictor once you start jumping through deep space.

If you're pressed for time, a quick way to destroy the Constrictor is to arm a missile and head straight for him, firing this missile just before colliding with him. Although he has an ECM system, he'll usually not have enough time to use it (this missile trick will work against any ship equipped with an ECM system). Or, you can simply run into him if you choose: if you have some shield energy, you'll always come out the victor in a collision with another ship. However you do it, you will immediately promoted to "dangerous" when the Constrictor is destroyed.

If at all possible, make it back to port before the 2.5 hours runs out: Orarra if you're still close, or hyperspace to another planet if you're not. You will receive 5,000 credits when you dock, and can get the 5,600 credit refund on your military laser. In a game like this, where you're concentrating on combat rating, you can't expect to have a final total of more than around 15,000 credits. So there you have it; the distillation of what I've learned in my journey through Elite's universe. Good luck in your quest for fame and fortune as a space warrior!
 
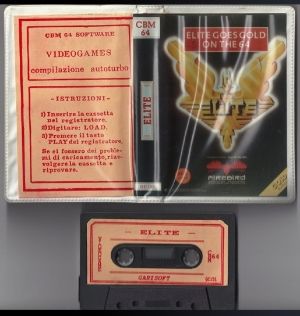
Italian Version of Elite for the C64

Here is an interesting find. It is a Commodore 64 cassette version of Elite that was released in Italy by Garisoft. It loads up fine on my C64 and the game itself appears to be the same as the English version with only the packaging in Italian. Has anyone seen this version before?

Elite_IT_zps36e49388.jpg

Nope never seen it. What state are you in again Ozoli ?
 
Top Bottom