Lego Technic SRV (WIP)

PROJECT COMPLETED (mostly)

uc


Click here to see more images of the finished model: https://forums.frontier.co.uk/threads/lego-technic-srv-wip.521140/post-8388639

Original thread follows below:


----------------------------------------------------------------------------------------------------------------------------------------------------------------------------------------------------------------

After buying a little spaceship and building it (because I'm an adult and I'm allowed to!) I had an idea to try and build an SRV out of Lego Technic.

The idea is to make it fairly big, with the ultimate aim to get power functions motors into it and be able to drive it around, but first I must make the basic model.

I found the Lego Digital Designer, and although officialy discontinued by Lego, they still keep it available to download from their website - it simply operates in offline mode. I plan on building the entire thing digitally, then ordering the parts and building it!

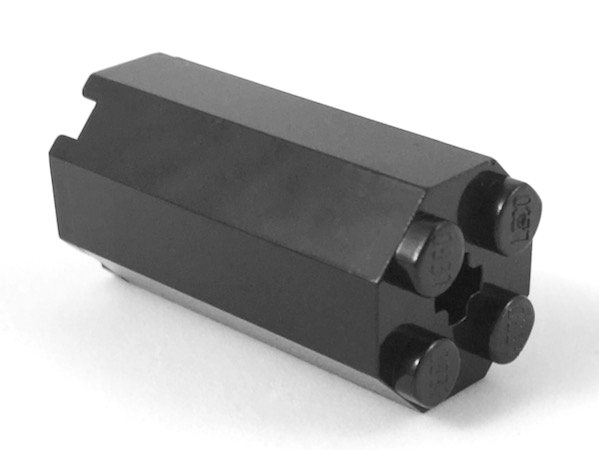
I've spent a few days off and on, and so far I have assembled the front wheel assembly. ATM these wheels will simply be adjusted by hand for effect.

NknEXca.png


I have redesigned the front assembly a few times, and probably will do again before it's finished.

Uw94N8k.png


MhX2UXM.png


Next step I think will be to adjust how the front arms come out so they come straight out at a sideways angle rather than down THEN at an angle. You can also see above the beginnings of where the cockpit will be attached to the body of the SRV
 
Last edited:
Update: 7/9/19

Started building up the sides of the main body:
o296Ws4.png


ItpGhpU.png


Also spent some time on the cockpit that's worked out quite well. Started work on the mid and rear wheel arms, although I'm thinking they need beefing up or bracing somehow as this looks like it's going to be fairly heavy

WS8BUPF.png
 
It's looking good but the front wheel supports on the technic rods and 32192 / 32016 connectors will struggle to take the weight of the main body, especially when you run it over lumps and bumps.
It might be worth putting together a real life version of some of the sections to check how it works in reality - LDD is great but you can't beat real life moccing!

Good luck with it and keep us updated :)

Edit:
The rollercoaster (10261) had supports made with round 2 x 2's (17485) and droid bodies (30361c) strengthened with technic rods in the centre. the thicker construction might work well in your moc.
 
Last edited:
It's looking good but the front wheel supports on the technic rods and 32192 / 32016 connectors will struggle to take the weight of the main body, especially when you run it over lumps and bumps.
It might be worth putting together a real life version of some of the sections to check how it works in reality - LDD is great but you can't beat real life moccing!

Good luck with it and keep us updated :)

Edit:
The rollercoaster (10261) had supports made with round 2 x 2's (17485) and droid bodies (30361c) strengthened with technic rods in the centre. the thicker construction might work well in your moc.

I was literally just experimenting with those pieces! The standard height round ones with the axel holes in the centre. I have a feeling the axel rods by themselves will bend or buckle under the weight without some support
 
I was literally just experimenting with those pieces! The standard height round ones with the axel holes in the centre. I have a feeling the axel rods by themselves will bend or buckle under the weight without some support
Nice one! I reckon the thicker supports would work really well as rods alone are pretty flimsily.
If you've not already done so, perhaps consider making the supports with the round 2x2's with axles through and then put droid bodies at the end, it should give you a couple of options for connection and might prove handy for giving the left / right angle at the front, and also possibly some scope for suspension.
I'm also pretty sure there were taller versions of the 2x2 rounds with a squarer section which may work, possibly from old castle (so they'll cost a bit and be in old grey, no doubt!)
Edit: here it is.
6037.original.png
Mid 90's octagonal so not hugely expensive or rare - there's a couple of versions to include side studs and 90 deg angle which might be handy.

It's looking great though, good work (y)
 
Last edited:
Update: 7/9/19

Started building up the sides of the main body:
o296Ws4.png


ItpGhpU.png


Also spent some time on the cockpit that's worked out quite well. Started work on the mid and rear wheel arms, although I'm thinking they need beefing up or bracing somehow as this looks like it's going to be fairly heavy

WS8BUPF.png

Excellent.

Maybe reinforce a bit, the arms of the front wheels ?

Sounds a little light compared to the overall mass.
 
Update 10/9/19 - I've been experimenting with two ways of making the arms stronger - using round blocks with axle holes and replacing the entire arm with beams instead.

If I use the beams it seems stronger but I have less angles to play with. If I use the axles re-enforced with round blocks it looks better, but the joints will be a weak point. I played around with droid bodies but as the axle doesn't go all the way through it limits usage. Might be able to do something with the side holes though.

STcnxSR.png
 
Update: 12/9/19 - I've been working on how to attach the angle beam supports at an angle for the rear wheels. I eventually settled on a 45 degree angle so I could securely attach it to the main body diagonally, and so I could attach the steering mechanism to the arm (allbeit oddly)

I know it looks ugly as sin, but I aimed to keep the whole structure here to within a 3x4.5 layout so the wheels turning axis stays the same as the front wheels.

mOmcCSg.png


Hucpfqw.png


It does indeed fit, and the wheels do indeed turn!

8Q6z37C.png
HbpNCFx.png


After realising that I still have to attach a steering mech from the main body out to the front and rear wheels I felt like I have bitten off more than I can chew. I might have to re-visit the entire wheel assembly in order to do this.

So I moved on to an easier bit - raising the main body of the SRV itself.

jOdsYke.png


The main issue I face when raising the body is that little zig-zag bit up there. currently it looks too busy and too thick. I'd like to use thinner beams but they only have axel holes and not round holes in. Again I'll have to re-think.

The eventual aim of this is to build it and remote control it with the Lego Power Functions I can rip out from another technic set I have
 
Update 14/9/19 - I have spent the day completely re-engineering the wheel assembly and steering mechanism. It now operates via cogs and not via the rack system I had originally planned. It also still fits within the dimensions of the first version with similar turning circles.

1AE1IdZ.png


IR20Nxx.png


csXH2bU.png


The axle sticking out of the last image is for the steering drive. Also excuse the mess, even digital lego kits create mess :D
 
Top Bottom