Thanks you very much for that and your project sounds intriguing! Make sure you post some pictures
Yes, working in London (the wrong side of London too) sucks. My commute is a mere 3.5 - 4 hours per day. Not goodQUOTE]
Hello matey,Yes,absolutely I will do.I think I might send you a link for them once it looks a bit more convincing,at the moment we are talking 70% frame and a floor
I can't post here my impressions of travelling to London in a van down The M1 I'm afraid,but we'll leave it at that.
You are using an out of date browser. It may not display this or other websites correctly.
You should upgrade or use an alternative browser.
You should upgrade or use an alternative browser.
Community Event / Creation The C-Pod: A DIY Command seat (build log)
- Thread starter ThereIs0nly0ne
- Start date
Loving your work man, very nice indeed, seems a bit of a waste of time building all this then putting a rift on though, I would just want to sit there in my own home made cockpit perhaps a projector setup on a curved screen with head tracking would be awesomer
https://www.youtube.com/watch?v=bo33PceNS3o
it actually looks like you have the skills to faithfully model the whole cockpit interior tbh, a projector outside like on those big flight simulators would be pure nerdgasm
Perhaps devs should enable a fullscreen no cockpit mode, where the individual sensors and displays could output to android tablets, so you could literally have you sensor in front of you at an angle on a tablet, the nav and systems screens inside the cockpit each side on tablets, and the projector outside the screen
Actually building of a cockpit and using Rift especially with a Buttkicker if you put the vibrator bass modules in all the right places should be giving an unparallel realism!
Once finished one could even make some further modifications in the project so to put the vibrators in all right places (back chair, cushins near ribcages at the back) and if set up just right could feel the bumping of explosions during fights.
Seems I got a message about awaiting my post to be reviewed by a forum mod, but it actually ate my initial post! LOL
It was my initial post saying hi and keep it up ITOO!
Also i posted a thread about a cardboard project from Arcadecontrols page and asked the question if a similar project could be done using cardboard instead of wood, according to you opinion.
Cheers!
It was my initial post saying hi and keep it up ITOO!
Also i posted a thread about a cardboard project from Arcadecontrols page and asked the question if a similar project could be done using cardboard instead of wood, according to you opinion.
Cheers!
Hello matey,Yes,absolutely I will do.I think I might send you a link for them once it looks a bit more convincing,at the moment we are talking 70% frame and a floor
Sounds very cool! Looking forwards to seeing that.
Actually building of a cockpit and using Rift especially with a Buttkicker if you put the vibrator bass modules in all the right places should be giving an unparallel realism!
Once finished one could even make some further modifications in the project so to put the vibrators in all right places (back chair, cushins near ribcages at the back) and if set up just right could feel the bumping of explosions during fights.
Yes, placement of transducers is important when using the smaller ones, particularly when using MDF as it doesn't transfer the vibrations as much as metal. Hopefully one much larger Buttkicker would be sufficient to overcome that issue. What I did on the R-Pod is to place one near all body contact points on the rig - seat, shifter and pedals with the wheel already having force feedback.
Seems I got a message about awaiting my post to be reviewed by a forum mod, but it actually ate my initial post! LOL
It was my initial post saying hi and keep it up ITOO!
Also i posted a thread about a cardboard project from Arcadecontrols page and asked the question if a similar project could be done using cardboard instead of wood, according to you opinion.
Cheers!
I have seen a good looking cockpit made of special rigid cardboard (I've searched but can't find it - I think it was for an a10c Warthog) and there was a kickstarter project for one so it is possible to do so. I couldn't vouch for the stability or durability though. Interesting project though!
I have seen a good looking cockpit made of special rigid cardboard (I've searched but can't find it - I think it was for an a10c Warthog) and there was a kickstarter project for one so it is possible to do so. I couldn't vouch for the stability or durability though. Interesting project though!
http://dogfightboss.com/
The "Dogfight Boss" is a cardboard simpit designed to be cheap and simple and still give a sense of sitting in a full sized cockpit.
The kickstarter failed but its apperent that the creator is driven and eager to finish this anyway and it seems these will become available for purchase sooner or later.
Im questioning the stability and longetivity of a cardboard construction though.
That's the one. It looks great but would be even better if it was made from plywood.
I have the next few days off work. Today I am filling the side pieces for the HOTAS cases. I may get around the covering the lids with vinyl also.
There's not may interesting pictures which can be taken of the filling process unfortunately but I will post a few. It's a time consuming task to get the finish good enough.
Some pictures of the preparation. This is the lid section for the throttle case.
Filled:
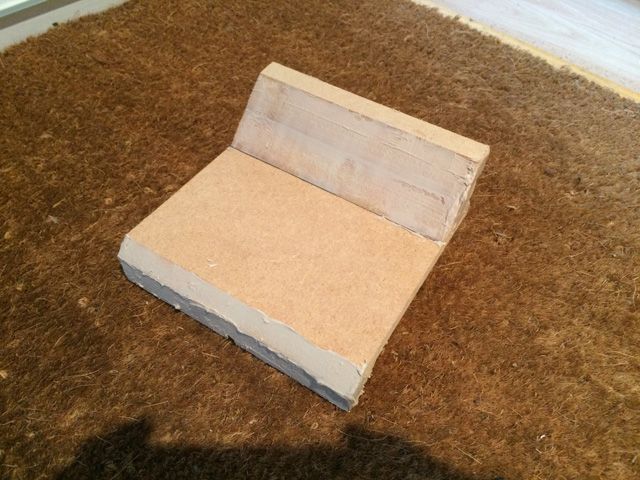
Sanded:
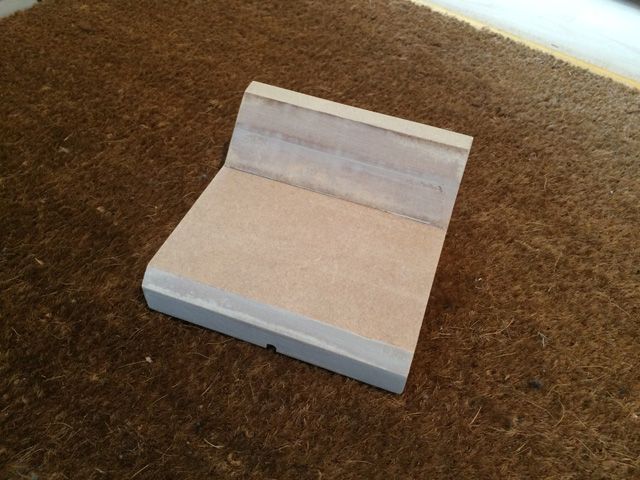
Side showing where inconsistencies in the width of some areas has been addressed:
Marked out for additional re-work:

Filled:

Sanded:

Side showing where inconsistencies in the width of some areas has been addressed:

Marked out for additional re-work:

That's the one. It looks great but would be even better if it was made from plywood.
I have the next few days off work. Today I am filling the side pieces for the HOTAS cases. I may get around the covering the lids with vinyl also.
There's not may interesting pictures which can be taken of the filling process unfortunately but I will post a few. It's a time consuming task to get the finish good enough.
Yeah they sure look good and the concept is brilliant, but cardboard...One spilled cup of coffe and its all over
But, afaik you can order the plans only for the dogfight boss, and then use the plans to cut the pieces yourself or have them cut at whatever local shop available.
I know the creator has commented on getting this cut in MDF or plywood, saying there are many pieces that bends thus making hard materials difficult to fit together. Nothing a little DIY magic couldnt solve i recon.
Looking forward to your progress this week!
Some pictures of the preparation. This is the lid section for the throttle case.
Filled:
Sanded:
Side showing where inconsistencies in the width of some areas has been addressed:
Marked out for additional re-work:
The man continues to show style!
I had to laugh at how you are such a perfectionist though.Love it!
Yes, it's not funny at times though! I really just need to move on and get things progressing.
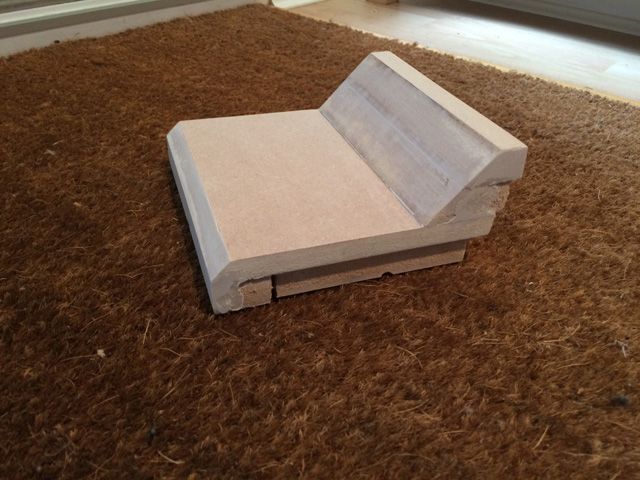
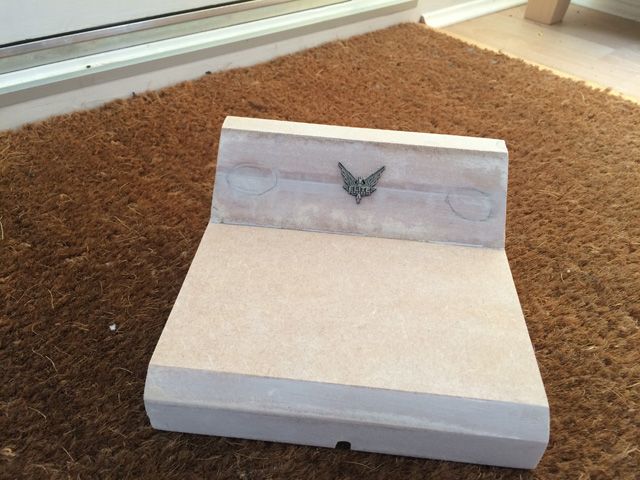
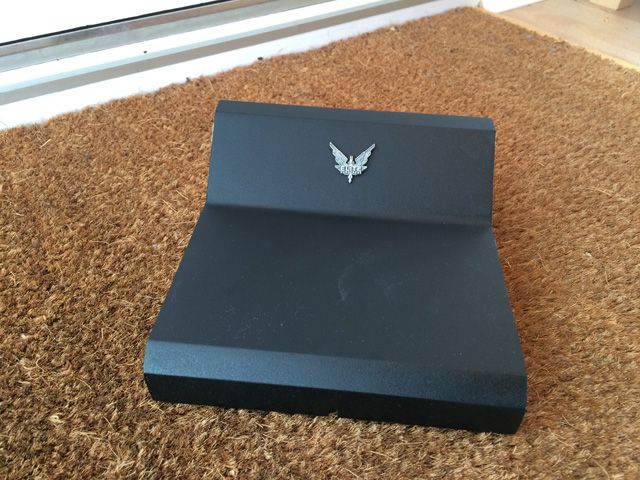
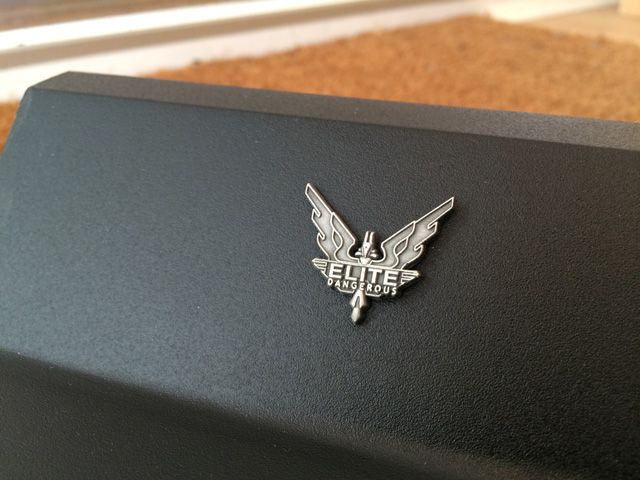
Completed the finishing for the lid and drilled the mounting hole for the emblem:

The badge will be epoxy'd in place once the blackboard vinyl is on:
Completed the finishing for the lid and drilled the mounting hole for the emblem:

The badge will be epoxy'd in place once the blackboard vinyl is on:

Yeah they sure look good and the concept is brilliant, but cardboard...One spilled cup of coffe and its all over
But, afaik you can order the plans only for the dogfight boss, and then use the plans to cut the pieces yourself or have them cut at whatever local shop available.
I know the creator has commented on getting this cut in MDF or plywood, saying there are many pieces that bends thus making hard materials difficult to fit together. Nothing a little DIY magic couldnt solve i recon.
Looking forward to your progress this week!
Cheers. Working with challenging curved shapes is not a forte of mine, unless it involves lots of filler! I reckon the kit would be a big hit if available in wood though.
Yeah they sure look good and the concept is brilliant, but cardboard...One spilled cup of coffe and its all over
But, afaik you can order the plans only for the dogfight boss, and then use the plans to cut the pieces yourself or have them cut at whatever local shop available.
I know the creator has commented on getting this cut in MDF or plywood, saying there are many pieces that bends thus making hard materials difficult to fit together. Nothing a little DIY magic couldnt solve i recon.
Looking forward to your progress this week!
Just had a quick look at that,and I must admit it does look pretty good,something for the kids for sure,and even the big kids like me.
Regarding the build quality though,well briefly my Son makes things with something called Pepikura(if I spelled that right) which is basically printing stuff out on paper and the glueing it together....anyway he advised me(yes ME,his Dad) that it is possible to make paper/cardboard much much stronger than it is because that's what he does (He made a great HALO helmet,hard as nails and looks every bit like the original)
Anyway,what he does is cover the paper with resin and then uses P38 body filler (if you have ever used it you will know its very very tough)to smooth it down after sanding, so one of my tests/experiments was to try different materials to see how they would react with different substances..I only had Fibreglass resin at that particular time,and plenty of cardboard.
The Cardboard I covered back and front with the resin,no fibreglass sheet,just the resin.Looking at my notes,it took 48 hours to dry(lose it's tack) was extremely hard (on the notes I wrote "feels like wood when you tap it") the only thing it did have was a very shiny surface.Which is the only problem with that particular cockpit I can see...having said that,although I did not try it,I reckon that a few coats of mat varnish over the top would eliminate that problem and save the need to paint over,and then have to paint in the dials.
But it's just a suggestion for the guy who was interested in this (can't recall his name)
All the best everyone.
Yes, it's not funny at times though! I really just need to move on and get things progressing.
Completed the finishing for the lid and drilled the mounting hole for the emblem:]
It doesn't bother me,I can sit back and enjoy the ride
Regarding the build quality though,well briefly my Son makes things with something called Pepikura(if I spelled that right) which is basically printing stuff out on paper and the glueing it together....anyway he advised me(yes ME,his Dad) that it is possible to make paper/cardboard much much stronger than it is because that's what he does (He made a great HALO helmet,hard as nails and looks every bit like the original)
Anyway,what he does is cover the paper with resin and then uses P38 body filler (if you have ever used it you will know its very very tough)to smooth it down after sanding, so one of my tests/experiments was to try different materials to see how they would react with different substances..I only had Fibreglass resin at that particular time,and plenty of cardboard.
The Cardboard I covered back and front with the resin,no fibreglass sheet,just the resin.Looking at my notes,it took 48 hours to dry(lose it's tack) was extremely hard (on the notes I wrote "feels like wood when you tap it") the only thing it did have was a very shiny surface.Which is the only problem with that particular cockpit I can see...having said that,although I did not try it,I reckon that a few coats of mat varnish over the top would eliminate that problem and save the need to paint over,and then have to paint in the dials.
Interesting. There's always a way to get around a problem. P38 is hard stuff, that's what I'm using
It doesn't bother me,I can sit back and enjoy the ride
lol, I'm glad you're enjoying it!
Interesting. There's always a way to get around a problem. P38 is hard stuff, that's what I'm using
lol, I'm glad you're enjoying it!
P38 is brilliant,in fact it was my P38 he was using
I am indeed enjoying it,I have always enjoyed these kind of threads and websites.It's nice to be involved (watching) from a distance this time,because usually I tune in long after theyre finished.
So to be here while youre still building is great for me!
Greatly enjoying it me too
Ive followed (and read through finished) builds for some time, mostely replicas of real world cockpits and im always awestruck by the quality and skill/craftmanship by some people.
What makes this build so special is that there is no real world exemple to take measurements and designs from. I mean, if you want to make an f-16 cockpit there are countless sources on just about every single detail of that pit.
But this, its all up to tioo to "make it up"! And what is really impressive is that this fact aside, you still manage to capture the small details that make such a huge difference! Makes it come out so professional.
And for what its worth, just so you know that this thread is a great inspiration and I can see a fair amount of "C-Pods" appearing the coming winter
Thanks for the kind words and I really do hope other people start building these!
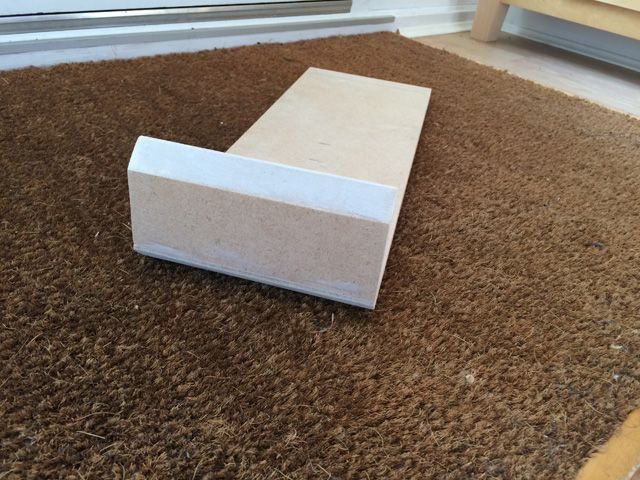
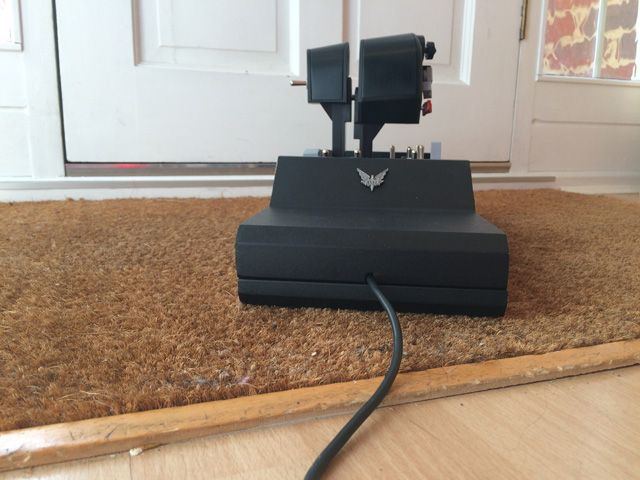
Finished the prep for the throttle base:
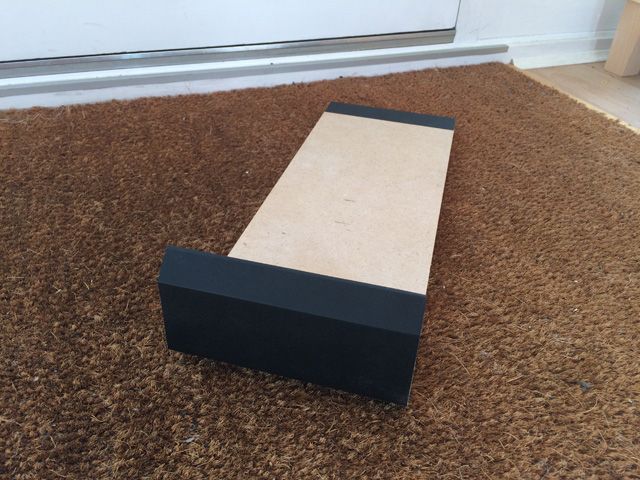
Blackboard vinyl applied:
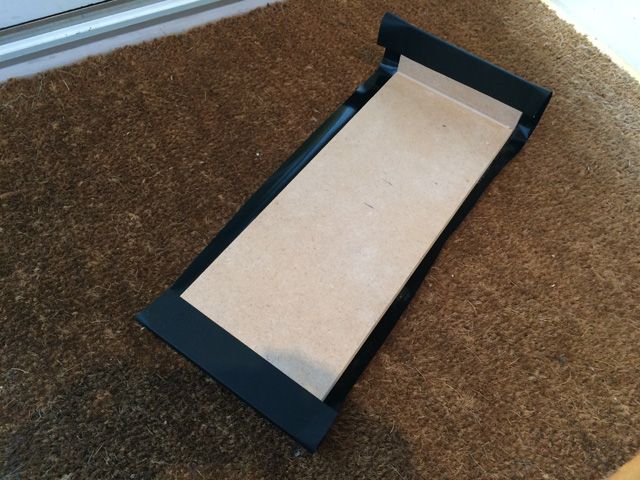
Trimmed:

Close-up:
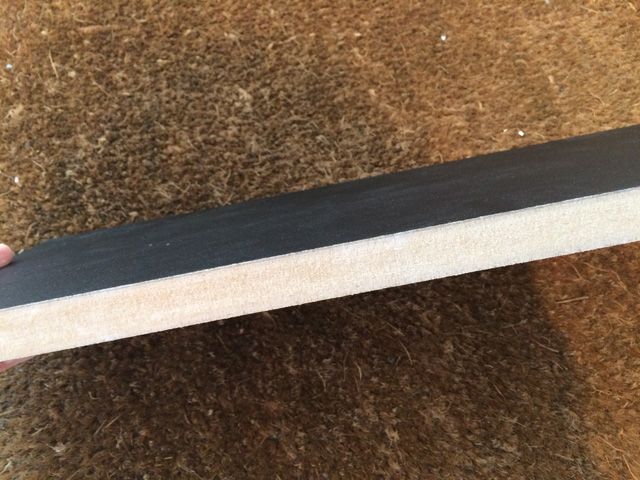
The critical things to remember are to dust the surfaces of well, slightly round off any 90 degree angles with a light sanding (avoids bubbling) and press really firmly using your thumbs (this will hurt a bit after a while) and pull/stretch the last edge parts.
The blackboard vinyl is a go-to material for me now. Much better than regular vinyl; it is slightly thicker, slightly more forgiving on uneven surfaces and has a lovely texture to it.
Finished the prep for the throttle base:

Blackboard vinyl applied:

Trimmed:


Close-up:

The critical things to remember are to dust the surfaces of well, slightly round off any 90 degree angles with a light sanding (avoids bubbling) and press really firmly using your thumbs (this will hurt a bit after a while) and pull/stretch the last edge parts.
The blackboard vinyl is a go-to material for me now. Much better than regular vinyl; it is slightly thicker, slightly more forgiving on uneven surfaces and has a lovely texture to it.
I've covered the real lid. The edges will be painted black so there will be no visible wood to be seen once in-place.
Emblem close-up:
Rear view:

Emblem close-up:

Rear view:

Can you access the controls for the thruster OK? Seems like the lip of the housing might make it tricky.
Can you access the controls for the thruster OK? Seems like the lip of the housing might make it tricky.
The throttle will actually sit on some risers to allow the cable to fit easily underneath. It will be more flush then. I will be making a blanking plate for the top from 6mm MDF to tidy everything up though